
By Chuck Wilson | Published: October 31, 2025 | Updated: March 2026 Difficulty: Intermediate | Read Time: ~20 min
What You’ll Need Before Starting
Before diving in, make sure you have the following ready:
- Raspberry Pi 4 (4GB or 8GB RAM) or Raspberry Pi 5 (recommended)
- A 32GB+ Class 10 microSD card or a USB SSD (strongly preferred)
- A domain name or free DuckDNS subdomain (e.g.,
myvault.duckdns.org) - Basic Linux command-line familiarity (copy/paste is enough for most steps)
- Estimated time: 60 to 90 minutes for a first-time setup


💡 Already know Docker? Jump straight to Deploying Vaultwarden, then Web Access and HTTPS, then Strengthening Security.
Introduction
I went looking for a self-hosted password manager after yet another “data breach notification” email landed in my inbox. You know the ones: “We take your privacy seriously,” right before they tell you someone ran off with your data.
So I grabbed a spare Raspberry Pi, fired up some Docker containers, and built my own setup using Vaultwarden. It runs on my home network, stores the password database locally, uses HTTPS for encrypted access, and protects everything with AES-256 ciphers. No subscription, no cloud sync surprises, no third-party holding your keys.
This guide walks you through the exact steps to do the same, from OS prep to Docker deployment, HTTPS certificates, security hardening, automated backups, and remote access. Whether you’re a first-timer or just tired of renting your privacy from cloud services, everything you need is here.
Key Takeaways
- Vaultwarden gives you full control of your password vault with no subscription cost
- Raspberry Pi 4 or 5 provides a reliable, low-power, always-on hosting platform
- Docker Compose simplifies deployment, updates, and disaster recovery
- HTTPS, Fail2Ban, and automated backups protect your data end-to-end
- All official Bitwarden clients (browser extensions, mobile apps, desktop) work seamlessly with Vaultwarden
Why Vaultwarden?
Vaultwarden is a lightweight, community-built server that is fully compatible with all official Bitwarden clients. It’s written in Rust, which means it’s fast, memory-efficient, and well-suited to small devices like the Raspberry Pi.
Bitwarden’s hosted service is excellent, but if you want your password database to live on hardware you own, Vaultwarden is the answer. It strips out the heavy enterprise features that demand large servers while keeping everything you actually use: secure storage, end-to-end encryption, browser extensions, mobile sync, two-factor authentication, and organization support.
Compared to KeePassXC, which is great for single-device local storage, Vaultwarden works through your browser and syncs across all your devices automatically, just like Bitwarden cloud, except you control the server.
And because it runs in Docker, setup is clean, updates are painless, and recovery from a failed SD card takes minutes rather than hours.
🔒 Security note: Vaultwarden is community-maintained and has not undergone the third-party security audits that Bitwarden’s official server has. It is widely trusted in homelab communities, but this distinction is worth knowing if you’re evaluating it for team or business use.
Choosing the Right Raspberry Pi Model
Not all Pi models handle Vaultwarden equally. Here’s how the current lineup stacks up:
| Pi Model | RAM | Network | USB Speed | Verdict |
|---|---|---|---|---|
| Pi 5 (4GB/8GB) | 4 to 8GB | Gigabit | USB 3.0 + PCIe | Best overall, fastest, NVMe-capable |
| Pi 4 (8GB) | 8GB | Gigabit | USB 3.0 | Excellent for multi-user or team use |
| Pi 4 (4GB) | 4GB | Gigabit | USB 3.0 | Recommended for personal use |
| Pi 3B+ | 1GB | Fast Ethernet | USB 2.0 | Usable, but expect slower UI and backups |
| Pi Zero W / Zero 2W | 512MB | Wi-Fi only | USB 2.0 | Not recommended for always-on vault hosting |
💡 Running a Raspberry Pi 5? The setup steps in this guide are identical. The Pi 5 uses the same Raspberry Pi OS, Docker installation, and Vaultwarden Docker image. The main differences are: the Pi 5 uses a USB-C PD power supply (27W recommended), and you can attach an NVMe SSD via the PCIe connector for dramatically faster storage.
Storage matters more than you think. SD cards are convenient but prone to corruption under constant read/write load. If you’re running Vaultwarden as your primary password manager, use a USB SSD. I learned this the hard way after two corrupted cards.
Prepping the OS
Start with a clean, minimal operating system. Raspberry Pi OS Lite is the recommended choice: no desktop, no bloat, just a lean server base.
Flash the OS using Raspberry Pi Imager:
- Download Raspberry Pi Imager
- Select your Pi model and Raspberry Pi OS Lite (64-bit)
- Under Advanced Options (the gear icon), pre-configure your Wi-Fi credentials, hostname, and enable SSH
- Flash to your microSD or USB SSD
Once booted, SSH in and run the basics:
sudo apt update && sudo apt upgrade -y
sudo raspi-config
In raspi-config, set your timezone, hostname, and confirm SSH is enabled.
Set a static IP address so your router always finds your Pi at the same address. Edit /etc/dhcpcd.conf:
interface eth0
static ip_address=192.168.1.100/24
static routers=192.168.1.1
static domain_name_servers=1.1.1.1 8.8.8.8
Reboot, then SSH back in:
ssh pi@192.168.1.100
You’re now running headless. Time to install Docker.
Installing Docker and Docker Compose
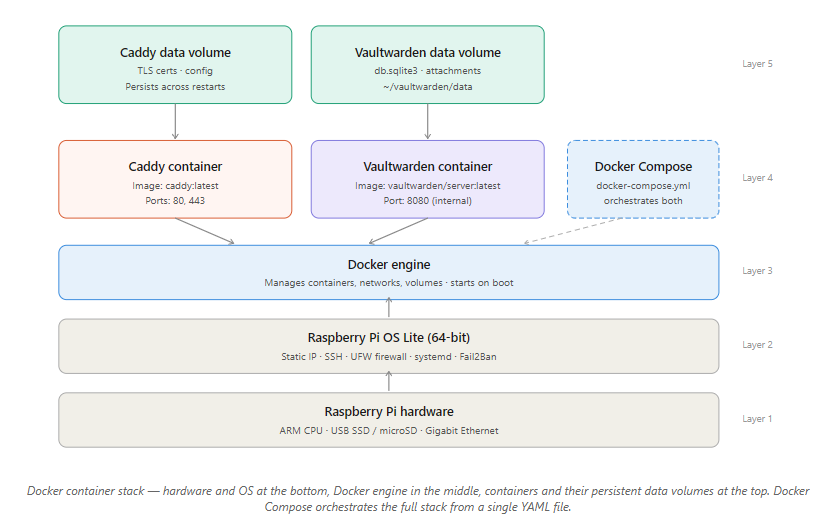
Vaultwarden runs inside a Docker container. Docker Compose manages the service configuration. This guide uses Docker Compose v2, the current standard with no deprecated pip3 installs.
Install Docker:
curl -fsSL https://get.docker.com -o get-docker.sh
sudo sh get-docker.sh
Add your user to the Docker group (so you don’t need sudo for every command):
sudo usermod -aG docker $USER
Log out and back in for this to take effect.
Install Docker Compose v2 (ships as a Docker plugin):
sudo apt install docker-compose-plugin -y
Verify both are working:
docker --version
docker compose version
Both should return version numbers. Note the syntax: it’s docker compose (with a space), not docker-compose (with a hyphen). The hyphenated version is the legacy v1 command.
Enable Docker to start on boot:
sudo systemctl enable docker
Your Pi is now container-ready.
Deploying Vaultwarden
Create a dedicated directory for Vaultwarden and its data:
mkdir -p ~/vaultwarden/data
cd ~/vaultwarden
Create a docker-compose.yml file:
nano docker-compose.yml
Paste the following:
services:
  vaultwarden:
    image: vaultwarden/server:latest
    container_name: vaultwarden
    restart: unless-stopped
    environment:
      WEBSOCKET_ENABLED: "true"
      SIGNUPS_ALLOWED: "false"
      ADMIN_TOKEN: "REPLACE_WITH_LONG_RANDOM_TOKEN"
    volumes:
      - ./data:/data
    ports:
      - "8080:80"
⚠️ Generate a strong admin token now. Don’t use a guessable string. Run this and use the output as your
ADMIN_TOKEN:openssl rand -hex 32
Key settings explained:
SIGNUPS_ALLOWED: "false"prevents anyone who finds your URL from registering. You’ll create accounts manually via the admin panel.WEBSOCKET_ENABLED: "true"enables real-time sync with browser extensions.restart: unless-stoppedautomatically restarts Vaultwarden after a reboot or crash.
Launch the container:
docker compose up -d
Confirm it’s running:
docker ps
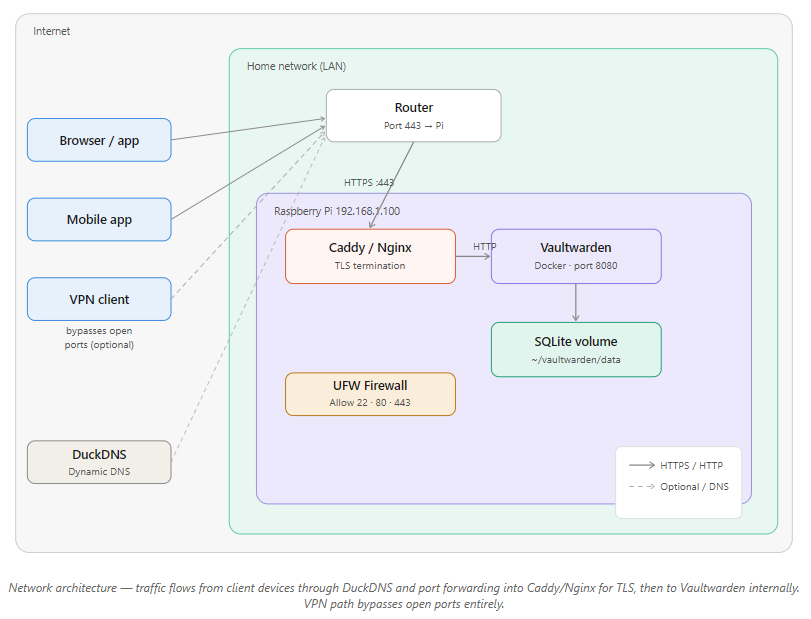
Visit http://192.168.1.100:8080 in your browser. You should see the Vaultwarden login page. The container stores its SQLite database in ~/vaultwarden/data/db.sqlite3.
Next step: secure it with HTTPS.
Web Access and HTTPS
Plain HTTP is fine for local testing, but you need HTTPS before trusting this with real passwords. Bitwarden clients also require it for sync.
Option A: Caddy (Recommended for Beginners, Automatic HTTPS)
Caddy handles SSL certificates automatically via Let’s Encrypt. Add it to your docker-compose.yml:
services:
  vaultwarden:
    image: vaultwarden/server:latest
    container_name: vaultwarden
    restart: unless-stopped
    environment:
      WEBSOCKET_ENABLED: "true"
      SIGNUPS_ALLOWED: "false"
      ADMIN_TOKEN: "YOUR_TOKEN_HERE"
    volumes:
      - ./data:/data

  caddy:
    image: caddy:latest
    container_name: caddy
    restart: unless-stopped
    ports:
      - "80:80"
      - "443:443"
    volumes:
      - ./Caddyfile:/etc/caddy/Caddyfile
      - caddy_data:/data
      - caddy_config:/config

volumes:
  caddy_data:
  caddy_config:
Create a Caddyfile in the same directory:
myvault.duckdns.org {
  reverse_proxy vaultwarden:80
}
Option B: Nginx + Certbot (More Control)
sudo apt install nginx certbot python3-certbot-nginx -y
sudo certbot --nginx
Sample Nginx reverse proxy config at /etc/nginx/sites-available/vaultwarden:
server {
    listen 443 ssl;
    server_name myvault.duckdns.org;

    ssl_certificate /etc/letsencrypt/live/myvault.duckdns.org/fullchain.pem;
    ssl_certificate_key /etc/letsencrypt/live/myvault.duckdns.org/privkey.pem;

    location / {
        proxy_pass http://localhost:8080;
        proxy_set_header Host $host;
        proxy_set_header X-Real-IP $remote_addr;
        proxy_set_header X-Forwarded-For $proxy_add_x_forwarded_for;
        proxy_set_header X-Forwarded-Proto $scheme;
    }
}
Getting a Free Domain with DuckDNS
If you don’t have a domain, DuckDNS gives you a free subdomain that tracks your home IP:
- Sign up at duckdns.org
- Create a subdomain (e.g.,
myvault.duckdns.org) - Set up a cron job to keep the DNS record updated:
crontab -e
Add:
*/5 * * * * echo url="https://www.duckdns.org/update?domains=myvault&token=YOUR_TOKEN&ip=" | curl -k -o ~/duckdns/duck.log -K -
Port Forwarding
In your router’s admin panel, forward:
- Port 443 to your Pi’s IP (HTTPS)
- Port 80 to your Pi’s IP (needed for Let’s Encrypt certificate renewals)
Your vault should now be reachable at https://myvault.duckdns.org.
Creating and Managing Your Account
Access the Admin Panel
Navigate to:
https://myvault.duckdns.org/admin
Enter your ADMIN_TOKEN. From here you can manage users, toggle signups, and configure security settings.
⚠️ If you get a blank screen or 403 error, confirm the
ADMIN_TOKENindocker-compose.ymlis correct and restart the container:docker compose restart
Create Your First Account
Go to https://myvault.duckdns.org and register with a strong, unique master password. This is the one password you must never forget or reuse. Consider a passphrase of 4 to 5 random words (e.g., “correct-horse-battery-staple”) for both memorability and strength.
Security Defaults to Configure in the Admin Panel
- Toggle “Allow Signups” to Off
- Set minimum password length (16+ characters recommended)
- Enable email verification if you’ve configured SMTP
- Set session timeout to an appropriate value (e.g., 30 minutes)
- Enable 2FA enforcement for all accounts
Strengthening Security
Enable Two-Factor Authentication (2FA)
In your account settings, go to Settings > Two-Step Login and configure TOTP using an authenticator app (Aegis, Authy, or Google Authenticator).
🔒 Save your recovery codes offline. Print them or store them in a secure physical location. Without them, a lost phone means a locked vault.
Use a Strong Admin Token
Already covered in the deployment step, but if you haven’t yet:
openssl rand -hex 32
Replace the token in docker-compose.yml and restart:
docker compose down && docker compose up -d
Limit Login Attempts with Fail2Ban
Fail2Ban monitors your logs and automatically blocks IP addresses after repeated failed login attempts. This is one of the most effective defenses against brute-force attacks.
Install Fail2Ban:
sudo apt install fail2ban -y
Create a Vaultwarden jail configuration:
sudo nano /etc/fail2ban/jail.d/vaultwarden.conf
Paste:
[vaultwarden]
enabled = true
port = 80,443
filter = vaultwarden
logpath = /home/pi/vaultwarden/data/vaultwarden.log
maxretry = 5
bantime = 3600
findtime = 300
Create the filter:
sudo nano /etc/fail2ban/filter.d/vaultwarden.conf
Paste:
[Definition]
failregex = ^.*Username or password is incorrect\. Try again\. IP: <ADDR>.*$
ignoreregex =
Enable logging in Vaultwarden by adding this to your docker-compose.yml environment block:
LOG_FILE: "/data/vaultwarden.log"
LOG_LEVEL: "warn"
Restart both services:
docker compose restart
sudo systemctl restart fail2ban
Verify Fail2Ban is running:
sudo fail2ban-client status vaultwarden
Run Vaultwarden Rootless (Optional but Recommended)
For extra isolation, run the container as a non-root user by adding to docker-compose.yml:
user: "1000:1000"
Ensure your ./data directory is owned by that UID:
sudo chown -R 1000:1000 ~/vaultwarden/data
Enable UFW Firewall
sudo apt install ufw -y
sudo ufw allow 22
sudo ufw allow 80
sudo ufw allow 443
sudo ufw enable
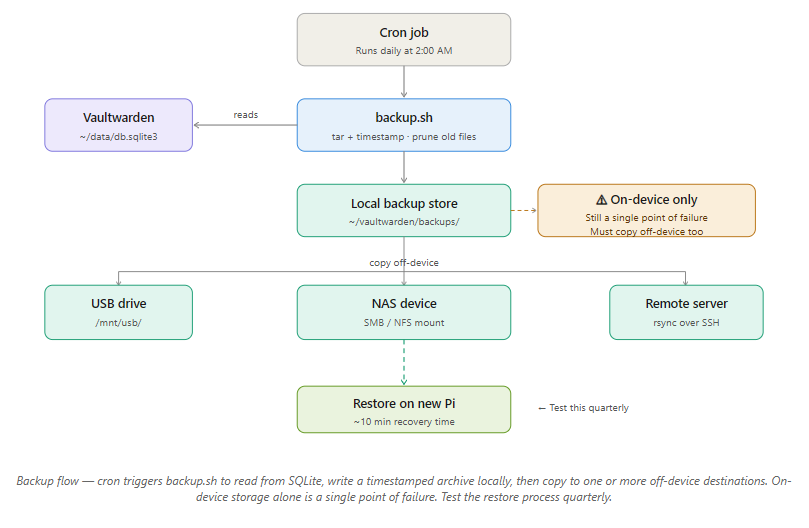
Automating Backups
⚠️ Without backups, a dead SD card means total vault loss. This section is not optional.
What to Back Up
Vaultwarden stores everything in a single SQLite file:
~/vaultwarden/data/db.sqlite3
The entire ./data directory is what you need.
Create a Backup Script
mkdir -p ~/vaultwarden/backups
nano ~/vaultwarden/backup.sh
Paste:
#!/bin/bash
TIMESTAMP=$(date +"%Y%m%d-%H%M")
BACKUP_DIR=~/vaultwarden/backups
DATA_DIR=~/vaultwarden/data
tar -czf $BACKUP_DIR/vaultwarden-$TIMESTAMP.tar.gz -C $DATA_DIR .
# Keep only the last 14 backups
ls -tp $BACKUP_DIR/*.tar.gz | grep -v '/$' | tail -n +15 | xargs -I {} rm -- {}
Make it executable:
chmod +x ~/vaultwarden/backup.sh
Schedule it with cron (runs daily at 2:00 AM):
crontab -e
Add:
0 2 * * * /home/pi/vaultwarden/backup.sh
Store Backups Off-Device
Backing up to the same Pi is not a backup strategy. Options:
- USB drive:
sudo mount /dev/sda1 /mnt/usb && cp ~/vaultwarden/backups/*.tar.gz /mnt/usb/ - NAS device: via SMB or NFS mount
- Remote server: using
rsync -avz ~/vaultwarden/backups/ user@remotehost:/backups/vaultwarden/
Test Your Backups
Restore to a test container every few months:
mkdir -p ~/vaultwarden-test/data
tar -xzf ~/vaultwarden/backups/vaultwarden-YYYYMMDD-HHMM.tar.gz -C ~/vaultwarden-test/data
A backup you’ve never tested is just hope.
Secure Remote Access
Option 1: VPN (Most Secure, Recommended)
Instead of exposing Vaultwarden directly to the internet, connect through a VPN. Your Pi never needs open ports beyond the VPN endpoint.
Install PiVPN:
curl -L https://install.pivpn.io | bash
Choose WireGuard (faster, simpler) or OpenVPN. Once connected to your VPN, access Vaultwarden as if you were on your home network.
Option 2: Direct HTTPS with DuckDNS
If you prefer direct access without a VPN, the HTTPS + DuckDNS + port forwarding setup from the Web Access section is the right approach. Just ensure Fail2Ban is running and your firewall rules are tight.
Keeping the System Healthy
Monitor Container Status
docker ps
docker compose logs vaultwarden
If Vaultwarden isn’t listed in docker ps, check the logs for port conflicts, permission errors, or database lock issues.
System Monitoring
sudo apt install htop -y
htop
For dashboards, Netdata is lightweight and runs well on Pi. Prometheus + Grafana works for more advanced setups.
Monitor SSL Certificate Expiry
Let’s Encrypt certificates expire every 90 days. Test auto-renewal:
sudo certbot renew --dry-run
Caddy handles this automatically. Nginx + Certbot users should ensure the systemd timer or cron job for Certbot is active.
Keep Raspberry Pi OS Updated
sudo apt update && sudo apt upgrade -y
Set a monthly reminder. Outdated packages are the most common vector for homelab exploits.
Updating Vaultwarden
Docker makes updates safe and reversible:
# Pull the latest image
docker pull vaultwarden/server:latest

# Restart with the new image
docker compose down
docker compose up -d
Your data in ./data is untouched. It lives in a volume, not the container.
To roll back if something breaks, edit docker-compose.yml to pin a specific version tag:
image: vaultwarden/server:1.30.5
Then restart. Check the official release notes to compare versions.
Migrating to Vaultwarden from LastPass or 1Password
If you’re coming from a cloud password manager, migration takes under 15 minutes.
From LastPass:
- In LastPass, go to Account Options > Advanced > Export > LastPass CSV
- In Vaultwarden (via the Bitwarden web vault), go to Tools > Import Data
- Select LastPass (csv) and upload your file
From 1Password:
- Export from 1Password as a 1PUX or CSV file
- In Vaultwarden, go to Tools > Import Data > 1Password (1pux)
From Bitwarden cloud:
- Export from Bitwarden as JSON (Encrypted)
- Import to Vaultwarden. It reads the same format natively.
After importing, verify a handful of entries match the originals before deleting anything from your old manager.
Troubleshooting Vaultwarden
Container Doesn’t Start
docker compose logs
Common causes:
- Port conflict: Something else is using port 8080 or 443. Check with
sudo ss -tlnp - Volume permission error: Fix with
sudo chown -R $USER:$USER ~/vaultwarden/data - YAML syntax error: Use yamllint.com to validate your
docker-compose.yml
Admin Page Returns 403 or Blank Screen
- Confirm
ADMIN_TOKENis set indocker-compose.yml - Try a private/incognito browser window to rule out cached credentials
- Restart:
docker compose down && docker compose up -d
Database Locked
Vaultwarden’s SQLite database can lock if two processes access it simultaneously (for example, a backup running while the container restarts). It usually self-resolves. If not:
- Stop any running backup scripts
- Check for leftover
.db-walor.db-shmfiles in./data - Restart the container
SSL Certificate Issues
If your browser shows “Not Secure”:
- Confirm your DuckDNS domain resolves to your Pi’s public IP:
nslookup myvault.duckdns.org - Confirm ports 80 and 443 are forwarded in your router
- Force certificate renewal:
sudo certbot renew --force-renewal
Comparing Password Manager Options
Vaultwarden vs Bitwarden Cloud
| Feature | Vaultwarden (Self-Hosted) | Bitwarden Cloud |
|---|---|---|
| Data control | Full, stored on your hardware | Stored on Bitwarden’s servers |
| Cost | Free | Free tier + paid premium |
| Setup complexity | Medium (about 90 min) | None |
| Third-party security audits | No | Yes (annual) |
| Updates | Manual | Automatic |
| Offline access | Yes (local network) | Requires internet |
Vaultwarden vs KeePassXC
| Feature | Vaultwarden | KeePassXC |
|---|---|---|
| Browser integration | Native (Bitwarden extension) | Add-on only |
| Multi-device sync | Built-in | Manual (via Syncthing etc.) |
| Web UI | Yes | No |
| Multi-user / sharing | Yes | No |
| Network exposure | Required | None |
Why Raspberry Pi Over a Cloud VPS?
- Power consumption is around 5W average, compared to 5 to 10W idle for the cheapest VPS (which also costs $5 to $10 per month)
- Your data never leaves your home network
- Full hardware access with no provider lock-in
- One-time hardware cost with near-zero ongoing operating cost
Ongoing Maintenance Checklist
Keep this on a monthly schedule:
- ✅
docker pull vaultwarden/server:latestthen restart the container - ✅
sudo apt update && sudo apt upgrade -y - ✅ Confirm the backup cron job produced a file dated today
- ✅ Test-restore a backup to a temporary container
- ✅
sudo certbot renew --dry-run(Nginx users) - ✅ Rotate
ADMIN_TOKENif it’s been 6 or more months - ✅
docker image prune -ato reclaim disk space - ✅ Review Fail2Ban logs:
sudo fail2ban-client status vaultwarden
Final Thoughts
Running Vaultwarden on a Raspberry Pi is one of those homelab projects that quietly becomes load-bearing infrastructure. Once it’s running, you’ll wonder how you ever trusted a third party with your entire password database.
It’s not completely hands-off. You’ll patch it, check the backups, and occasionally read a log file. But what you get in return is a fast, private, always-available password manager that you genuinely own. For anyone who values knowing exactly where their data lives and who can touch it, this setup is a no-brainer.
If you’d rather not manage the server yourself, Bitwarden’s hosted plan is the right call. But if you’re already running a Raspberry Pi at home, the marginal effort to add Vaultwarden is small, and the payoff is significant.
FAQ
Q: Can I use Vaultwarden with the official Bitwarden browser extension and mobile app? Yes. All official Bitwarden clients (Chrome, Firefox, Safari, and Edge extensions, plus iOS and Android apps) are fully compatible with Vaultwarden. Just point them to your Pi’s domain or IP during setup.
Q: Is Vaultwarden safe for sensitive data? Yes, with caveats. It uses strong encryption (AES-256, Argon2) and HTTPS. The main distinction from Bitwarden’s official server is that Vaultwarden hasn’t undergone formal third-party security audits. For personal and homelab use it is widely trusted, but factor this in for any business use managing sensitive credentials.
Q: What happens if my Raspberry Pi dies? If you’ve been running daily backups of the ./data directory, recovery takes about 10 minutes on a new Pi. Install Docker, restore the backup, and start the container. No backup means starting from scratch, which is why the backup section is non-negotiable.
Q: Can I use Vaultwarden without Docker? Yes, but it’s not recommended. Without Docker, you’ll need to compile Vaultwarden from Rust source and manage dependencies manually. Docker makes updates, rollbacks, and portability significantly easier.
Q: Does Vaultwarden work on a Raspberry Pi Zero 2W? Technically yes. The Zero 2W has enough RAM and can run Docker. In practice, the limited processing power makes web UI loading noticeably slow and backup times long. Use it only if it’s all you have available.
Q: Is it safe to expose Vaultwarden directly to the internet? Yes, if you follow the security steps in this guide: HTTPS, a strong admin token, SIGNUPS_ALLOWED: false, 2FA, Fail2Ban, and UFW firewall rules. For maximum security, use a VPN instead of direct port forwarding. That way Vaultwarden never faces the public internet at all.
Q: How do I migrate from LastPass or 1Password to Vaultwarden? See the Migration section above. Both platforms support CSV or JSON export, and Vaultwarden imports these formats natively in under 15 minutes.
References
- Vaultwarden GitHub Repository
- Vaultwarden Wiki: Configuration Options
- Docker Hub: Vaultwarden Image
- Bitwarden Import/Export Documentation
- DuckDNS: Free Dynamic DNS
- Fail2Ban Documentation
- Let’s Encrypt: Free SSL Certificates