

A Raspberry Pi 5 UniFi controller is a solid way to manage a few access points and a switch without buying a dedicated cloud key or a bigger box. The Pi sits on Ethernet, holds a fixed IP, and hosts the UniFi Network Application. Done right, it runs for months without attention. Done wrong, it becomes the thing you are rebooting at 11pm because Wi-Fi is down and someone is annoyed about it.
This guide covers both installation paths, Docker and native APT, along with adoption, backups, updates, security hardening, and the troubleshooting steps that actually fix the common problems. The goal is a controller that is boring to operate, which is exactly what you want from network infrastructure.
Key Takeaways
- Put the controller on Ethernet with a stable IP. This solves more adoption problems than anything else.
- SSD beats microSD for long-term reliability. UniFi writes stats and events constantly.
- Back up before every UniFi update, every time, without exception.
- Update the controller first. Confirm it is healthy. Then update APs and switches.
- If VLANs are involved, inform traffic matters more than discovery. TCP 8080 is the one port that has to work.
- Do not expose the controller UI to the internet. Use a VPN if remote access is needed.
Hardware and OS Preparation
Hardware checklist
- Raspberry Pi 5 (4GB is fine for a small site, 8GB gives more headroom)
- Official USB-C power supply or a known-good 5V supply that will not sag under load
- Active cooling (the Pi 5 runs warm, and heat causes slowdowns that look like software problems)
- Ethernet cable to your switch or router
- Storage: microSD for boot, plus SSD for UniFi data if you can manage it
Storage: where setups get burned
UniFi writes a steady stream of stats and events. microSD cards handle it for a while, then they get flaky. The failure is quiet. Things just start behaving oddly before anything obvious breaks. For a setup you want to forget about, put UniFi data on an SSD. Keep the microSD for the OS if that is the easiest path. For the full picture on reducing write pressure and extending storage life, see Preventing SD Card Corruption on Raspberry Pi and Setting Up zram on Raspberry Pi. If you want to boot from USB SSD entirely, see Booting Raspberry Pi from USB SSD.
Install Raspberry Pi OS 64-bit
Use Raspberry Pi Imager. Pick Raspberry Pi OS Lite 64-bit. In the Imager settings before flashing, set your hostname (something like unifi-pi5), enable SSH, set your username and a strong password, and configure Wi-Fi only if Ethernet is genuinely impossible. Ethernet is the better call for a controller.
After first boot, update everything before installing anything:
sudo apt update && sudo apt -y upgrade
sudo reboot
Give it a stable address
UniFi device adoption relies on the controller staying at the same address. A DHCP reservation on the router is the cleanest option for most setups. A static IP on the Pi also works, but make sure it is outside the DHCP pool. Set a local DNS name if your router supports it (unifi-pi5.lan for example), which makes set-inform commands and browser bookmarks less annoying over time.
Pre-install checks
hostnamectl
timedatectl
df -h
ip addr
Confirm SSH works, the Pi is on Ethernet, the IP will not change, there is disk space available, and the Pi stays cool under load. Sorting these out before installing UniFi saves time later.
Install Option A: Docker
Docker keeps UniFi in its own container so the Pi stays tidy. If an update acts up, switching image tags back is usually faster than wrestling with a broken package install. This is the recommended path for most setups.
Install Docker
Raspberry Pi OS 64-bit is Debian arm64 under the hood, so Docker’s official Debian install method works directly:
# Add Docker's GPG key and repository
sudo apt install -y ca-certificates curl
sudo install -m 0755 -d /etc/apt/keyrings
sudo curl -fsSL https://download.docker.com/linux/debian/gpg -o /etc/apt/keyrings/docker.asc
sudo chmod a+r /etc/apt/keyrings/docker.asc

echo "deb [arch=$(dpkg --print-architecture) signed-by=/etc/apt/keyrings/docker.asc] \
https://download.docker.com/linux/debian \
$(. /etc/os-release && echo "$VERSION_CODENAME") stable" | \
sudo tee /etc/apt/sources.list.d/docker.list > /dev/null

sudo apt update
sudo apt install -y docker-ce docker-ce-cli containerd.io docker-buildx-plugin docker-compose-plugin
Confirm it installed correctly:
docker --version
docker compose version
Add your user to the Docker group so you do not need sudo for every command:
sudo usermod -aG docker $USER
# Log out and back in for the group change to take effect
Create folders for UniFi data
Put UniFi data on the SSD if you have one mounted. If not, the main filesystem works for now.
sudo mkdir -p /srv/unifi/{config,data,logs}
sudo chown -R $USER:$USER /srv/unifi
Create the Compose file
nano /srv/unifi/compose.ymlservices:
unifi-network-application:
image: lscr.io/linuxserver/unifi-network-application:latest
container_name: unifi-network-application
environment:
- PUID=1000
- PGID=1000
- TZ=America/Chicago
volumes:
- /srv/unifi/config:/config
ports:
- "8443:8443"
- "8080:8080"
- "3478:3478/udp"
- "10001:10001/udp"
restart: unless-stoppedSet TZ to your actual timezone. The ports map to what UniFi and the LinuxServer image document as the standard baseline for home and small office setups.
Start the container
cd /srv/unifi
docker compose up -d
docker ps
Then open the UI from a browser on your LAN: https://YOUR_PI_IP:8443
Ports reference
| Purpose | Protocol | Port |
|---|---|---|
| Controller web UI | TCP | 8443 |
| Device inform | TCP | 8080 |
| STUN (adoption assist) | UDP | 3478 |
| Discovery | UDP | 10001 |
Sanity checks
docker logs -n 50 unifi-network-application
ss -tulpn | grep -E '8443|8080|3478|10001'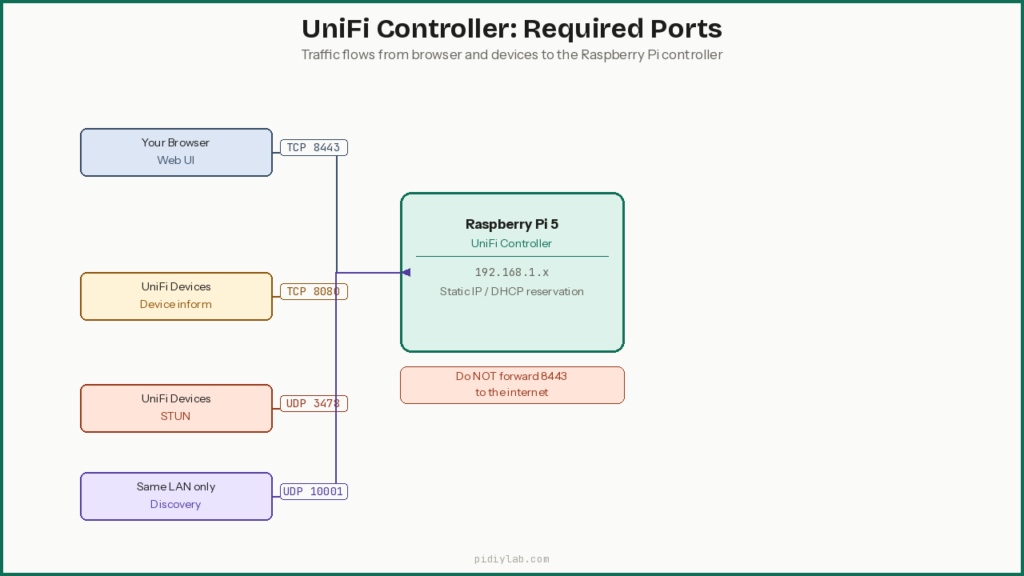
Install Option B: Native APT
If you want UniFi Network Application to run as a normal Linux service without container overhead, the native APT install is the alternative. Updates require more care since package upgrades can occasionally cause service issues, but it is a cleaner setup for people who prefer managing services directly.
Back up before touching anything
If you are migrating an existing controller, take a manual backup first. In the UniFi UI go to Settings, then System, then Backups, and download a .unf file. Keep it somewhere off the Pi.
Install using Ubiquiti’s APT method
sudo apt-get update && sudo apt-get install -y ca-certificates apt-transport-httpsecho 'deb [ arch=amd64,arm64 ] https://www.ui.com/downloads/unifi/debian stable ubiquiti' | \
sudo tee /etc/apt/sources.list.d/100-ubnt-unifi.listsudo wget -O /etc/apt/trusted.gpg.d/unifi-repo.gpg https://dl.ui.com/unifi/unifi-repo.gpgsudo apt-get update && sudo apt-get install -y unifiIf the service does not start automatically:
sudo service unifi start
sudo service unifi status
MongoDB note
Current versions of UniFi Network Application bundle their own MongoDB handling. For a fresh install on a current Raspberry Pi OS image, the package manager handles the dependency automatically. If UniFi fails to start after installation, check the MongoDB log first:
cat /usr/lib/unifi/logs/mongod.logConfirm the controller is reachable
ss -tulpn | grep -E '8443|8080|3478|10001'Open https://YOUR_PI_IP:8443 in a browser on your LAN. If it loads, the install worked.
Where logs live
/usr/lib/unifi/logs/server.log
/usr/lib/unifi/logs/mongod.log
First Login and Baseline Settings
Open https://YOUR_PI_IP:8443 in a browser on the same LAN. A certificate warning on first load is normal for a fresh controller. Work through the setup wizard and set these before doing anything else:
- Timezone and country (so logs and Wi-Fi rules line up with reality)
- Controller name and site name (obvious names save confusion when there is more than one site later)
- Auto backup schedule (turn it on now, not after the first problem)
- Stats retention (keep it modest on a Pi so storage does not balloon)
Local-only vs cloud account
Local-only access stays on your LAN with fewer moving parts. A UI cloud account with Remote Management is useful if you manage the network from elsewhere, but lock it down with MFA and store recovery codes somewhere safe. Either way, keep the controller UI off the open internet. If remote access is needed, use a VPN into your home network rather than port forwarding 8443.
Adopting UniFi Devices
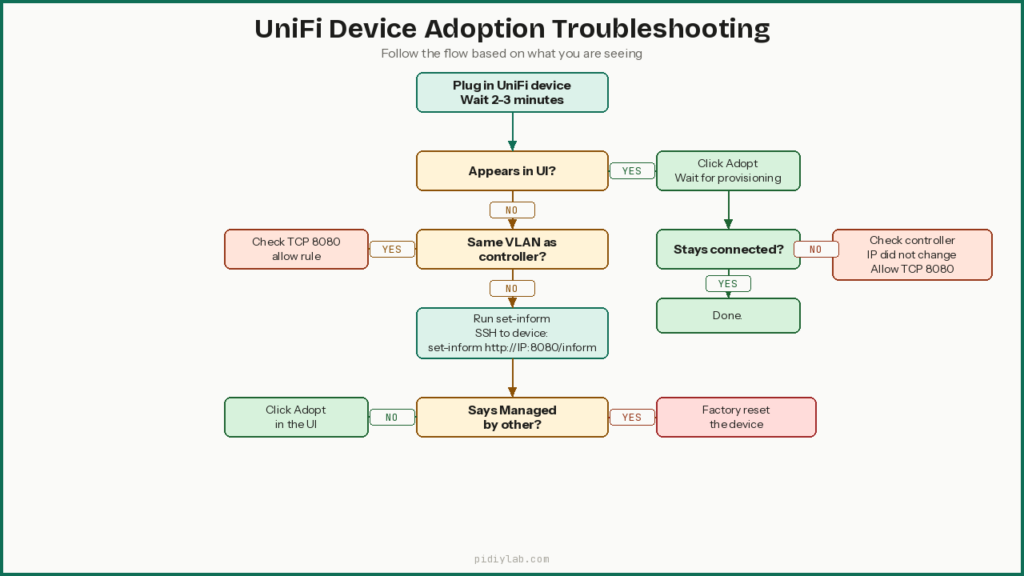
Fast path: same LAN adoption
- Plug in the UniFi AP or switch
- Wait 1 to 3 minutes
- In the UniFi UI, look under Devices for a status of Pending Adoption
- Click Adopt
- Let it finish provisioning. Do not power-cycle it halfway through.
If it was adopted to another controller
If you still have access to the old controller, use Forget on the device there first. If you do not, factory reset the device, then try adoption again on the new controller.
Cross-VLAN adoption
Discovery often fails across subnets. The device shows up in the UI on the same LAN but not when it is on a different VLAN. Two approaches work reliably: temporarily place the device on the same VLAN as the controller for initial adoption, then move it back after. Or keep it on its VLAN and use set-inform with the appropriate firewall rules in place.
The one port that has to work for cross-VLAN adoption and ongoing communication is TCP 8080 from the device network to the controller IP. Without it, nothing works and the troubleshooting loop is frustrating.
Set-inform fallback
When discovery does not work, set-inform does. SSH into the UniFi device and run:
set-inform http://YOUR_CONTROLLER_IP:8080/informThen click Adopt in the UI. Some devices need the set-inform command run a second time after the UI prompts. That is normal.
Adoption troubleshooting by symptom
| Symptom | Likely cause | Fix |
|---|---|---|
| Device never appears | Discovery blocked or wrong VLAN | Try same VLAN once, then set-inform |
| Stuck on Adopting | Inform cannot reach controller | Check TCP 8080 from device to controller IP |
| Adopts then Disconnected | Controller IP changed or firewall too strict | Lock controller IP, confirm TCP 8080 stays allowed |
| Managed by other | Still tied to old controller | Factory reset, then adopt again |
Backups and Restores
Storage fails. Updates happen. A controller rebuild should take minutes, not a rage spiral. The only way that is true is if backups exist.
Set up automatic backups
In the UniFi UI go to Settings, then System, then Backups. Turn on automatic backups, set a daily schedule, and keep 7 to 14 backups in rotation. Store backups somewhere other than the same drive as the controller data when possible.
Take a manual backup before any change
Do a manual backup before UniFi version upgrades, major network changes (new VLANs, SSIDs, firewall rules), and before moving the controller to new hardware. Name the file with the date so you can find it fast when you need it.
Docker backup habit
Keep /srv/unifi/config on an SSD and copy the UniFi backup export files to another machine occasionally. The UniFi backups handle the controller config. The config volume handles container state. Both matter.
How to restore after a rebuild
Fresh install of UniFi (same method as before), open the UI, choose Restore from backup, upload the .unf file, and wait for it to come back up. If the controller IP and hostname stayed the same, devices usually reconnect without intervention. If the IP changed, run set-inform on any stubborn devices.
Restore validation checklist
- SSIDs are present and enabled
- VLAN networks exist and are configured correctly
- Devices show up and come online
- Guest networks and DNS settings behave
- No alerts about adoption failures or disconnected devices
Updates Without Breaking Things
You do not need latest. You need stable. The fastest way to wreck a small Pi controller is updating blindly, then finding the controller will not start and the house Wi-Fi looks possessed.
Update rules
- Back up first, every time
- Update the controller and confirm it is healthy before updating APs or switches
- Do not auto-update the controller unless you enjoy surprise downtime
- Keep the controller IP the same. A changed IP is a quiet adoption killer.
Docker update flow
# Back up in the UI first, then:
cd /srv/unifi
docker compose pull
docker compose up -d
# Health check after update
docker ps
docker logs -n 80 unifi-network-applicationIf the update acts up, roll back by restoring the previous image tag and restarting. If it is still a mess, restore the backup file in the UI.
Native APT update flow
# Back up in the UI first, then:
sudo apt update
sudo apt -y upgrade
sudo reboot
# Confirm service is running after reboot
sudo service unifi status# If it will not start
sudo service unifi restart
sudo journalctl -u unifi --no-pager -n 120Troubleshooting by Symptom
Controller web UI will not load
ping YOUR_PI_IP
ss -tulpn | grep 8443
docker ps   # if using Docker
Common causes: service or container not running, IP changed via DHCP, firewall blocking 8443 on your LAN, or a browser caching a stale certificate warning page. Try another browser before assuming the service is broken.
Devices will not adopt
The most common cause is inform traffic not reaching the controller. Confirm the controller has a stable IP, then confirm VLAN rules allow TCP 8080 from the device network to the controller IP. Run set-inform from the device as a fallback. If it says it is managed elsewhere, factory reset the device first.
Devices adopt then go Disconnected
Usually the controller IP changed, or a firewall rule allows adoption but blocks ongoing inform traffic. Lock the controller IP via DHCP reservation. Confirm TCP 8080 stays allowed continuously, not just during adoption.
Controller running but feels slow
df -h
vcgencmd measure_temp
top
Usual culprits are microSD wear or low free space, CPU throttling from heat, or stats retention set too high for a small box. Move UniFi data to an SSD, improve cooling, and lower retention. In that order.
Nuclear option recovery
If you are stuck in a loop: fresh install of UniFi using the same method as before, keep the same controller IP if possible, restore from the most recent backup file, then set-inform any devices that do not reconnect automatically. This takes minutes if the backup exists and the IP stayed the same.
Security Hardening
Keep the UI off the internet
Do not port-forward 8443 from your router. If remote access is needed, use a VPN into your home network, not an exposed admin page. UniFi’s Remote Management feature is the other option if you use a cloud account.
Lock down SSH
# Generate a key on your computer if you do not have one
ssh-keygen

# Copy key to the Pi
ssh-copy-id YOUR_USERNAME@YOUR_PI_IP

# Edit SSH config on the Pi
sudo nano /etc/ssh/sshd_config
Set or confirm these lines:
PasswordAuthentication no
PermitRootLogin no
sudo systemctl restart sshAdd a simple firewall
sudo apt -y install ufw
sudo ufw default deny incoming
sudo ufw default allow outgoing

# SSH from your LAN subnet
sudo ufw allow from 192.168.1.0/24 to any port 22 proto tcp

# UniFi UI
sudo ufw allow from 192.168.1.0/24 to any port 8443 proto tcp

# UniFi device inform
sudo ufw allow from 192.168.1.0/24 to any port 8080 proto tcp

# STUN and discovery
sudo ufw allow from 192.168.1.0/24 to any port 3478 proto udp
sudo ufw allow from 192.168.1.0/24 to any port 10001 proto udp

sudo ufw enable
sudo ufw status verbose
Replace 192.168.1.0/24 with your actual LAN subnet. If you have multiple VLANs with UniFi devices, add rules for each device subnet that needs to reach the controller on TCP 8080.
Controller login hardening
- Use a strong admin password
- Enable MFA if you use a cloud sign-in
- Do not create extra admin accounts just in case. Old logins stick around.
- Prefer SSD for UniFi data. If stuck on microSD, keep backups off the Pi because the card will eventually fail.
Maintenance Checklist
Weekly
df -h
free -h
uptime
Download a manual backup from the UI even if automatic backups are running.
Monthly
sudo apt update && sudo apt -y upgrade
sudo reboot
vcgencmd measure_temp
hostname -IBefore any UniFi update
- Download a manual backup
- Update the controller
- Confirm devices reconnect
- Update APs and switches after
Red flags that mean fix it now
- Disk free space under 20 percent
- Random reboots (suspect power or heat first)
- Devices flapping between Online and Disconnected
- Controller UI slow after days of uptime (usually storage or heat)
FAQ
Will Wi-Fi stop if the controller goes offline?
No. UniFi access points keep broadcasting SSIDs and handling connections without the controller. What you lose is stats, alerts, and the ability to make changes in the UI until the controller comes back up.
Is a Raspberry Pi 5 strong enough for a UniFi controller?
For a small setup with a few APs and a switch, yes. The limit is usually storage and heat rather than raw CPU. If the UI feels slow, moving UniFi data to an SSD and improving cooling fixes more than adding RAM does.
Is microSD okay for a UniFi controller?
It works, but it is the weakest link. UniFi writes stats and events constantly, and microSD wears out. For a set-it-and-forget-it deployment, put UniFi data on an SSD. The SD card corruption guide covers what is actually hitting your card and what to do about it: Preventing SD Card Corruption on Raspberry Pi.
Can the controller live on a different VLAN than the APs?
Yes, but you must allow TCP 8080 from the device VLANs to the controller IP. If discovery fails across subnets, set-inform works as long as inform traffic is allowed. That one firewall rule is what most cross-VLAN adoption problems come down to.
What are the minimum ports to allow?
For most small setups: TCP 8443 (browser to controller UI) and TCP 8080 (devices to controller inform). Add UDP 3478 for STUN and UDP 10001 for discovery if needed. If only one port can be opened between a device VLAN and the controller, make it TCP 8080.
What is the easiest recovery after something breaks?
Reinstall UniFi using the same method, keep the same controller IP if possible, restore from the latest backup file, then set-inform any stubborn devices. This takes minutes if the backup exists and the IP stayed the same. It takes much longer if neither of those is true.
References
- https://help.ui.com/hc/en-us/articles/360008976393
- https://docs.docker.com/engine/install/debian/
- https://www.raspberrypi.com/documentation/computers/getting-started.html