

Programming on Raspberry Pi starts with choosing a language, setting up an editor, and understanding how the Pi’s GPIO pins connect software to hardware. Python with gpiozero is the recommended starting point for most users: it is pre-installed on Raspberry Pi OS Desktop, has the largest Pi-specific library ecosystem, and scales from a three-line LED blink to a full home automation server. This guide covers the four main programming languages available on Pi, the tools for writing and running code, GPIO fundamentals, and a project-based roadmap with links to the specialist guides on this site.
Last reviewed: Raspberry Pi OS Bookworm Desktop 64-bit | May 2025 | Raspberry Pi 4 Model B (4GB) | Python 3.11, gpiozero 2.0, Node.js 22 LTS, Scratch 3
Key Takeaways
- Python is the primary programming language for Raspberry Pi projects. It ships with Raspberry Pi OS, has native support for GPIO via gpiozero, and has the largest collection of Pi-specific tutorials and libraries. For new projects on Bookworm, use gpiozero rather than the older RPi.GPIO library.
- On Bookworm, pip installs outside a virtual environment fail with a PEP 668 error. Create a virtual environment with
python3 -m venv ~/myproject-env && source ~/myproject-env/bin/activatebefore installing any packages with pip. Packages installed via APT (sudo apt install python3-gpiozero) work without a venv. - The Raspberry Pi’s GPIO pins operate at 3.3V logic. Connecting 5V signals directly to GPIO pins can permanently damage them. Always check the voltage requirements of sensors and modules before wiring them to the Pi.
Languages Available for Programming on Raspberry Pi
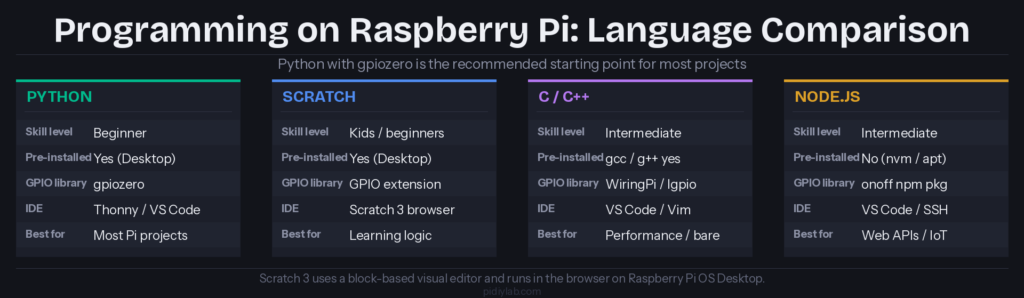
Python is the right choice for the vast majority of Raspberry Pi projects. It is pre-installed on Raspberry Pi OS Desktop, reads like plain English, and has mature libraries for every Pi use case: gpiozero for GPIO, picamera2 for the camera, requests and Beautiful Soup for web scraping, Pygame for games, and Tkinter for GUIs. For a complete Python and virtual environment setup guide, see Python Raspberry Pi: Complete Practical Setup and Usage Guide.
Scratch 3 is the correct starting point for children and complete beginners. It uses a drag-and-drop block interface that eliminates syntax errors and makes logic visible. Scratch 3 runs in the browser on Raspberry Pi OS Desktop and includes a GPIO extension for controlling LEDs and reading buttons without writing text-based code. For classroom use, see Raspberry Pi in the Classroom: Setup, Projects, and Results.
C and C++ are available via the gcc and g++ compilers, which are pre-installed on Raspberry Pi OS Lite. C gives direct access to hardware registers and is the correct choice when performance is critical or when writing code for embedded systems that will not run Linux. The lgpio library provides GPIO access from C on Bookworm. Most Pi users do not need C unless they are working on kernel modules, real-time constraints, or interfacing with hardware that has no Python library.
Node.js is the natural choice if a project is primarily a web server, API, or WebSocket service that also reads GPIO. The onoff npm package handles GPIO. Node.js does not ship with Raspberry Pi OS and requires installation via nvm or the NodeSource setup script. For a complete Node.js setup and Express server guide, see Raspberry Pi Node.js: Install, Express Server, and GPIO Guide.
Setting Up the Programming Environment on Raspberry Pi
Raspberry Pi OS Desktop ships with Thonny, a Python IDE designed for beginners. It has a built-in Python interpreter, a variable inspector, and a simple debugger. For most beginner projects, Thonny is the right starting point. No configuration needed, just open it from the Programming menu.
For more complex projects, VS Code (Visual Studio Code) is available for Pi 4 and Pi 5 via the APT repository or via the official download page. It provides full Python language server support, integrated Git, extensions for remote development over SSH, and a terminal panel. Many experienced developers write code on a desktop machine and run it on the Pi via SSH, using VS Code’s Remote-SSH extension.
For headless Pi builds (Raspberry Pi OS Lite with no desktop), the workflow is: SSH from a desktop machine, edit files with nano or vim on the Pi, run scripts from the terminal. This is how most production Pi deployments work.
Virtual environments on Bookworm. Bookworm enforces PEP 668, which prevents pip from installing packages into the system Python environment. The standard workflow for any Python project that uses pip packages:
python3 -m venv ~/myproject-env
source ~/myproject-env/bin/activate
pip install requests beautifulsoup4  # or any package
python3 myscript.py
Packages available via APT (sudo apt install python3-gpiozero python3-picamera2) work system-wide without a venv and are the preferred install method for hardware libraries. For a complete Python setup including virtual environments, package management, and the difference between APT and pip, see Python Raspberry Pi: Complete Practical Setup and Usage Guide.
GPIO and Hardware Programming on Raspberry Pi
The Raspberry Pi’s 40-pin GPIO header is what makes it different from a standard desktop computer. Each pin can be configured as a digital input or output, and several pins support hardware protocols: I2C for sensors, SPI for displays and high-speed devices, UART for serial communication, and hardware PWM for motor and LED control.
The critical hardware constraint: GPIO pins operate at 3.3V logic with a maximum safe current of 8mA per pin. Connecting 5V signals directly to any GPIO pin can permanently damage the BCM2711 (Pi 4) or BCM2712 (Pi 5) SoC. When interfacing with 5V devices, use a logic level converter or a voltage divider.
gpiozero is the correct library for GPIO programming in Python on Bookworm. It provides named classes that describe the hardware being controlled rather than raw pin operations:
from gpiozero import LED, Button, MotionSensor, Servo

led    = LED(17)           # Output on GPIO17
btn    = Button(4)         # Input with internal pull-up on GPIO4
pir    = MotionSensor(18)  # PIR sensor on GPIO18
servo  = Servo(12)         # Servo on GPIO12 (hardware PWM)

btn.when_pressed  = led.on
btn.when_released = led.off
The event-driven model (when_pressed, when_released, when_motion) means hardware responses happen in background threads without blocking the main script. This is the key difference from RPi.GPIO’s manual polling approach.
Projects by Skill Level: Where to Go Next
The table below maps project types to the dedicated guides on this site. Each link goes to a complete, tested, Bookworm-compatible guide.
| Skill level | Project | Guide |
|---|---|---|
| Beginner | LED control and GPIO basics | Raspberry Pi LED Python Guide |
| Beginner | Python setup and virtual environments | Python Raspberry Pi Guide |
| Beginner | GUI apps with Tkinter | Raspberry Pi Tkinter Guide |
| Beginner | 2D games with Pygame | Raspberry Pi Pygame Guide |
| Intermediate | IoT sensors and MQTT | Raspberry Pi IoT Projects Guide |
| Intermediate | Web scraping with Beautiful Soup | Raspberry Pi Beautiful Soup Guide |
| Intermediate | Node.js web server and GPIO | Raspberry Pi Node.js Guide |
| Intermediate | GPS module and Python logging | Raspberry Pi GPS Guide |
| Intermediate | Robot with motors and sensors | Raspberry Pi Robot Basics Guide |
| Advanced | Local LLM with llama.cpp | llama.cpp on Raspberry Pi 5 Guide |
| Advanced | AI object detection with Coral | Coral TPU Raspberry Pi 5 Guide |
| Advanced | Custom kernel and Gentoo | Gentoo on Raspberry Pi Guide |
FAQ
What is the best programming language for Raspberry Pi beginners?
Python for text-based programming; Scratch for children or complete beginners who prefer a visual block interface. Python is pre-installed on Raspberry Pi OS Desktop, reads like plain English, and has mature libraries for every Pi hardware project. Scratch 3 runs in the browser on Desktop with a GPIO extension for physical computing without writing text code. Both are correct starting points depending on the learner’s age and comfort with text syntax.
Does Raspberry Pi come with Python pre-installed?
Yes. Raspberry Pi OS Desktop ships with Python 3.11 pre-installed. Thonny, a beginner-friendly Python IDE, is also pre-installed and accessible from the Programming menu. On Raspberry Pi OS Lite, Python 3 is available but Thonny is not installed by default. Run python3 --version in a terminal to confirm the installed version. Python 2 is not installed on Bookworm and should not be used for new projects.
What GPIO library should I use for programming on Raspberry Pi?
gpiozero for Python on Bookworm. It ships with Raspberry Pi OS Desktop, provides named hardware abstractions (LED, Button, Servo, MotionSensor), and uses an event-driven model that avoids blocking the main program. The older RPi.GPIO library still works but requires explicit installation on Bookworm with sudo apt install python3-rpi.gpio. New projects should use gpiozero. For C projects, lgpio is the current recommended library for direct GPIO access on Pi 4 and Pi 5.
Can I use VS Code for programming on Raspberry Pi?
Yes. VS Code is available for Pi 4 and Pi 5 running the 64-bit OS. Install it from the Raspberry Pi OS recommended software list or download the ARM64 .deb from code.visualstudio.com. For Pi Zero 2W or Pi 3, VS Code’s resource requirements make it impractical; use Thonny or a terminal editor like nano or vim instead. VS Code’s Remote-SSH extension also lets you edit files on the Pi from a desktop machine, which is often the most comfortable workflow for larger projects.
What is the 3.3V GPIO limit and why does it matter?
Every GPIO pin on the Raspberry Pi outputs and accepts 3.3V logic. The maximum safe input voltage on any GPIO pin is 3.3V. Connecting a 5V signal (from an Arduino, sensor, or logic chip running at 5V) directly to a GPIO pin can permanently damage the Pi’s SoC. When interfacing with 5V devices, use a voltage divider (two resistors) or a dedicated logic level converter. This constraint applies to all Pi models from Pi 1 through Pi 5.
References:
- gpiozero documentation: gpiozero.readthedocs.io
- Raspberry Pi GPIO documentation: raspberrypi.com/documentation/computers/os
- Python documentation: docs.python.org/3
- Scratch 3: scratch.mit.edu
- Raspberry Pi OS: raspberrypi.com/software
About the Author
Chuck Wilson has been programming and building with computers since the Tandy 1000 era. His professional background includes CAD drafting, manufacturing line programming, and custom computer design. He runs PidiyLab in retirement, documenting Raspberry Pi and homelab projects that he actually deploys and maintains on real hardware. Every article on this site reflects hands-on testing on specific hardware and OS versions, not theoretical walkthroughs.
Reviewed May 2025 against Raspberry Pi OS Bookworm Desktop 64-bit on Raspberry Pi 4 Model B (4GB).