
As an Amazon Associate I earn from qualifying purchases. Some links in this guide are affiliate links.
The Raspberry Pi AI HAT+ 2 puts a Hailo-10H accelerator and 8GB of dedicated on-board RAM on a Raspberry Pi 5, delivering 40 TOPS and, for the first time on an official Pi accelerator, enough memory to run small large language models on-device. It mounts on the Pi 5’s PCIe interface, is auto-detected on an up-to-date Raspberry Pi OS, and hangs off the same camera stack the AI Kit and AI HAT+ use.
This guide covers mounting the board, installing the Hailo software with a single package, running real-time object detection, and running a local LLM, plus how it compares to the earlier AI Kit and AI HAT+. If you are doing camera AI, it pairs with the Frigate NVR guide, and if you want the CPU-only side of local models, see the llama.cpp on Raspberry Pi 5 guide.
Last tested: Raspberry Pi OS Trixie 64-bit | July 2026 | Raspberry Pi 5 (8GB) with Active Cooler | AI HAT+ 2 (Hailo-10H, 40 TOPS, 8GB) | PCIe Gen 3 | 27W USB-C supply
Key Takeaways
- The AI HAT+ 2 is a Raspberry Pi 5 accessory only. It connects over PCIe, so it will not work on a Pi 4 or earlier, and it needs a current Raspberry Pi OS that detects it automatically. Budget for a Pi 5, not a spare older board.
- The 8GB of on-board RAM is the whole point of the “2.” It lets the Hailo-10H run small on-device language and vision-language models (up to roughly 1.5 billion parameters), not just camera inference. If all you want is object detection, the cheaper AI Kit or AI HAT+ already do that job.
- Cooling and power are requirements, not extras. Fit the Raspberry Pi Active Cooler on the Pi 5 to prevent throttling and the included heatsink on the HAT, use the official 27W (5V/5A) USB-C supply, and set PCIe to Gen 3 for full speed.
What the AI HAT+ 2 Is, and How It Differs from the AI Kit and AI HAT+
All three official accelerators put a Hailo neural processing unit on the Pi 5 over PCIe. The AI HAT+ 2 is the one built for generative AI: a newer Hailo-10H chip, more compute, and crucially its own 8GB of RAM so models do not compete with the Pi’s system memory. Figures below are from the Raspberry Pi AI HAT documentation and the product pages.
| Accelerator | Chip | Performance | On-board RAM | Best for |
|---|---|---|---|---|
| AI Kit | Hailo-8L | 13 TOPS | None | Entry-level vision |
| AI HAT+ (13) | Hailo-8L | 13 TOPS | None | Vision |
| AI HAT+ (26) | Hailo-8 | 26 TOPS | None | Heavier vision |
| AI HAT+ 2 | Hailo-10H | 40 TOPS | 8GB | Vision plus on-device LLMs and VLMs |
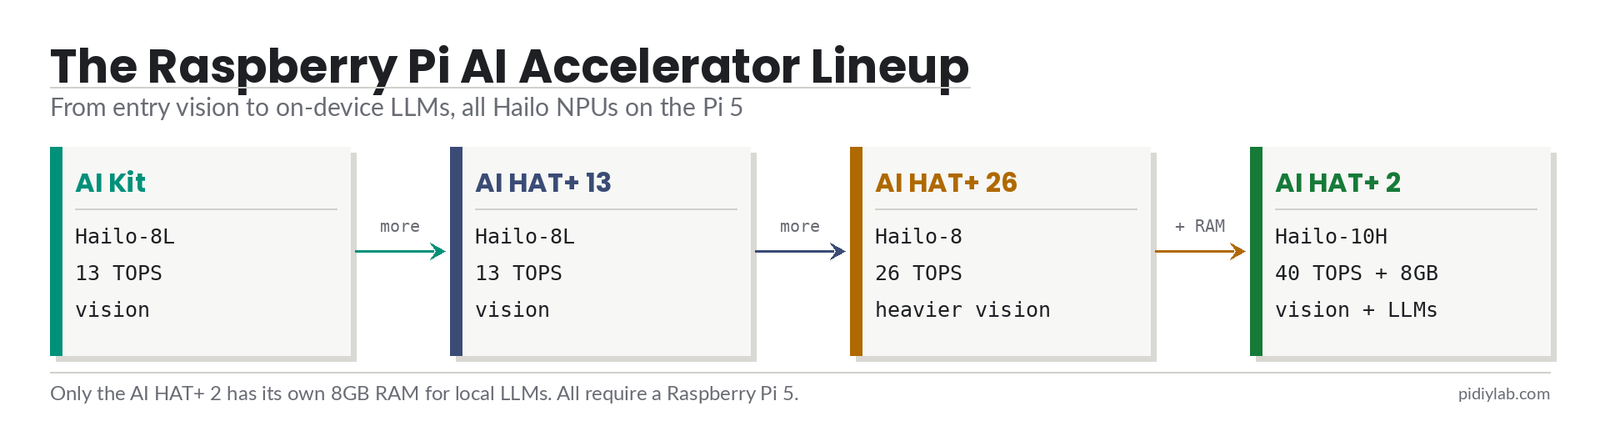
If your project is camera detection and nothing else, an AI Kit or AI HAT+ saves money. Choose the AI HAT+ 2 when you specifically want to run language or vision-language models locally, or want headroom on heavier vision workloads.
What You Need
- Raspberry Pi 5 (the 8GB model gives the most system headroom)
- Raspberry Pi Active Cooler on the Pi 5 (required to avoid throttling)
- Official 27W USB-C power supply (5V/5A)
- The AI HAT+ 2, which includes its heatsink, a 16mm stacking header, spacers, and screws
- A current Raspberry Pi OS install (Bookworm or Trixie), fully updated
- A Raspberry Pi camera, only if you want the vision demos
Install the AI HAT+ 2 on the Raspberry Pi 5
Power the Pi down and disconnect it. With the Active Cooler already fitted, press the supplied 16mm stacking header onto the Pi 5’s 40-pin GPIO, fit the spacers, and seat the AI HAT+ 2 on top. Connect the short PCIe ribbon (FFC) from the HAT to the Pi 5’s PCIe connector, matching the contacts to the correct side, and secure the board with the screws. Fit the included heatsink onto the NPU and memory on the HAT.
Once it is screwed down and the ribbon is seated firmly at both ends, the hardware is ready. Reconnect power and boot the Pi. Nothing lights up on the HAT itself; you confirm it in software next.
Install the Hailo Software
Update the OS first, then install the single meta-package that pulls in the firmware, runtime, driver, and camera integration. The hailo-all package auto-detects which Hailo chip is fitted, per the Raspberry Pi AI software documentation:
sudo apt update
sudo apt full-upgrade
sudo apt install hailo-all
sudo reboot
The AI HAT+ 2 is auto-detected as PCIe Gen 3, which it needs for full speed. If a check shows it running at Gen 2, set it explicitly by adding dtparam=pciex1_gen=3 to /boot/firmware/config.txt (or use the PCIe Speed option under Advanced in sudo raspi-config) and reboot. After the reboot, confirm the board is present:
hailortcli fw-control identifyThat command reports the device and its architecture (the Hailo-10H). Seeing it identified means the driver, firmware, and PCIe link are all working, and you are ready to run a workload.
Run Real-Time Object Detection
The camera stack integrates with the accelerator directly, so a connected Raspberry Pi camera can run detection with no extra glue. The Hailo post-processing assets ship with the camera software under /usr/share/rpi-camera-assets/. List that folder to see the current model files, since names change between releases, then point rpicam-hello at one:
ls /usr/share/rpi-camera-assets/
rpicam-hello -t 10s --post-process-file /usr/share/rpi-camera-assets/hailo_yolov8_inference.json
A preview window opens with live bounding boxes drawn around detected objects, and the work runs on the Hailo chip rather than the Pi’s CPU. For pose estimation and segmentation pipelines, and for headless Python examples, clone the hailo-rpi5-examples repository and run its install script.
Run a Local LLM
This is what the 8GB of on-board RAM buys you. The Hailo-10H can run small language models entirely on the accelerator, with no cloud connection and without eating the Pi’s system memory. At launch the officially supported models include Llama 3.2 (1B), Qwen 2.5 (1.5B), and DeepSeek R1 (1.5B). Raspberry Pi and Hailo report Llama 3.2 (1B) running at roughly 30 to 50 tokens per second in decode on the Hailo-10H, well above the low single digits the same model manages on the Pi 5 CPU alone.
The language-model examples and the current supported-model list live in Hailo’s tooling rather than a single apt package, so follow the generative-AI examples in the hailo-rpi5-examples repository for the exact, current commands. Expect a prompt-and-response chat running locally on the HAT. For context on how the same class of model performs on the CPU, the llama.cpp guide is the comparison point.
Verify the Install
Run down this checklist to confirm the board is fully working:
hailortcli fw-control identifyreports the Hailo-10H.- The PCIe link is at Gen 3, not Gen 2.
- Object detection draws live boxes with a camera connected.
- A supported LLM loads and generates tokens on the HAT.
- Under load, the Pi 5 does not throttle (temperatures stay in range with the Active Cooler and HAT heatsink fitted).
Cooling, Power, and Throttling
The accelerator itself is efficient: roughly 1.2W idle, around 3.5 to 4.5W during vision inference, and up to about 8W in bursts when a language model saturates the compute cores and memory. The heat that matters is the Pi 5’s own SoC under sustained load, which is why the Active Cooler is required rather than optional. Fit both the Active Cooler on the Pi and the supplied heatsink on the HAT, and use the official 27W supply so the whole stack has power budget to spare. If you run heavy workloads for long stretches, the Pi 5 cooling guide covers fan curves and cases.
Troubleshooting the AI HAT+ 2
The board is not detected. Power down and reseat the PCIe ribbon at both ends; it is easy to get slightly off. Confirm the OS is fully updated (sudo apt full-upgrade) and that hailo-all installed without errors, then reboot and re-run hailortcli fw-control identify.
Performance is lower than expected. Check the PCIe link speed. If it is at Gen 2, force Gen 3 with dtparam=pciex1_gen=3 in /boot/firmware/config.txt and reboot.
hailortcli: command not found. The Hailo software did not install. Re-run sudo apt install hailo-all and reboot; it pulls in the runtime that provides the tool.
The camera demo fails. Confirm a camera is connected and works on its own with rpicam-hello, and that you pointed the command at a post-process file that actually exists in /usr/share/rpi-camera-assets/.
Low-voltage or power warnings. Use the official 27W (5V/5A) USB-C supply. Underpowered supplies show up as throttling and instability, especially when a language model spikes the draw.
Hardware for This Build
- Raspberry Pi 5 (8GB) is the required host; the AI HAT+ 2 is a Pi 5 accessory only.
- The Raspberry Pi 5 Active Cooler is required to keep the SoC from throttling under AI load.
- A Camera Module 3 if you want the real-time object-detection demos, and an official Pi 5 case to house it.
- You will also need the AI HAT+ 2 board and the official 27W USB-C supply from a Raspberry Pi reseller.
FAQ
Does the AI HAT+ 2 work on a Raspberry Pi 4?
No. It connects over the Raspberry Pi 5’s PCIe interface, which earlier boards do not expose in the same way, so it is a Pi 5 accessory only. There is no supported path to run it on a Pi 4 or Pi 400.
What is the difference between the AI HAT+ 2 and the AI Kit or AI HAT+?
The AI Kit and AI HAT+ use Hailo-8L or Hailo-8 chips (13 or 26 TOPS) with no dedicated RAM and are aimed at camera vision. The AI HAT+ 2 uses the newer Hailo-10H at 40 TOPS and adds 8GB of on-board RAM, which is what lets it run small on-device language and vision-language models rather than vision alone.
Can it run ChatGPT-style models locally?
It runs small local models, not large hosted ones. Supported models at launch include Llama 3.2 (1B), Qwen 2.5 (1.5B), and DeepSeek R1 (1.5B), running entirely on the HAT with no cloud. Expect capable small-model performance (tens of tokens per second on the 1B model), not the scale of a large cloud model.
Do I really need the Active Cooler?
Yes. The Active Cooler on the Pi 5 is required to keep the SoC from throttling under sustained AI load, and the HAT ships with its own heatsink for the accelerator. Running without adequate cooling costs you performance and stability.
Can I use it with Frigate for camera detection?
The accelerator handles vision inference through the Raspberry Pi camera stack, and Hailo hardware is a common choice for accelerated detection. If you are building a full NVR, see the Frigate guide for how the detection pipeline fits together; confirm the current Frigate release’s support for the Hailo-10H before you commit a build to it.
References:
- Raspberry Pi AI HAT documentation: raspberrypi.com/documentation/accessories/ai-hat-plus.html
- Raspberry Pi AI software documentation: raspberrypi.com/documentation/computers/ai.html
- Hailo Raspberry Pi 5 examples: github.com/hailo-ai/hailo-rpi5-examples
- AI HAT+ 2 product page: raspberrypi.com/products/ai-hat-plus-2
About the Author
Chuck Wilson has been programming and building with computers since the Tandy 1000 era. His professional background includes CAD drafting, manufacturing line programming, and custom computer design. He runs PidiyLab in retirement, documenting Raspberry Pi and homelab projects that he actually deploys and maintains on real hardware. Every article on this site reflects hands-on testing on specific hardware and OS versions, not theoretical walkthroughs.
Tested on the hardware and OS noted at the top of this article. July 2026.