
As an Amazon Associate I earn from qualifying purchases. Some links in this guide are affiliate links.
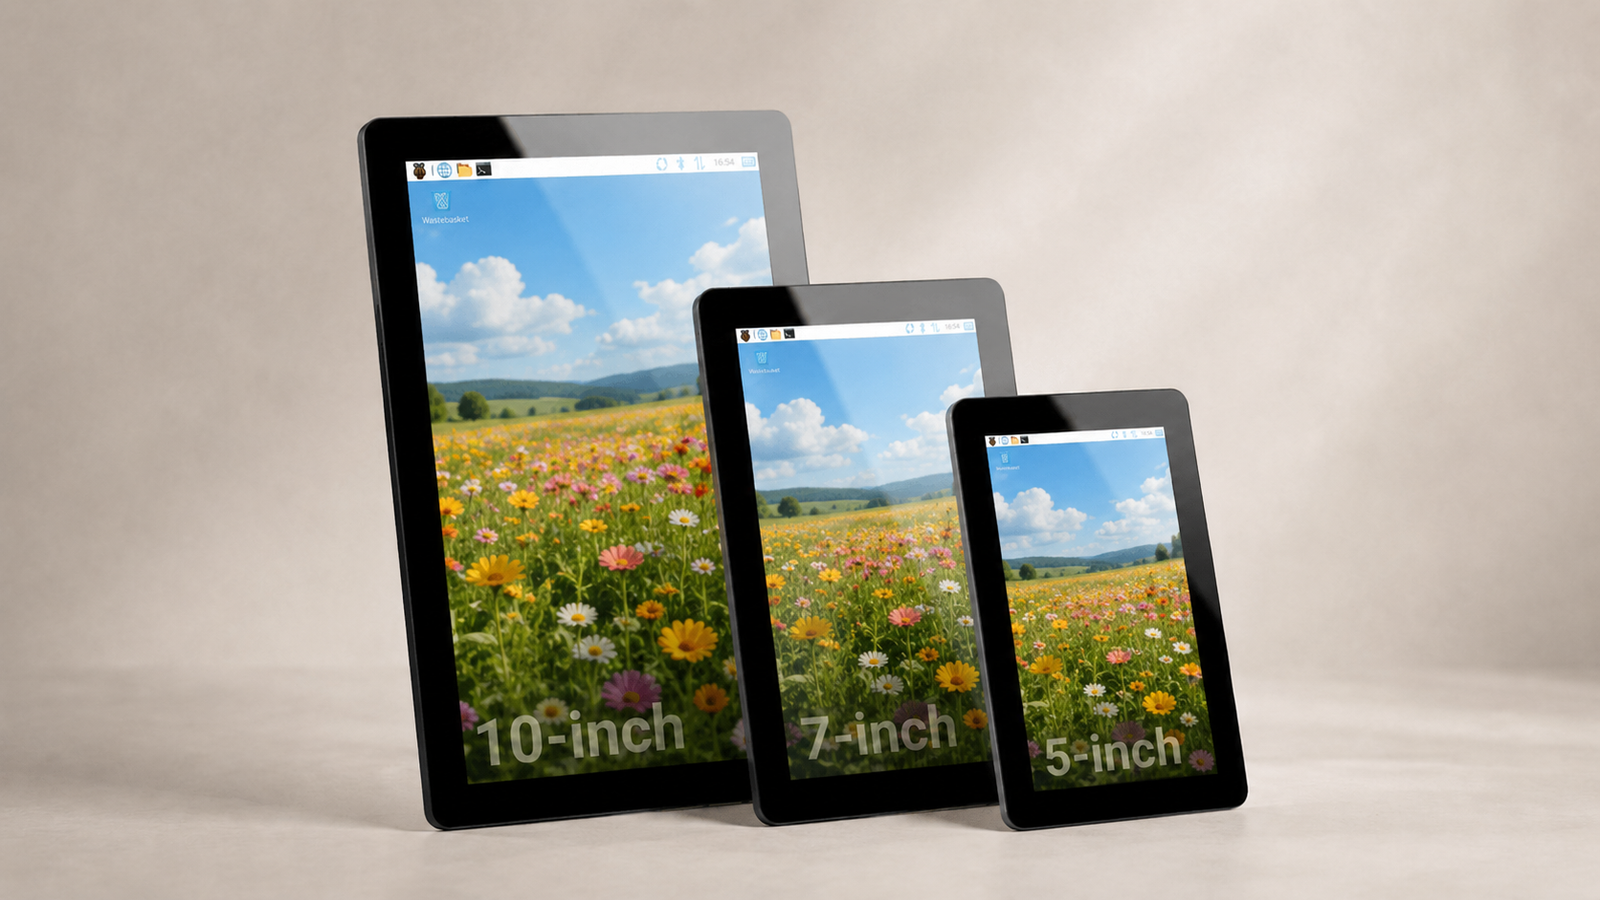
The Raspberry Pi Touch Display 2 is the official portrait touchscreen for Raspberry Pi, sold in 5-inch, 7-inch, and 10-inch sizes from $40. It connects over DSI for video and touch, draws power from the GPIO header, and works with no driver install or calibration on Raspberry Pi OS Bookworm. The panel is portrait by default, which is the single fact that decides whether it fits your project. This review covers what each size delivers, how setup works, where it falls short, and which one to buy.
Review basis: Raspberry Pi first-party specifications and official documentation | July 2026 | 5-inch, 7-inch, and 10-inch variants | Raspberry Pi OS Bookworm (Squeekboard, DSI KMS driver). This is a research review from published specs and documentation, not a bench test.
Key Takeaways
- It is a portrait panel first. The native orientation is portrait (720 x 1280 on the 5 and 7-inch, 1200 x 1920 on the 10-inch). Landscape works, but only after you rotate it in software. The screen does not detect its own orientation, so plan the mounting around portrait or budget a config step.
- The 10-inch has a hard compatibility limit. The 10-inch model runs on Raspberry Pi 5 and Compute Modules only, because its higher resolution needs four DSI lanes and the newer connector. The 5 and 7-inch work on any Pi with a DSI port (Pi 1B+ onward, excluding the Zero and Keyboard series). Power comes off the GPIO header, so account for those pins.
- The value is integration, not raw panel specs. There is no separate power brick and no case in the box. What you pay for is a display that Raspberry Pi OS drives automatically with no calibration. If you only want a cheap HDMI monitor, this is not that. If you want a touchscreen that behaves like part of the Pi, it is.
What the Raspberry Pi Touch Display 2 Is
The Touch Display 2 is Raspberry Pi’s official multi-touch panel, built to bolt directly onto a Pi rather than sit on a desk as a general monitor. It replaced the original 7-inch Touch Display in 2024 with a slimmer body and a higher-resolution screen, then gained a 5-inch variant, and in July 2026 a 10-inch model joined the line. All three share the same idea: two connections, no external power, and full driver support in the OS.
That design target explains both its strengths and its limits. Because it talks to the Pi over the Display Serial Interface (DSI) ribbon rather than HDMI, the same cable carries video and touch data, and the operating system recognizes the panel without you editing anything. Because it pulls power from the GPIO header, there is no wall wart, but you do give up a few pins. And because it was designed as an embedded panel, it ships in portrait, aimed at tablets, wall dashboards, kiosks, and control surfaces rather than at replacing your desktop screen.
The Three Sizes, Side by Side
The three models are not just the same screen at different sizes. The 5 and 7-inch are close siblings with identical resolution and touch behavior, while the 10-inch is a different class of panel: a sharper IPS display with a ten-finger controller and a stricter compatibility list. The table below is drawn from Raspberry Pi’s published specifications and product briefs. All compatibility here is documented by Raspberry Pi; none of it was verified on my own bench for this review.
| Spec | 5-inch | 7-inch | 10-inch |
|---|---|---|---|
| List price (Not Reseller’s Price) | $40 | $60 | $80 |
| Resolution | 720 x 1280 | 720 x 1280 | 1200 x 1920 |
| Color | 24-bit RGB | 24-bit RGB | 24-bit RGB |
| Panel type | LCD TFT, anti-glare | LCD TFT, anti-glare | IPS TFT |
| Touch points | 5 | 5 | 10 |
| Viewing angle | Not published | Not published | 85 degrees |
| Brightness | Not published | Not published | 400 cd/m2 |
| Active area | 62.1 x 110.4 mm | 86.94 x 154.56 mm | 135.4 x 216.6 mm |
| Compatible Pi (documented) | Pi 1B+ onward, DSI port required | Pi 1B+ onward, DSI port required | Pi 5 and Compute Modules only |
The pattern to read out of that table: the 5 and 7-inch are the flexible, backward-compatible options, and the 10-inch trades that reach for a bigger, higher-resolution IPS screen tied to current hardware. The 10-inch panel is rated at 400 cd/m2, which is comfortable indoors for a workshop, kitchen, or desk but is not a sunlight-readable panel, and strong overhead light or a nearby window will throw reflections. The IPS panel does hold its image well off-axis, which matters for a screen you mount on a stand or sink into a project box.
Setting Up the Raspberry Pi Touch Display 2
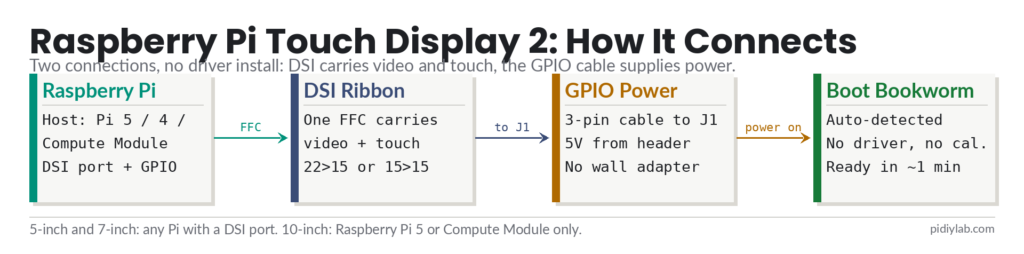
Setup is genuinely two connections. You seat the DSI ribbon cable at both ends and plug the GPIO power cable in, then boot. There is no driver to download and no touchscreen to calibrate. On a fresh install through Raspberry Pi Imager or an already-running Pi, the steps are the same, because the display is detected in hardware rather than configured in software.
Picking the right ribbon cable
The 5 and 7-inch boxes include two flat flexible cables (FFCs) plus eight M2.5 screws and the GPIO power cable. Use the 22-way to 15-way FFC for a Raspberry Pi 5, and the 15-way to 15-way FFC for every other supported model. The 10-inch is different: its higher resolution needs four DSI lanes, so it uses the narrower, higher-bandwidth ribbon and the newer display connector found only on the Pi 5 and Compute Module IO boards.
That is the physical reason it will not run on a Pi 4 or earlier. On a Pi with more than one DSI port, use the one labeled 1. After both ends are seated and the GPIO cable is on, reconnect power. It can take up to a minute for Raspberry Pi OS to start driving the screen, so a blank panel in the first few seconds is normal.
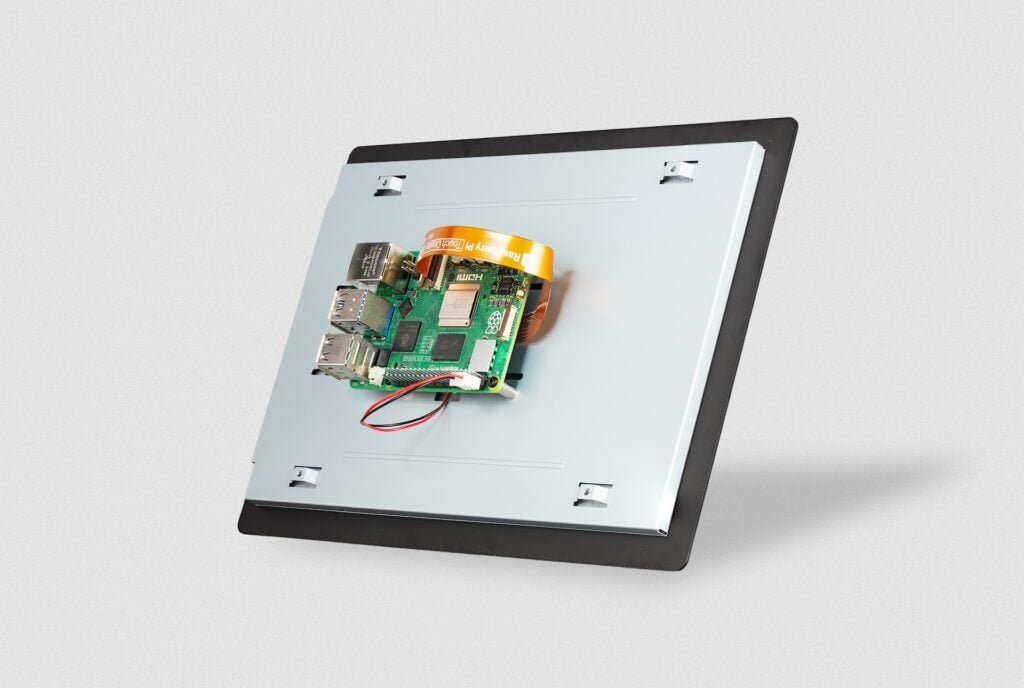
At this point you should have a working, touch-responsive portrait display with no further configuration. On Raspberry Pi OS Bookworm the Squeekboard on-screen keyboard also comes along for free: it pops up automatically whenever a text field is focused and hides itself again when it is not, so a touch-only build does not strictly need a physical keyboard.
Rotating to landscape
Because the panel is portrait-native, landscape is a software change. On the desktop, open the Screen Configuration tool, right-click the rectangle that represents the display (usually labeled DSI-1), and choose a rotation of 0, 90, 180, or 270 degrees. Headless or console-only, add a line to /boot/firmware/cmdline.txt instead:
video=DSI-1:720x1280@60,rotate=90One caveat worth knowing before you rely on it: the rotate= setting in cmdline.txt rotates the text console, but applications that write straight to DRM (such as cvlc or the libcamera apps) are not rotated and need their own rotation option. Also, when a DSI and an HDMI display run at the same time, they share one rotation value and cannot be rotated independently this way. After the prompt returns and you reboot, the display should come up in the orientation you chose.
Touch tweaks and Compute Modules
If touch axes end up mirrored after a rotation, the Device Tree overlay exposes fixes you set in /boot/firmware/config.txt. The 5-inch overlay is vc4-kms-dsi-ili9881-5inch and the 7-inch is vc4-kms-dsi-ili9881-7inch, and you append options such as invx, invy, or swapxy on the same line:
dtoverlay=vc4-kms-dsi-ili9881-7inch,invx,invyOne important exception to the plug-and-play story: Compute Modules do not auto-detect the panel. A standard Pi has fixed connections between the SoC and the DSI port, so the system knows what is attached; a Compute Module exposes everything and cannot guess. On a Compute Module you have to declare the display yourself, most simply by adding the overlay entry to config.txt. If your build is CM-based, treat “no configuration required” as a claim about full-size Pi boards, not about your board.
Where the Touch Display 2 Falls Short
The panel does its core job cleanly, so the honest criticisms are about fit and expectations rather than defects. Portrait-native is the big one. If your project is a landscape dashboard or a car-style console, you will be rotating in software and, on mixed DSI-plus-HDMI setups, living with a shared rotation value. Reviewers consistently flag that the lack of orientation auto-detection is the first friction point.
The rest is a short list. There is no case or stand in the box, so a finished-looking build usually means a third-party or 3D-printed enclosure. Power off the GPIO header means the three-pin cable occupies pins you might have wanted for a HAT or sensors, so check your pinout before committing. The 10-inch panel’s 400 cd/m2 brightness is fine indoors but not for bright or outdoor use, and it locks you to a Pi 5 or Compute Module. And on Compute Modules the automatic setup does not apply. None of these are dealbreakers for the intended use, but each one has bitten someone who assumed a generic touchscreen.
Which Size Should You Buy?
Start from your host board and your mounting. If you are on anything older than a Pi 5, the 10-inch is off the table, and the choice is between the 5-inch at $40 for a compact panel meter, thermostat, or handheld build, and the 7-inch at $60 for a general dashboard or a small tablet where the extra area earns its keep. Both are the same 720 x 1280 resolution and five-point touch, so you are choosing physical size, not capability.
If you are on a Pi 5 or a Compute Module and want the best screen in the family, the 10-inch at $80 (although current suppliers are asking $97…expect it to come down when the dust settles) is the one to want: sharper 1200 x 1920 resolution, an IPS panel with usable off-axis viewing, and a ten-finger controller for richer touch UIs. Buy it for home-automation walls, kiosks, robotics interfaces, and signage where the size and resolution do real work. The reassuring part for any of the three is longevity: Raspberry Pi lists the Touch Display 2 as in production until at least January 2030, so a build you start now will still be buildable in a few years.

- COMPLETE KIT: Development kit includes Raspberry Pi Compute Module 5, IO Board, protective case, cooling system, antenna…
- POWERFUL PROCESSOR: Features BCM2712 64-bit processor with ARM Cortex-A76 architecture for high-performance computing ca…
- DEVELOPMENT READY: IO Board provides comprehensive connectivity options including HDMI and USB ports for versatile proto…

- 🔌𝗣𝗹𝘂𝗴-𝗮𝗻𝗱-𝗣𝗹𝗮𝘆 𝗦𝗲𝘁𝘂𝗽 𝘄𝗶𝘁𝗵 𝗣𝗿𝗲-𝗜𝗻𝘀𝘁𝗮𝗹𝗹𝗲𝗱 𝗥𝗮𝘀𝗽𝗯𝗲𝗿𝗿𝘆 𝗣𝗶 𝗢𝗦: Get up and running in minutes with our beginner-friendly, step-…
- 🎁𝗔𝗹𝗹-𝗜𝗻𝗰𝗹𝘂𝘀𝗶𝘃𝗲 𝗞𝗶𝘁 𝘄𝗶𝘁𝗵 𝗘𝘃𝗲𝗿𝘆𝘁𝗵𝗶𝗻𝗴 𝗬𝗼𝘂 𝗡𝗲𝗲𝗱 𝘁𝗼 𝗦𝘁𝗮𝗿𝘁: Dive into your project without any extra purchases. Our kit includ…
- ❄️ 𝗘𝗻𝗵𝗮𝗻𝗰𝗲𝗱 𝗖𝗼𝗼𝗹𝗶𝗻𝗴 𝗦𝘆𝘀𝘁𝗲𝗺 𝗳𝗼𝗿 𝗥𝗲𝗹𝗶𝗮𝗯𝗹𝗲, 𝗟𝗼𝗻𝗴-𝗟𝗮𝘀𝘁𝗶𝗻𝗴 𝗣𝗲𝗿𝗳𝗼𝗿𝗺𝗮𝗻𝗰𝗲: Keep your Raspberry Pi running smoothly with our adva…
FAQ
Does the Raspberry Pi Touch Display 2 work with the Raspberry Pi Zero?
No. The Zero series and the Keyboard series lack a DSI connector, and the Touch Display 2 needs DSI for video and touch. The 5 and 7-inch models work on any Raspberry Pi from the 1B+ onward that has a DSI port, and the 10-inch model is limited to the Raspberry Pi 5 and Compute Modules.
Can the Touch Display 2 run in landscape mode?
Yes, but it does not switch on its own. The panel is portrait-native, so you rotate it in software: use the Screen Configuration tool on the desktop, or add a video line with a rotate value to cmdline.txt on a headless setup. Note that the console rotation does not rotate apps that draw directly to DRM, and a simultaneous DSI and HDMI pair share one rotation value.
Does the 10-inch model work with a Raspberry Pi 4?
No. The 10-inch Touch Display 2 needs four DSI lanes and the newer, narrower display connector, which are only present on the Raspberry Pi 5 and Compute Module IO boards. For a Pi 4 or earlier, choose the 5-inch or 7-inch variant, which use two DSI lanes and the older connector.
Do I need to install a driver or calibrate the touchscreen?
No. On Raspberry Pi OS Bookworm the display is detected in hardware and driven out of the box, with no driver download and no manual calibration. The exception is Compute Modules, which do not auto-detect the panel and need the display declared in config.txt. Touch axis mirroring after a rotation can be corrected with Device Tree options.
Does the Touch Display 2 need its own power supply?
No. It is powered directly from the host Raspberry Pi through a three-pin GPIO power cable, so there is no separate adapter. The trade-off is that the cable occupies power and ground pins on the GPIO header, which is worth checking against any HAT or wiring you plan to use.
References
- Raspberry Pi Touch Display 2 product page and specifications
- A new 10-inch Raspberry Pi Touch Display 2 (Raspberry Pi news, 22 July 2026)
- Touch Display 2 install and configuration documentation
- Touch Display 2 5-inch and 7-inch product brief (PDF)
- Touch Display 2 10-inch product brief (PDF)
- The Register hands-on with the Touch Display 2
- CNX Software 10-inch Touch Display 2 review
About the Author
Chuck Wilson has been programming and building with computers since the Tandy 1000 era. His professional background includes CAD drafting, manufacturing line programming, and custom computer design. He runs PidiyLab in retirement, documenting Raspberry Pi and homelab projects that he actually deploys and maintains on real hardware. Every article on this site reflects hands-on testing on specific hardware and OS versions, not theoretical walkthroughs.
Review basis for this article: Raspberry Pi first-party specifications and official documentation for the Touch Display 2 (5-inch, 7-inch, and 10-inch), cross-checked against published independent reviews. Last referenced OS: Raspberry Pi OS Bookworm.