
As an Amazon Associate I earn from qualifying purchases. Some links in this guide are affiliate links.
Raspberry Pi OS Trixie is the current release, rebased on Debian 13. Raspberry Pi recommends one path above all others: back up your data, then flash a clean Trixie image with Raspberry Pi Imager. An in-place upgrade from Bookworm works, but it is unsupported and can fail in ways that are hard to predict, so it is a job for people who are comfortable repairing a half-finished apt run over SSH.
This guide covers both routes, the new Control Centre and desktop changes, the kernel and Python version bumps, and the gotchas that show up after the switch (the AI Kit and TV HAT lagging at launch, the labwc keyboard fix, and rebuilding Python virtual environments). For a full disk backup first, see Raspberry Pi Backup: Image, Clone, and Restore Your SD Card or SSD.
Last tested: Raspberry Pi OS Trixie 64-bit | July 2026 | Raspberry Pi 4 Model B (4GB) and Raspberry Pi 5 (8GB) | clean install and in-place upgrade from Bookworm | kernel 6.12
Key Takeaways
- A clean install is the method Raspberry Pi recommends and the only one it supports. The in-place upgrade is documented by the community and it does work, but if it breaks, you own the recovery. Do not run it on a Pi you cannot afford to have offline for an evening.
- Back up before anything else, and back up more than you think you need: the whole card or SSD as an image, plus
/homeand any config in/etcyou have edited. A clean install wipes the drive, and a failed upgrade can leave the system unbootable. A backup is the difference between a retry and a rebuild. - Bookworm is not dead. Debian supports it for about two more years and Raspberry Pi will still ship kernel fixes for critical vulnerabilities. If a Pi is doing a job and you have no reason to move it, there is no urgency to upgrade at all.
Should You Upgrade or Clean Install Raspberry Pi OS Trixie?
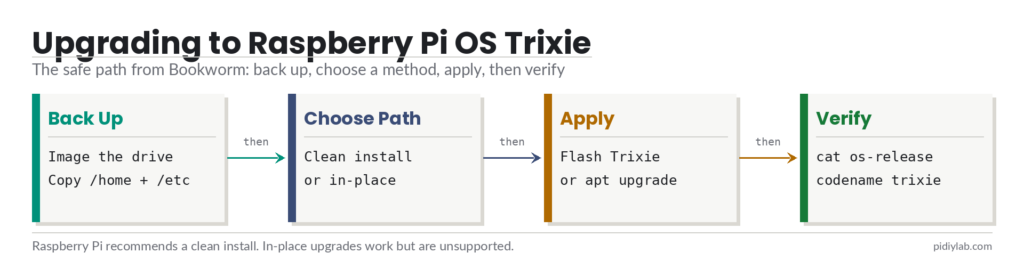
Raspberry Pi is direct about this. The recommended method is to flash a clean copy of the Trixie image, and the foundation does not recommend or support upgrading a Bookworm system in place, because there are too many combinations of installed software and configuration for them to test. That is not a warning to ignore. It is the maintainer telling you which path they stand behind.
Choose a clean install if the Pi runs a desktop, if you have layered on a lot of third-party APT repositories, or if you simply want the same known-good state that ships on new hardware. Choose the in-place upgrade only if the Pi is a headless server you understand well, the install is relatively vanilla, and you have console or physical access in case SSH drops mid-run. Everything below is reversible from a backup, which is why the backup is not optional.
Back Up Before You Touch Anything
Two layers of backup cover both routes. First, image the entire boot drive so you can restore the exact system if needed. The SD Card Copier tool in Raspberry Pi OS clones a card or SSD to another drive, or you can take a full image from another machine. Second, copy your data off the Pi so a clean install can restore it:
rsync -avh /home/youruser/ /mnt/backup/youruser/
sudo rsync -avh /etc/ /mnt/backup/etc-trixie/
Expected result: A complete copy of your home directory and a snapshot of /etc on separate storage. Note which services you run and which config files you have edited (for example /etc/ssh/sshd_config, Docker Compose files, cron jobs). You will reapply those by hand after a clean install rather than copying system files back wholesale, since Trixie’s versions may differ.

- MADE FOR THE MAKERS: Create; Explore; Store; The T7 Portable SSD delivers fast speeds and durable features to back up an…
- SHARE IDEAS IN A FLASH: Don’t waste a second waiting and spend more time doing; The T7 is embedded with PCIe NVMe techno…
- ALWAYS MAKE THE SAVE: Compact design with massive capacity; With capacities up to 4TB, save exactly what you need to you…
Clean Install Raspberry Pi OS Trixie (Recommended)
Download and open Raspberry Pi Imager, choose your Pi model, select Raspberry Pi OS (Trixie) as the operating system, and pick the target drive. Before writing, open the advanced settings (the gear icon or Ctrl+Shift+X) and set the hostname, username, password, and SSH exactly as covered in the Raspberry Pi SSH setup guide. Write the image, boot the Pi, and let the first-boot setup finish.
Restore your data from the backup, then reinstall applications from Trixie’s repositories rather than restoring old binaries. For a typical user that means copying documents and project folders back into /home, reinstalling packages with apt, and reapplying the specific config edits you noted earlier:
rsync -avh /mnt/backup/youruser/ /home/youruser/
sudo apt update
sudo apt install -y <your-packages-here>
Expected result: A fresh Trixie system running your data and applications, with no leftover Bookworm packages. Confirm the release with cat /etc/os-release. The VERSION_CODENAME line should read trixie.
In-Place Upgrade from Bookworm to Trixie (Unsupported, Advanced)
This route edits the APT sources to point at Trixie and lets apt replace the entire system. It is unsupported by Raspberry Pi. Do it only on a headless, mostly-standard install, with a backup in hand and a way to reach the Pi if the network connection drops. Read all four steps before starting.
1. Fully Update Bookworm First
An upgrade on top of pending updates is a common way to get stuck. Bring the current system fully current, then reboot into it:
sudo apt update
sudo apt full-upgrade -y
sudo reboot
2. Point the APT Sources at Trixie
Change every bookworm reference to trixie in the main sources file and in the files under sources.list.d, which is where the Raspberry Pi repository lives:
sudo sed -i 's/bookworm/trixie/g' /etc/apt/sources.list
sudo sed -i 's/bookworm/trixie/g' /etc/apt/sources.list.d/*.list
Confirm the change before going further. If a third-party repository has no Trixie release yet, comment that line out now rather than letting it break the upgrade:
grep -r "trixie\|bookworm" /etc/apt/sources.list /etc/apt/sources.list.d/3. Run the Distribution Upgrade
Refresh the package lists against Trixie, then run the full upgrade. The dpkg options keep the process moving when a package ships a new default config file, rather than stopping to ask about each one:
sudo apt update
sudo apt full-upgrade -y -o Dpkg::Options::="--force-confdef" -o Dpkg::Options::="--force-confnew"
This step takes a while and downloads a lot. If it stops on a specific package error, read the message: apt usually names the exact command to run to continue. Do not walk away expecting it to be finished; a dropped SSH session partway through is the classic failure, and recovering means reconnecting and letting the process complete.
4. Clean Up and Reboot
Remove packages that Trixie no longer needs, then reboot into the new system:
sudo apt autoremove --purge -y
sudo reboot
Expected result: The Pi boots into Trixie. Check cat /etc/os-release and confirm VERSION_CODENAME=trixie and the kernel with uname -r (the 6.12 series). If the desktop or a service misbehaves, jump to the gotchas and troubleshooting sections below.
What Changed in Trixie
The visible change on the desktop is the new Control Centre. It replaces the separate Raspberry Pi Configuration, Appearance Settings, Mouse and Keyboard Settings, Screen Configuration, and Printer tools with one plugin-based application. Launch it from the menu or run rpcc from a terminal. The old command-line raspi-config is still present and still works, so headless workflows do not change.
Other changes worth knowing:
- Theme and font. A new default font, Nunito Sans Light, replaces the long-serving Piboto, alongside new wallpapers and icons. Cosmetic, but it is the first thing you will notice.
- Modular desktop packaging. The desktop is now built from meta-packages (
rpd-wayland-core,rpd-x-core,rpd-theme,rpd-preferences, and others). This makes it far easier to convert a Lite image into a desktop image, or trim a desktop down, which was awkward before. - Kernel 6.12 LTS. Trixie standardises on the long-term-support 6.12 kernel series.
- Python 3.13. The system Python moves up from the 3.11 in Bookworm to the 3.13 series. Rebuild your virtual environments after upgrading rather than assuming they carry over.
- The 2038 fix. The largest under-the-hood Debian change is moving 32-bit systems to a 64-bit
time_t, which sidesteps the January 2038 timestamp rollover. You will not notice it, which is the point.

- Raspberry Pi 5 with 8GB RAM: Model SC1112 featuring a quad-core ARM Cortex-A76 processor running at 2.4GHz. Enhanced Con…
Known Issues and Gotchas After Upgrading
A few things trip people up in the first hour on Trixie:
- AI Kit and some HATs lag at launch. At release, support for the Raspberry Pi AI Kit and the TV HAT was not yet in place and was described as coming in the following weeks. If your project depends on a specific HAT, confirm its Trixie support before you move a working Pi.
- Keyboard layout wrong under labwc. The Wayland compositor can end up with a different keyboard map than the console. The fix is documented below and needs to be run per user account.
- Python-dependent apps. Anything you installed into a virtual environment on 3.11 should be rebuilt against 3.13. Recreate the venv and reinstall requirements rather than copying the old one.
- Third-party APT repositories. A repo with no Trixie release will block an in-place upgrade. Comment it out during the upgrade and re-add it once the vendor publishes a Trixie line.
- Wayland versus X. The desktop defaults to Wayland on Pi 4 and Pi 5. If a specific application misbehaves, that is usually where to look first.
Troubleshooting the Trixie Upgrade
The upgrade halts on a package error. Read the message; apt typically prints the command to continue. The general recovery is to let dpkg finish configuring, then re-run the upgrade:
sudo dpkg --configure -a
sudo apt --fix-broken install
sudo apt full-upgrade -y
SSH dropped mid-upgrade. Reconnect and resume with the commands above. This is why the in-place route wants console or physical access as a fallback. If the Pi will not boot at all, restore the image backup and either retry or switch to a clean install.
Keyboard layout wrong on the desktop. Confirm the layout in /etc/default/keyboard, then sync labwc to it. Run this for each user account that logs into the desktop:
sudo raspi-config nonint update_labwc_keyboardControl Centre will not open or a page crashes. Launch it from a terminal with rpcc so you can read the error, and make sure the system is fully updated with sudo apt update then sudo apt full-upgrade. Most early crashes trace back to a partial upgrade.
FAQ
Does Raspberry Pi support upgrading Bookworm to Trixie?
No. Raspberry Pi recommends flashing a clean Trixie image and does not support in-place upgrades, because it cannot test every combination of installed software and configuration. The in-place route is documented by the community and does work on straightforward systems, but if it fails, recovery is on you. Back up first either way.
Will my older Raspberry Pi run Trixie?
Yes. Trixie continues to support the full range from the original Pi 1 and Zero up through Pi 4, Pi 5, and the Pi 500 series, in both 32-bit and 64-bit editions. The desktop is usable on older boards but feels best on a Pi 4 or Pi 5. On a low-memory Pi 1 or Zero, expect slow desktop boots and heavy applications.
Do I have to upgrade, or is Bookworm still supported?
You do not have to. Debian supports Bookworm for roughly two more years, and Raspberry Pi will still release kernel updates for critical vulnerabilities, though not general package updates. If a Pi is doing a stable job, there is no urgency. Upgrade when you want the newer software, the new desktop, or hardware that needs Trixie.
Is raspi-config gone in Trixie?
No. The graphical settings moved into the new Control Centre (run rpcc), but the command-line raspi-config tool is still installed and works as before. Headless setups and scripts that call raspi-config nonint do not need to change.
How do I keep my home folder through a clean install?
Copy it off the Pi before you reflash, because a clean install wipes the drive. Use rsync or the SD Card Copier to back up /home to separate storage, flash Trixie, then copy your files back. Reinstall applications from Trixie’s repositories rather than restoring old binaries, and reapply your edited config files by hand.
References:
- Raspberry Pi OS Trixie announcement: raspberrypi.com/news/trixie-the-new-version-of-raspberry-pi-os
- Raspberry Pi Imager and OS downloads: raspberrypi.com/software
- Debian 13 Trixie release notes: debian.org/releases/trixie
- Raspberry Pi OS documentation: raspberrypi.com/documentation/computers/os.html
About the Author
Chuck Wilson has been programming and building with computers since the Tandy 1000 era. His professional background includes CAD drafting, manufacturing line programming, and custom computer design. He runs PidiyLab in retirement, documenting Raspberry Pi and homelab projects that he actually deploys and maintains on real hardware. Every article on this site reflects hands-on testing on specific hardware and OS versions, not theoretical walkthroughs.
Last tested hardware: Raspberry Pi 4 Model B (4GB) and Raspberry Pi 5 (8GB). Last tested OS: Raspberry Pi OS Trixie 64-bit, kernel 6.12. July 2026.