
A Raspberry Pi bird feeder camera with libcamera and motion detection captures bird visits automatically without recording empty footage all day. Instead of running nonstop, the camera watches for movement at the feeder and saves short video clips only when something actually shows up. This guide shows exactly how to build that system. By the end you will have a camera that runs on its own, manages its own storage, and quietly collects clips of real bird activity without any babysitting.
Key Takeaways
- libcamera is required on modern Raspberry Pi systems. The old raspistill and raspivid commands are gone.
- Motion detection measures pixel change between frames, not bird shapes. Framing matters more than sensitivity settings.
- Short clips are far easier to manage than continuous video. A 15-second clip per event keeps storage predictable.
- A systemd service turns this from a script into an appliance. It restarts automatically after every reboot or crash.
- SD card longevity matters on a 24/7 camera build. Automatic storage cleanup and zram are both worth setting up before you deploy.
What You Need Before Starting
Hardware
- Raspberry Pi 4 or Pi 5 (recommended; older models can work at lower resolutions)
- Raspberry Pi Camera Module v2 or v3
- Camera ribbon cable
- 32GB or larger microSD card
- Stable 5V power supply
Optional but recommended
- USB SSD or flash drive for video storage (extends the life of your SD card significantly on a 24/7 build)
- Weatherproof enclosure if the camera is placed outdoors
- Fixed mount or clamp aimed at the feeder
- PIR motion sensor for a hardware-based trigger instead of software detection
Software assumptions
- Raspberry Pi OS 64-bit (Bookworm)
- SSH enabled for remote access
- Internet access for package installation
Step 1: Prepare the Raspberry Pi
Flash Raspberry Pi OS using Raspberry Pi Imager. Configure your username, password, Wi-Fi credentials, and SSH access in the Imager settings before writing the image. After first boot, update everything before installing anything else:
sudo apt update && sudo apt full-upgrade -y
sudo reboot
This ensures the camera drivers and libcamera stack are current before you test anything.
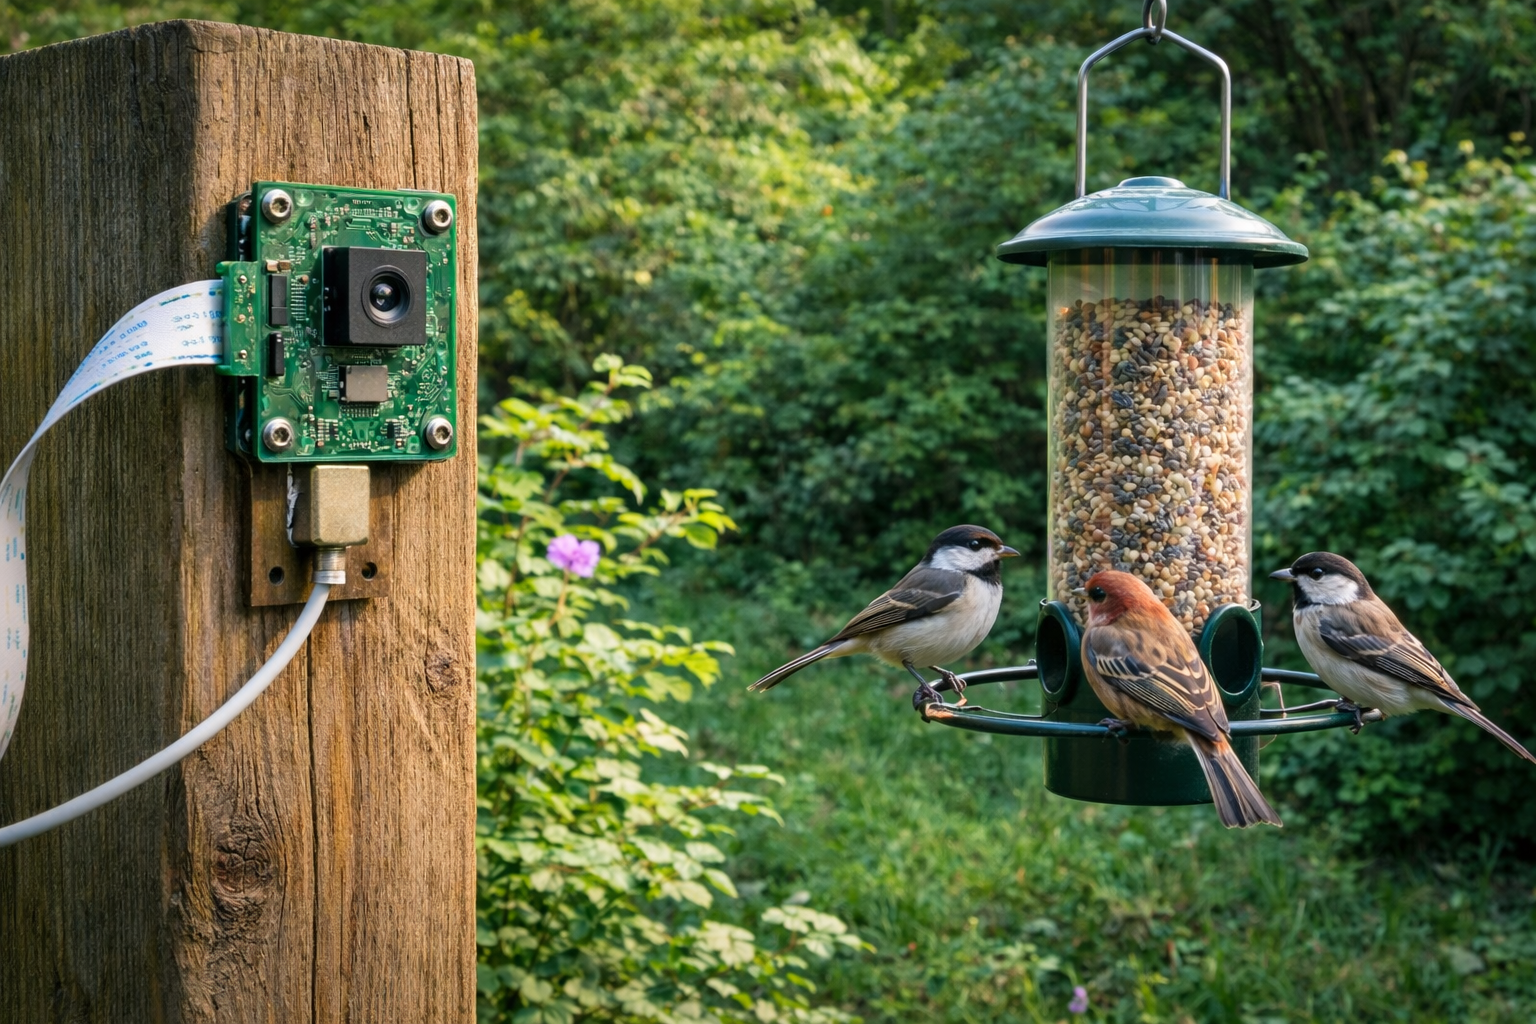
Step 2: Connect and Test Your Raspberry Pi Bird Feeder Camera
Power off the Pi, insert the ribbon cable into the CSI camera port, lock the connector, then power back on. Test that the camera is detected:
rpicam-helloIf it starts without errors, the camera is working through libcamera. Record a short test clip to confirm video encoding works:
mkdir -p ~/birdcam/test
rpicam-vid -t 5000 -o ~/birdcam/test/test.h264
A five-second clip in ~/birdcam/test/ confirms the camera hardware, libcamera, and video encoding are all working. Sort this out before touching the motion detection code.

Step 3: Choose a Motion Detection Approach
There are two reliable approaches. Option A uses software-based video frame comparison. It requires no extra hardware, runs entirely in Python, and uses slightly more CPU. Option B uses a PIR motion sensor wired to a GPIO pin. It uses almost no CPU, responds to heat-based movement, and requires additional wiring. This guide covers Option A since it needs no extra parts. The PIR upgrade is covered later.
Step 4: Install Dependencies
sudo apt install -y python3-picamera2 python3-opencv ffmpegThis installs camera access through libcamera, OpenCV for frame comparison, and ffmpeg for converting raw H.264 files to MP4 for easier playback.
Step 5: Create the Motion Detection Script
mkdir -p ~/birdcam/videos
nano ~/birdcam/birdcam_motion.py
Paste the following script. This version uses Picamera2’s encoder-based recording API, which is the correct approach for current Raspberry Pi OS images:
import time
from datetime import datetime
from pathlib import Path
import cv2
from picamera2 import Picamera2
from picamera2.encoders import H264Encoder
from picamera2.outputs import FileOutput
SAVE_DIR = Path("/home/YOUR_USERNAME/birdcam/videos")
SAVE_DIR.mkdir(parents=True, exist_ok=True)
CLIP_SECONDS = 15
COOLDOWN = 10
THRESHOLD = 25
MIN_CHANGE_PERCENT = 1.0
def timestamp():
return datetime.now().strftime("%Y-%m-%d_%H-%M-%S")
cam = Picamera2()
config = cam.create_video_configuration(
main={"size": (1280, 720)},
lores={"size": (640, 360), "format": "YUV420"}
)
cam.configure(config)
cam.start()
time.sleep(1)
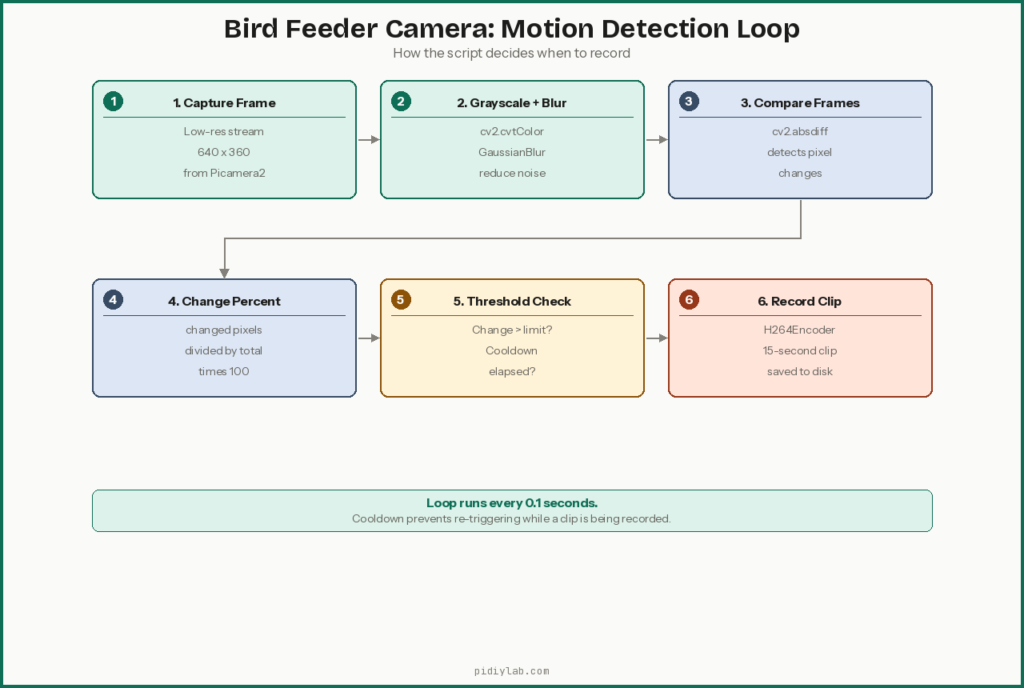
prev_gray = None
last_record = 0
encoder = H264Encoder()
while True:
# Use low-resolution stream for motion detection
lores = cam.capture_array("lores")
gray = cv2.cvtColor(lores, cv2.COLOR_YUV2GRAY_I420)
gray = cv2.GaussianBlur(gray, (9, 9), 0)
if prev_gray is None:
prev_gray = gray
time.sleep(0.1)
continue
diff = cv2.absdiff(prev_gray, gray)
_, thresh = cv2.threshold(diff, THRESHOLD, 255, cv2.THRESH_BINARY)
change = (thresh > 0).mean() * 100
now = time.time()
if change > MIN_CHANGE_PERCENT and now - last_record > COOLDOWN:
last_record = now
filename = str(SAVE_DIR / f"{timestamp()}.h264")
print(f"Motion detected ({change:.1f}%) -- recording {filename}")
output = FileOutput(filename)
cam.start_encoder(encoder, output)
time.sleep(CLIP_SECONDS)
cam.stop_encoder()
prev_gray = None
prev_gray = gray
time.sleep(0.1)Replace YOUR_USERNAME in the SAVE_DIR line with the username you set during Raspberry Pi Imager setup. The script uses the low-resolution stream for motion detection while the main stream stays ready for recording, which avoids the fragile configuration-switching approach you will see in older guides.
Make it executable:
chmod +x ~/birdcam/birdcam_motion.pyStep 6: Test Motion Detection
python3 ~/birdcam/birdcam_motion.pyWave your hand in front of the camera. A video file should appear in ~/birdcam/videos/ within a few seconds. If it does, the detection is working. If nothing triggers, lower MIN_CHANGE_PERCENT slightly. If everything triggers, raise it or tighten the frame.
Step 7: Convert Clips to MP4
Raw H.264 files need a container for reliable playback on most devices. Run this from a terminal to convert existing clips:
cd ~/birdcam/videos
for f in *.h264; do
    ffmpeg -framerate 30 -i "$f" -c copy "${f%.h264}.mp4"
done
This copies the video stream into an MP4 container without re-encoding, so quality is unchanged and conversion is fast. You can automate this with a cron job if you want MP4s produced automatically.
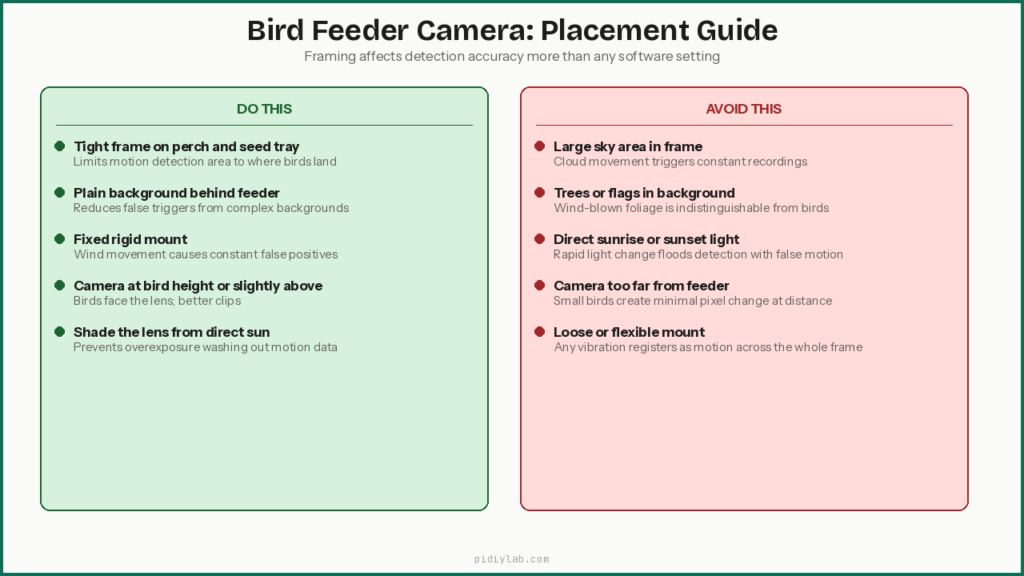
Step 8: Mount and Aim the Camera
Good placement matters more than any sensitivity setting. Tight framing around the perch and seed tray reduces the area of background that can trigger false detections. A stable mount prevents wind-induced camera shake from registering as motion. A simple background makes pixel changes easier to detect and attribute to actual birds.
Do this
- Aim directly at the perch and seed tray
- Keep the background as plain as possible
- Fix the camera so it cannot move in wind
Avoid this
- Large areas of open sky in the frame
- Trees, flags, or other moving objects behind the feeder
- Direct sunrise or sunset light hitting the lens
Better framing reduces false motion triggers more reliably than tuning detection thresholds.
Step 9: Run the Camera Automatically on Boot
Create a systemd service so the camera starts after every reboot. Replace YOUR_USERNAME with your actual username in both the path and the User field:
sudo nano /etc/systemd/system/birdcam.service[Unit]
Description=Bird Feeder Camera
After=network.target
[Service]
ExecStart=/usr/bin/python3 /home/YOUR_USERNAME/birdcam/birdcam_motion.py
WorkingDirectory=/home/YOUR_USERNAME/birdcam
Restart=always
User=YOUR_USERNAME
[Install]
WantedBy=multi-user.targetEnable and start it:
sudo systemctl daemon-reload
sudo systemctl enable birdcam
sudo systemctl start birdcam
Check that it is running:
sudo systemctl status birdcamThe camera now starts automatically after every reboot and restarts itself if the script crashes.
Step 10: Manage Storage Automatically
A 24/7 motion-triggered camera will fill storage faster than you expect during active periods. Set up automatic cleanup to delete clips older than 14 days:
crontab -e# Delete bird camera clips older than 14 days at 3am daily
0 3 * * * find /home/YOUR_USERNAME/birdcam/videos -type f -mtime +14 -deleteSilent storage failures are one of the more frustrating ways a camera build stops working. You come back three weeks later and discover nothing was recorded because the card filled up on day two. The cleanup cron prevents that. For a deeper look at reducing write pressure on the SD card itself, see Preventing SD Card Corruption on Raspberry Pi. If this camera is going outside permanently, moving the video storage to a USB drive and booting from USB SSD is worth the effort. See Booting Raspberry Pi from USB SSD. Your Raspberry Pi bird feeder camera will now restart automatically after every power interruption
Optional Upgrade: PIR Motion Sensor
A PIR sensor wired to a GPIO pin can replace video-based motion detection entirely. When the PIR fires, the script records a fixed-length clip and resets. This approach uses almost no CPU, reduces false triggers from light changes and shadows, and is more reliable in windy environments where moving background foliage constantly trips the frame-comparison approach.
The trade-off is that PIR sensors detect heat-based movement rather than precise feeder activity. A large bird landing on a nearby branch will trigger it the same as one landing on the perch. For most backyard setups the simplicity is worth it. Wiring the HC-SR501 is the same three-wire connection used in any GPIO project: VCC to 5V, GND to ground, and the output pin to a free GPIO pin. Replace the frame comparison logic in the script with a GPIO edge detection call to the PIR pin.

HiLetgo 3pcs HC-SR501 PIR Infrared Sensor Human Body Infrared Motion Module for Arduino Raspberry Pi
Optional Upgrade: Copy Clips to Another Computer
Copy clips to a remote machine using secure copy:
scp ~/birdcam/videos/*.mp4 user@remote_ip:/path/to/bird_videos/Automate this with a nightly cron job to back up the previous day’s clips and keep the Pi’s local storage manageable. Setting up SSH key authentication first means the cron job can run without a password prompt.
What This System Does Well
- Captures real bird visits without hours of empty footage
- Runs quietly for weeks once deployed
- Manages its own storage with minimal setup
What it will not do
- Identify bird species automatically (that requires additional ML software and processing)
- Ignore all background motion in a busy outdoor environment
- Replace professional wildlife cameras at distance
FAQ
Does this require internet access to work?
No. Once installed, the camera records locally without any network connection. Internet access is only needed for setup, system updates, or copying clips to another machine.
Will this work on older Raspberry Pi models?
It works best on Pi 4 or newer. Older models can handle it at lower resolutions, but they may struggle with frequent motion events or higher resolution clips. A Pi 3B+ at 640×360 is workable. A Pi Zero is not the right choice for this project.
Why does it record H.264 files instead of MP4?
The camera records a raw H.264 video stream because it is fast and efficient. MP4 is just a container format. Converting to MP4 does not change quality at all. It only improves compatibility with media players and devices that do not handle raw H.264 streams.
How accurate is motion detection for small birds?
Accuracy depends on framing and the detection threshold. Tight framing around the perch and using the low-resolution stream for detection improves results. Motion detection measures pixel change, not bird shape, so a well-framed camera with minimal background movement will catch most visits reliably.
Will shadows and clouds trigger false recordings?
They can. Reducing sky in the frame, avoiding moving backgrounds, and keeping the cooldown period long enough to prevent rapid re-triggering reduces false positives significantly. A PIR sensor is more reliable than frame comparison in environments with lots of light variation.
How much storage do I need?
With 15-second clips at 720p, 32GB holds weeks of footage even on a busy feeder. Automatic cleanup via cron is strongly recommended regardless of card size. Silent storage failure is a worse outcome than deleting old clips.
Can this run for weeks without supervision?
Yes. With the systemd service, automatic storage cleanup, and a reliable power supply, the camera runs for weeks without intervention. For 24/7 outdoor builds, setting up zram to reduce SD card write pressure is worth the five minutes it takes. See Setting Up zram on Raspberry Pi.
Can I use more than one camera?
Yes, but each camera increases system load. Multi-camera setups work best on a Pi 5 or with separate Pi devices dedicated to each camera. Running two cameras on a single Pi 4 is possible at reduced resolution but requires testing your specific setup under real load.
References
- https://datasheets.raspberrypi.com/camera/picamera2-manual.pdf
- https://www.raspberrypi.com/documentation/computers/camera_software.html
- https://opencv.org/