
As an Amazon Associate I earn from qualifying purchases. Some links in this guide are affiliate links.
A Raspberry Pi security camera system can be built three ways depending on what level of intelligence and integration is needed. MotionEye provides a simple web-based interface for motion-triggered recording on any Pi with a camera. Frigate NVR adds AI object detection (person, car, pet, face) via a Coral TPU accelerator and integrates directly with Home Assistant. An RTSP stream turns the Pi into a camera source that any NVR software on the network can consume. This guide covers choosing between the three approaches, MotionEye setup on Bookworm, the correct libcamera commands replacing the deprecated raspistill, camera module options, and secure remote access via Tailscale rather than port forwarding.
Last tested: Raspberry Pi OS Bookworm Lite 64-bit | May 2026 | Raspberry Pi 4 Model B (4GB) | MotionEye 0.43, libcamera 0.3, Camera Module 3
Key Takeaways
raspistillandraspividare deprecated on Bookworm. The replacement commands arelibcamera-stillandlibcamera-vid. Any guide that showsraspistill -o test.jpgor tells you to enable the camera in raspi-config is describing the Bullseye method. On Bookworm, the camera works via the libcamera stack by default with no raspi-config step required.- Camera Module 3 is the current official Raspberry Pi camera (12MP autofocus, released 2023), replacing the Camera Module v2 (8MP fixed focus). Both work on Bookworm via libcamera. The Camera Module 3 Wide variant has a 120-degree field of view suited to room coverage. For a full RTSP streaming setup, see Raspberry Pi RTSP Surveillance Guide.
- Do not use port forwarding for remote camera access. Opening a port to the internet exposes the camera feed to port scanners and brute-force attacks. Use Tailscale instead: it creates an encrypted WireGuard tunnel with no open inbound ports. Access the camera from anywhere through the Tailscale IP. See Tailscale Raspberry Pi: Complete Secure Remote Access Guide.
Choosing Your Raspberry Pi Security Camera Approach
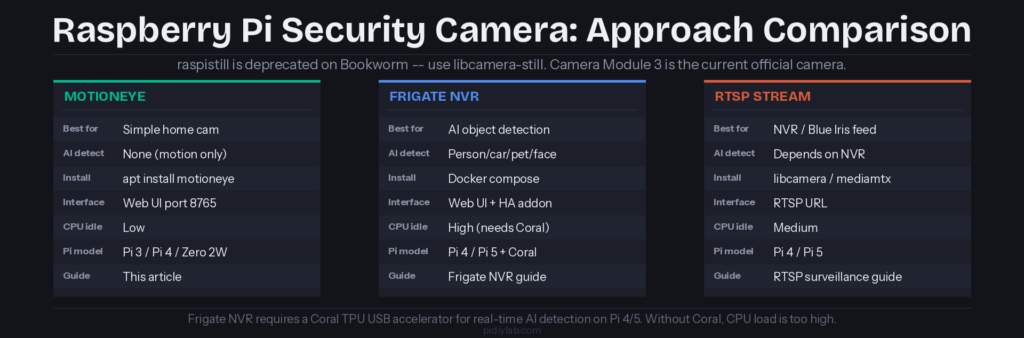
MotionEye is the right starting point for most home camera builds. It installs on Raspberry Pi OS as a Python web application, provides a clean browser interface for live feeds and recorded clips, and handles basic motion detection without any AI hardware. It works on Pi 3, Pi 4, and Pi Zero 2W. The web interface runs on port 8765. MotionEye is in maintenance mode. It works reliably but is not receiving major new features.
Frigate NVR is the correct choice when AI-powered object detection is needed. It distinguishes a person from a tree branch, a car from headlights, or a pet from a shadow. Frigate runs as a Docker container on Pi 4 or Pi 5 and requires a Coral TPU USB accelerator for real-time AI inference at acceptable CPU load. Without a Coral, Frigate runs inference on the Pi’s CPU and consumes 80-100% of one core per camera continuously. Frigate integrates with Home Assistant as a native addon. For the complete setup, see Frigate NVR Raspberry Pi 5: Complete Coral USB and Home Assistant Setup Guide.
RTSP stream turns the Pi into a camera source for an existing NVR: Blue Iris, Scrypted, Synology Surveillance Station, or any software that accepts an RTSP URL. The Pi runs a lightweight stream publisher (mediamtx or rpicam-apps with network output) and does no recording itself. This is the best approach when a dedicated NVR machine already exists and the Pi is just the camera endpoint. For the complete RTSP setup, see Raspberry Pi RTSP Surveillance Guide.
Setting Up Raspberry Pi Security Camera with MotionEye
Flash Raspberry Pi OS Bookworm Lite to a microSD card or USB SSD using Raspberry Pi Imager. Configure hostname, username, SSH, and WiFi in Imager’s advanced settings before flashing. Insert and boot. SSH in and verify the camera is detected:
libcamera-hello --list-camerasThe command lists detected camera devices. A Camera Module 3 appears as “imx708.” A Camera Module v2 appears as “imx219.” If no cameras are listed, check the CSI ribbon cable connection. The cable must be inserted with the contacts facing toward the board and the locking clip fully seated.
Test a still capture with the current libcamera command:
libcamera-still -o test.jpg
ls -lh test.jpg
Expected result: test.jpg appears in the current directory and is non-zero in size. Open it via SCP or a web browser to verify the image. If the command errors with “no cameras available,” the libcamera stack is not detecting the module. Reseat the ribbon and reboot.
Install MotionEye and its dependencies:
sudo apt update && sudo apt install -y python3-pip ffmpeg libmariadb-dev libpq-dev
sudo pip3 install motioneye --break-system-packages
sudo motioneye_init
The motioneye_init command creates the configuration directory and systemd service. Enable and start it:
sudo systemctl enable --now motioneyeExpected result: MotionEye is accessible at http://[pi-ip]:8765 in a browser. Log in with username admin and no password (set a password immediately after first login). The default view shows an empty camera list. Click the plus button to add a camera, select “Local MMAL/CSI Camera” for the Pi Camera Module, and configure the resolution and frame rate.
Add the MotionEye camera in the web interface: Camera Type = Local MMAL/CSI Camera, Resolution = 1920×1080, Frame Rate = 10-15fps (reduce if the Pi struggles). Enable motion detection under Motion Detection settings. Set the motion detection threshold to avoid false positives from lighting changes. Configure File Storage to save motion-triggered clips to a USB drive at /media/usb rather than the SD card.
Camera Modules for Raspberry Pi Security Builds
| Camera | Resolution | Focus | Field of view | Best for | Price |
|---|---|---|---|---|---|
| Camera Module 3 | 12MP | Autofocus | 66° | General indoor/outdoor | ~$25 |
| Camera Module 3 Wide | 12MP | Autofocus | 120° | Room coverage, wide angle | ~$35 |
| Camera Module 3 NoIR | 12MP | Autofocus | 66° | Night vision (add IR light) | ~$25 |
| Camera Module v2 | 8MP | Fixed | 62° | Legacy builds, lower cost | ~$15 used |
| HQ Camera | 12MP | Manual (C/CS mount) | Lens dependent | Telephoto / precision builds | ~$50 |
| USB webcam | Varies | Fixed | Varies | MotionEye, no ribbon needed | $15-40 |
The Camera Module 3 (ASIN B0B6RNFJ15) is the current recommended camera for new builds. Its autofocus handles varying distances automatically, important for outdoor cameras where subjects move at different depths. The NoIR variant removes the infrared filter and pairs with an external IR LED illuminator for night vision. USB webcams work with MotionEye without a ribbon cable, useful for enclosures where CSI ribbon routing is difficult.
Remote Access and Storage for Raspberry Pi Security Camera
Remote access via Tailscale. Install Tailscale on the Pi and on the viewing device (phone, laptop). Both join the same Tailscale network and the Pi’s camera is accessible at its Tailscale IP from anywhere:
curl -fsSL https://tailscale.com/install.sh | sh
sudo tailscale up
After joining, access MotionEye at http://[tailscale-ip]:8765 from any device on the Tailscale network. No port forwarding, no dynamic DNS, no inbound firewall rules needed. Tailscale is free for personal use up to 100 devices.
Local storage. Save recorded clips to a USB drive rather than the SD card. SD cards have limited write cycles and a camera recording motion events continuously will shorten the card’s life significantly. Mount a USB drive at boot by adding it to /etc/fstab:
# Find the USB drive UUID:
sudo blkid /dev/sda1

# Add to /etc/fstab:
UUID=your-uuid-here  /media/usb  ext4  defaults,nofail  0  2

# Create mount point and mount:
sudo mkdir -p /media/usb
sudo mount -a
In MotionEye’s File Storage settings, change the root directory to /media/usb. Set a maximum disk usage percentage (80%) so old clips are deleted automatically when storage fills.
Network storage. For clips that need to be accessible from other machines, mount an NFS or SMB share from a NAS. Configure the mount point as the MotionEye storage path. For a NAS setup using OpenMediaVault on the same network, see Raspberry Pi NAS with OpenMediaVault: Complete Setup Guide.
FAQ
What is the best software for a Raspberry Pi security camera?
MotionEye for a simple home camera with motion-triggered recording and a browser interface. No extra hardware needed and works on Pi 4, Pi 3, and Pi Zero 2W. Frigate NVR for AI object detection (person, car, pet detection) with Home Assistant integration. Requires a Pi 4 or Pi 5 and a Coral TPU USB accelerator. An RTSP stream (via mediamtx or rpicam-apps) for feeding an existing NVR software package. The right choice depends on whether AI detection is needed and whether Home Assistant is already in the stack.
Does raspistill work on Raspberry Pi OS Bookworm?
No. raspistill and raspivid are deprecated and removed on Bookworm. The replacement commands are libcamera-still for photos and libcamera-vid for video. Camera configuration in raspi-config is also not required on Bookworm. The camera works via the libcamera stack by default. Run libcamera-hello --list-cameras to verify detection, and libcamera-still -o test.jpg to capture a test image.
Which Raspberry Pi camera module should I use for security?
Camera Module 3 for most new builds. At 12MP with autofocus, it is significantly better than the v2’s 8MP fixed focus and is the current official camera from the Raspberry Pi Foundation. Camera Module 3 Wide has a 120-degree field of view suited to room and entry-point coverage. Camera Module 3 NoIR (no infrared filter) pairs with an external IR LED illuminator for night vision. The original Camera Module v2 still works on Bookworm via libcamera and is a lower-cost option for legacy or budget builds.
How do I access my Raspberry Pi security camera remotely?
Use Tailscale. Install it on the Pi with curl -fsSL https://tailscale.com/install.sh | sh && sudo tailscale up, install the Tailscale app on the viewing device, and both join the same private network. Access MotionEye via the Pi’s Tailscale IP address on port 8765. This approach requires no port forwarding, no dynamic DNS, and no inbound firewall holes. It is significantly more secure than exposing the camera directly to the internet.
Can Raspberry Pi security camera detect people and cars?
With Frigate NVR and a Coral TPU USB accelerator, yes. Frigate uses TensorFlow Lite object detection models to identify persons, cars, pets, and faces in real time. MotionEye uses pixel-difference motion detection only. It triggers on any movement including shadows, trees, and lighting changes, not on specific object types. For a setup that only alerts on people and ignores other motion, Frigate is required. For the complete Frigate and Coral setup, see Frigate NVR Raspberry Pi 5: Complete Coral USB and Home Assistant Setup Guide.
References:
- MotionEye GitHub: github.com/motioneye-project/motioneye
- libcamera documentation: libcamera.org/docs
- Raspberry Pi camera documentation: raspberrypi.com/documentation/accessories/camera
- Tailscale: tailscale.com
- mediamtx (RTSP publisher): github.com/bluenviron/mediamtx
About the Author
Chuck Wilson has been programming and building with computers since the Tandy 1000 era. His professional background includes CAD drafting, manufacturing line programming, and custom computer design. He runs PidiyLab in retirement, documenting Raspberry Pi and homelab projects that he actually deploys and maintains on real hardware. Every article on this site reflects hands-on testing on specific hardware and OS versions, not theoretical walkthroughs.
Last tested hardware: Raspberry Pi 4 Model B (4GB) with Camera Module 3. Last tested OS: Raspberry Pi OS Bookworm Lite 64-bit. MotionEye 0.43, libcamera 0.3, May 2026.