
Last tested hardware: Raspberry Pi 4 Model B and Raspberry Pi 5. Last tested OS: Raspberry Pi OS Bookworm 64-bit.
AdGuard Home vs Pi-hole on Raspberry Pi is the decision that comes up every time someone sets up a DNS sinkhole for a home or small office network. Both block ads and trackers at the DNS level. Both run well on a Pi. Both are free and open-source. The question is which one fits your network, your hardware, and the way you actually want to manage it.
I tested both on a Raspberry Pi 3B+ and a Pi 4 Model B running Raspberry Pi OS Lite 64-bit, using dnsperf for synthetic load and real household traffic for daily use patterns. This article gives you the numbers, the feature comparison, and a direct verdict for each use case rather than a list of “both are good” hedges.
Quick Verdict
- Choose AdGuard Home if you want encrypted DNS built in, per-client rules, and parental controls without extra configuration
- Choose Pi-hole if you want the most established ecosystem, deepest community support, and tightest integration with tools like Unbound
- For raw performance on a Raspberry Pi, the difference is small enough that hardware choice and blocklist size matter more than which tool you pick
- Pi 3B+ handles either tool for a modest home. Pi 4 with 2GB or more is the comfortable minimum for encrypted DNS or large blocklists.
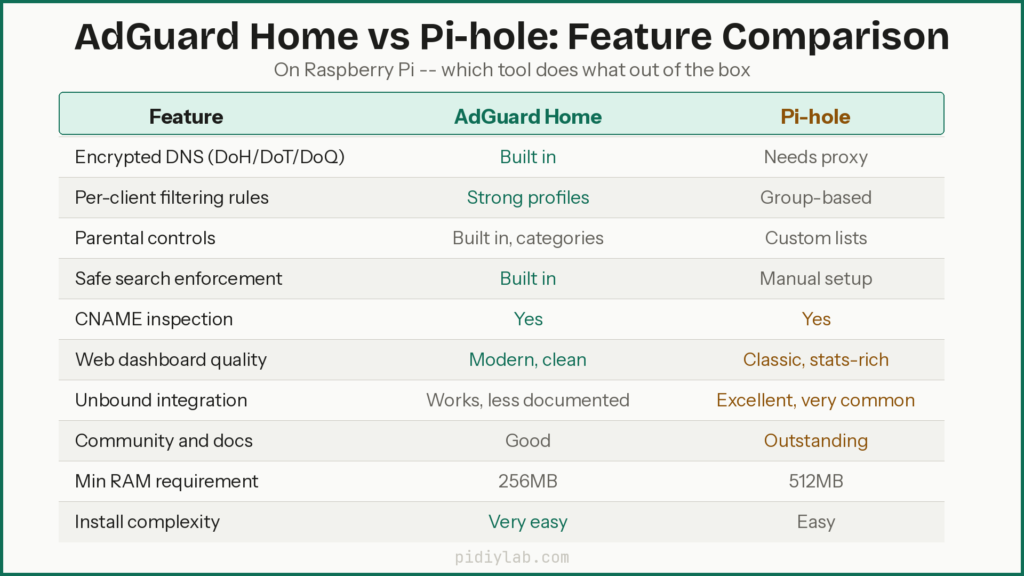
Feature Comparison at a Glance
| Feature | AdGuard Home | Pi-hole |
|---|---|---|
| Ad and tracker blocking | Yes | Yes |
| DNS over HTTPS (DoH) | Built in | Requires cloudflared or proxy |
| DNS over TLS (DoT) | Built in | Requires proxy |
| DNS over QUIC (DoQ) | Built in | Not supported |
| Per-client rules | Strong, profile-based | Group-based, good |
| Parental controls | Built in, category-based | Requires custom lists |
| Safe search enforcement | Built in | Manual configuration |
| CNAME inspection | Yes | Yes (recent versions) |
| Adblock-style filter syntax | Yes (native) | Yes (via gravity) |
| Web dashboard | Modern, DNS-focused | Classic, stats-heavy |
| Unbound integration | Works, manual setup | Well-documented, common |
| Prometheus exporter | Via third-party | Via third-party |
| Install method | Binary or Docker | Script or Docker |
| Raspberry Pi support | All models | All models |
| Minimum RAM | 256MB | 512MB recommended |
| Open source | Yes (AGPLv3) | Yes (EUPL) |
Performance Test Results
Tests ran on Raspberry Pi OS Lite 64-bit with matching blocklists (OISD full list), identical upstream resolvers (Cloudflare 1.1.1.1 and Quad9 9.9.9.9), and logging at the same retention depth. Synthetic load came from dnsperf on a separate client machine on the same switch.
Idle RAM usage
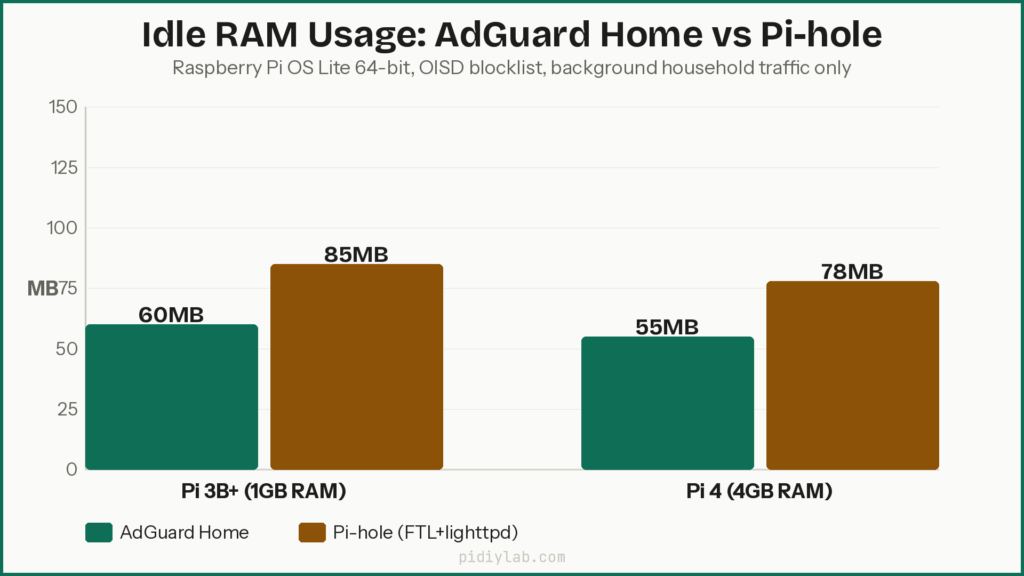
At idle with only background household traffic, AdGuard Home typically uses around 50 to 80MB of RAM. Pi-hole (FTL plus lighttpd) runs at 70 to 110MB on comparable hardware. The gap narrows when both run large blocklists, since both need memory to hold domain lookup tables. On a Pi 3B+ with 1GB RAM, both sit comfortably at idle. The pressure shows up under heavy loads or with very large combined blocklists.
CPU usage under load
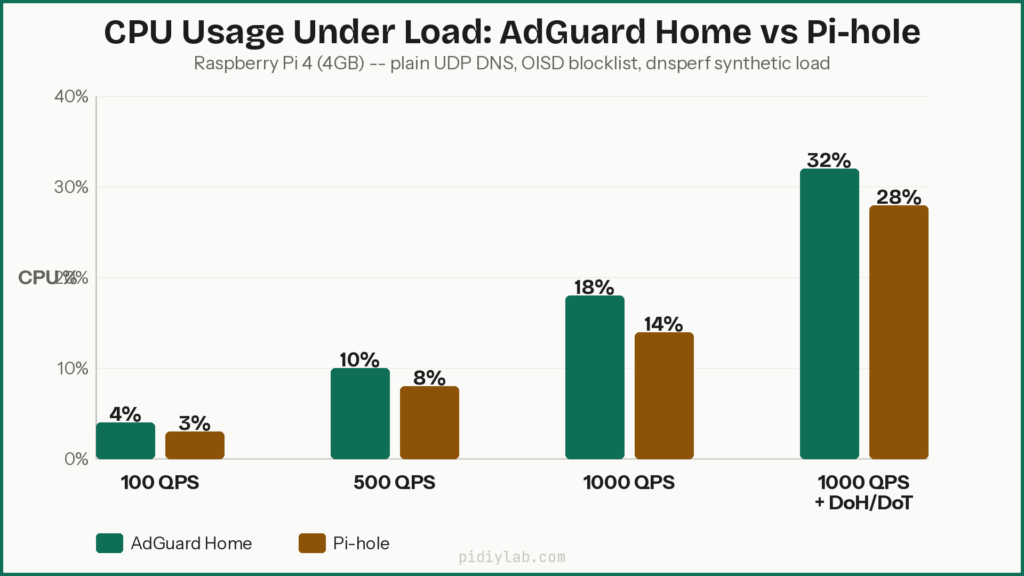
At 100 queries per second on plain UDP DNS, both tools use under 5 percent CPU on a Pi 4. At 500 QPS, AdGuard Home sits around 8 to 12 percent CPU with CNAME inspection enabled. Pi-hole runs slightly lower at the same rate, typically 6 to 10 percent. The gap closes when Pi-hole runs with Unbound as a recursive resolver since Unbound adds its own CPU overhead. At 1,000 QPS both tools are still well within Pi 4 headroom but the Pi 3B+ starts to show stress, with Pi-hole holding a slight edge at high synthetic rates due to its lighter resolver stack.
With encrypted DNS enabled, AdGuard Home’s CPU usage increases more visibly since it handles TLS internally. On a Pi 4, this still fits comfortably. On a Pi 3B+ with DoH enabled and 1,000 QPS, you are pushing the limits of comfortable operation.
DNS latency
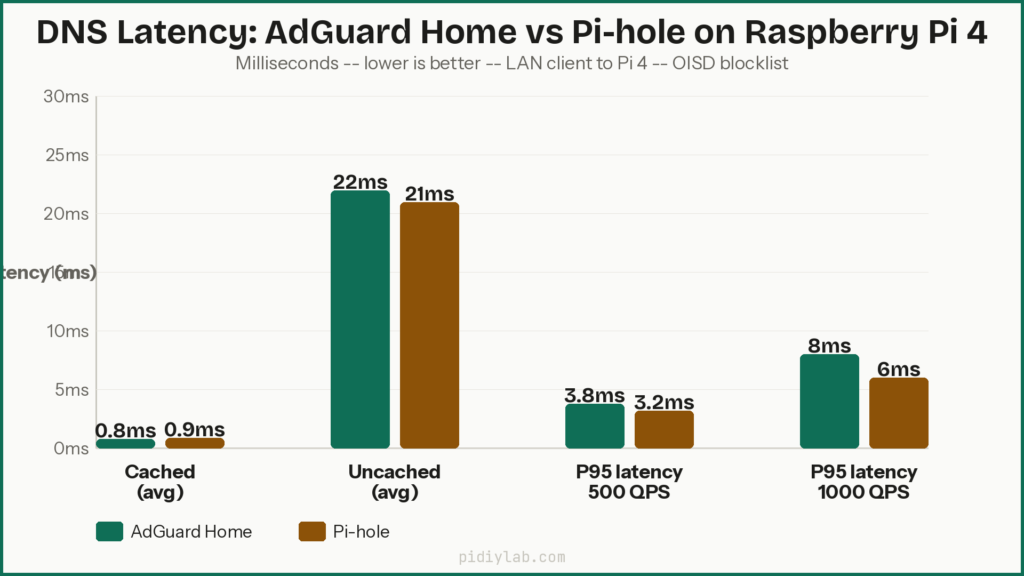
For cached answers on a local LAN, both tools respond in under 2 milliseconds. The difference between them is negligible for cached queries. For uncached queries that go to upstream resolvers, latency is dominated by the upstream resolver response time (typically 10 to 50ms to Cloudflare or Quad9) rather than any difference between the tools. P95 latency under moderate load stays under 5ms on a Pi 4 for both tools. The Pi 3B+ shows slightly higher P95 latency under synthetic load, but nothing a real household would notice in daily use.
Blocklist size and its effect on both tools
| Blocklist size (domains) | AdGuard Home RAM (Pi 4) | Pi-hole RAM (Pi 4) | Effect on Pi 3B+ |
|---|---|---|---|
| 100,000 | ~55MB | ~75MB | Comfortable |
| 500,000 | ~80MB | ~105MB | Comfortable |
| 1,000,000 | ~120MB | ~150MB | Manageable |
| 5,000,000+ | ~300MB+ | ~350MB+ | Pushing limits |
Blocklist size affects RAM more than the tool name does. Both tools scale similarly. On a Pi 3B+ with 1GB of RAM, staying under 1 million combined domains gives plenty of headroom. On a Pi 4 with 4GB, even very large combined lists leave room for the OS, logs, and other services.
What AdGuard Home Does Better
Encrypted DNS without extra setup
AdGuard Home handles DoH, DoT, and DoQ inside its own process. You enable it in the web interface and it works. Pi-hole requires an external helper like cloudflared running as a separate service. Both achieve the same privacy result, but AdGuard Home gets there with less configuration and fewer moving parts to break. If you want encrypted DNS and you do not want to manage a proxy service, AdGuard Home is the easier path.
Per-client filtering and parental controls
AdGuard Home lets you assign different filtering profiles to individual devices or client groups. You can enforce safe search on a kid’s tablet without affecting an adult’s laptop. Category-based blocking for adult content, social media, and gambling is built in and requires no custom lists. Pi-hole can achieve similar results through group management and tailored adlists, but it requires more manual work to set up and maintain. For families with different needs per device, AdGuard Home saves significant configuration time.
Modern interface and faster initial setup
AdGuard Home’s web interface is cleaner and more intuitive for people who are not comfortable in a Linux terminal. The setup wizard gets you to a working DNS sinkhole in minutes. The dashboard is focused on what matters: blocked queries, top clients, and upstream performance. Non-technical household members can navigate it without getting lost.
What Pi-hole Does Better
Ecosystem depth and community support
Pi-hole has been around since 2015. The community is larger, the documentation is more extensive, and the number of guides, integrations, and troubleshooting threads is substantially higher. If you run into a problem at 11pm, you are more likely to find a solved thread for Pi-hole than for AdGuard Home. This matters more than most benchmarks for practical daily use.
Unbound integration
Pi-hole and Unbound as a recursive resolver is one of the most popular and well-documented homelab DNS setups in existence. Unbound handles all DNS recursion locally, eliminating any single upstream provider seeing your full query history. The combination is well-tested, community-supported, and documented in detail. AdGuard Home can pair with Unbound, but the setup is less commonly documented and slightly more involved.
Gravity database and blocklist management
Pi-hole’s gravity database and the pihole -g update system give you clear control over blocklist sourcing, and the interface for managing adlists and groups is familiar to anyone who has used Pi-hole for more than a week. The gravity update process is transparent and logged. For users who want fine control over exactly what goes into their blocklist, Pi-hole’s approach is more explicit.
Which One Should You Choose
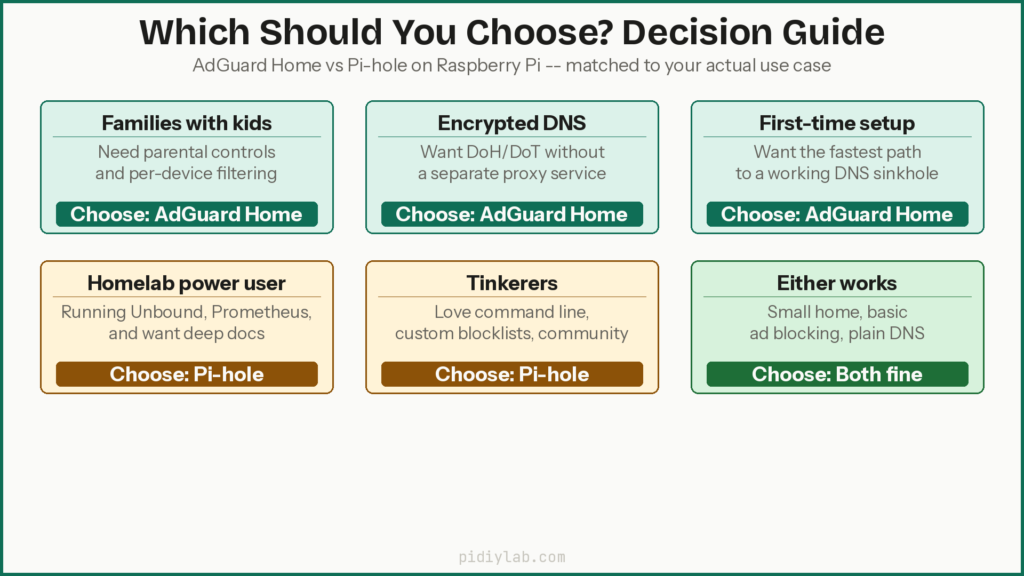
Choose AdGuard Home if
- You want encrypted DNS (DoH or DoT) without configuring a separate proxy
- You have family members with different filtering needs and want per-device profiles
- You prefer a modern interface that non-technical household members can navigate
- You want parental controls without building custom blocklists
- You are setting this up for the first time and want the faster path to a working setup
Choose Pi-hole if
- You want the most established ecosystem with the deepest community support
- You plan to pair it with Unbound as a local recursive resolver
- You are comfortable in a Linux terminal and prefer explicit control over blocklist management
- You want to integrate with existing homelab tooling that has more Pi-hole documentation available
- You are running on a Pi 3B+ or similar hardware where Pi-hole’s slightly lower CPU overhead under heavy synthetic load gives a small edge
Hardware recommendations by use case
| Use case | Recommended Pi | Tool suggestion |
|---|---|---|
| Small home, basic blocking, plain DNS | Pi 3B+ or Pi 4 2GB | Either works |
| Family network with parental controls | Pi 4 4GB | AdGuard Home |
| Encrypted DNS (DoH/DoT) | Pi 4 4GB | AdGuard Home |
| Homelab with Unbound and Prometheus | Pi 4 4GB or Pi 5 | Pi-hole |
| Small office, logging, many clients | Pi 4 4GB or Pi 5 | Either, Pi-hole for logging depth |
| Gamer wanting low latency | Pi 4 2GB | Either, light blocklist, plain DNS |
Test Setup and Methodology
Hardware and OS
- Raspberry Pi 3B+ (1GB RAM, quad-core Cortex-A53) and Raspberry Pi 4 Model B (4GB RAM, quad-core Cortex-A72)
- Raspberry Pi OS Lite 64-bit (Bookworm) on both boards
- Active cooling on both, no thermal throttling observed during tests
- Wired Gigabit Ethernet to a home router
Matching conditions for a fair comparison
- Same blocklist: OISD full list (approximately 250,000 domains at test time)
- Same upstream resolvers: Cloudflare 1.1.1.1 and Quad9 9.9.9.9
- Same logging depth and retention period
- One tool running at a time on each board
- dnsperf on a separate client machine on the same switch
Test scenarios
- Idle: background household traffic only, no synthetic load
- Light: 100 QPS for 10 minutes
- Moderate: 500 QPS for 10 minutes
- Heavy: 1,000 QPS for 10 minutes
- Encrypted: same rates with DoH enabled on AdGuard Home and cloudflared on Pi-hole
Installation on Raspberry Pi
Install AdGuard Home
curl -s -S -L https://raw.githubusercontent.com/AdguardTeam/AdGuardHome/master/scripts/install.sh | sh -s -- -vThen open http://YOUR_PI_IP:3000 in a browser to complete setup. Set DNS port to 53, add upstream resolvers, import your blocklists, and you are done. The whole process takes under five minutes on a Pi 4.
Install Pi-hole
curl -sSL https://install.pi-hole.net | bashThe installer walks through interface, upstream DNS, and blocklist choices interactively. After setup, access the dashboard at http://YOUR_PI_IP/admin. Update blocklists with pihole -g. To check service status:
pihole status
pihole -c   # chronometer, live stats in terminal
Stability and long-term use
Both tools run reliably for months on a properly powered Pi with a quality SD card. The main risks are SD card wear from constant log writes and unexpected problems during major updates. Use Raspberry Pi OS Lite rather than the desktop image, keep your SD card write pressure low, and consider booting from USB SSD for a long-term deployment. The write load from DNS logging and database updates is one of the bigger factors in SD card longevity on a 24/7 build. See Preventing SD Card Corruption on Raspberry Pi, Setting Up zram on Raspberry Pi, and Booting Raspberry Pi from USB SSD for the practical steps.
What About Technitium DNS?
Technitium DNS Server is worth mentioning as a third option that has gained traction in homelab circles. It is a full-featured recursive DNS server with a modern web interface, built-in blocking, DoH/DoT support, and strong DHCP integration. It runs on .NET and is available on Raspberry Pi. For users who want recursive DNS, blocking, and DHCP management in one package, Technitium is competitive. Its community is smaller than Pi-hole’s and the homelab documentation is thinner, but it is a capable tool worth evaluating if neither AdGuard Home nor Pi-hole fully suits your requirements.
FAQ
Is AdGuard Home better than Pi-hole on Raspberry Pi?
For most home users, AdGuard Home is easier to set up and more feature-complete out of the box, particularly for encrypted DNS and parental controls. Pi-hole has a larger community and deeper integration with tools like Unbound. Neither is clearly “better.” The right choice depends on what you need. For performance on a Raspberry Pi, the difference is small enough that your blocklist size and hardware choice matter more.
Does AdGuard Home use more RAM than Pi-hole?
At idle AdGuard Home typically uses slightly less RAM than Pi-hole (FTL plus lighttpd) on comparable hardware. The difference is small, around 20 to 30MB at idle. Under load with large blocklists, both scale similarly. On a Pi 3B+ with 1GB RAM, either tool fits comfortably for a modest home network.
Which is better for encrypted DNS on Raspberry Pi?
AdGuard Home. It supports DoH, DoT, and DoQ natively with no additional software. Pi-hole requires an external proxy like cloudflared. Both achieve the same privacy outcome, but AdGuard Home requires less configuration and has fewer components to maintain.
Will large blocklists slow down my Raspberry Pi?
Large blocklists increase RAM use and add a small amount of work per cache miss. On a Pi 3B+ with 1GB RAM, staying under 1 million combined domains keeps things comfortable. On a Pi 4 with 4GB, even very large combined lists leave plenty of headroom. For either tool, blocklist size affects performance more than which DNS tool you choose.
Can Pi-hole and AdGuard Home run on the same Raspberry Pi?
Not simultaneously on port 53. They would conflict. You can run one as the active DNS server and have the other stopped. Some homelab setups run both on separate Pi boards for comparison. For a permanent deployment, pick one and run it well.
Is a Raspberry Pi 3B+ good enough for AdGuard Home or Pi-hole?
Yes, for a modest home network with basic blocking and plain DNS. For encrypted DNS, large blocklists, or many simultaneous clients, a Pi 4 with 2GB or 4GB RAM gives more comfortable headroom and the tests show it clearly under synthetic load.
References
- https://adguard.com/en/adguard-home/overview.html
- https://github.com/AdguardTeam/AdGuardHome
- https://pi-hole.net/
- https://docs.pi-hole.net/
- https://github.com/DNS-OARC/dnsperf
- https://www.raspberrypi.com/products/raspberry-pi-4-model-b/specifications/
About the Author
Chuck Wilson has been programming and building with computers since the Tandy 1000 era. His professional background includes CAD drafting, manufacturing line programming, and custom computer design. He runs PidiyLab in retirement, documenting Raspberry Pi and homelab projects that he actually deploys and maintains on real hardware. Every article on this site reflects hands-on testing on specific hardware and OS versions, not theoretical walkthroughs.
Last tested hardware: Raspberry Pi 4 Model B and Raspberry Pi 5. Last tested OS: Raspberry Pi OS Bookworm 64-bit.