

Raspberry Pi HATs (Hardware Attached on Top) are add-on boards that connect directly to the 40-pin GPIO header, adding specific hardware capabilities without breadboarding or soldering. Most include an EEPROM that identifies the HAT to the Pi at boot and can load device tree overlays automatically. This guide covers the HAT specification and the newer HAT+ standard for Pi 5, the eight main HAT categories with current hardware picks, how to select and stack HATs without GPIO conflicts, and how to diagnose the most common HAT failures.
Last tested: Raspberry Pi OS Bookworm 64-bit | May 2025 | Raspberry Pi 4 Model B (4GB) and Raspberry Pi 5 (8GB) | gpiozero 2.0, Sense HAT library 2.6
Key Takeaways
- HAT+ is the current specification for Pi 5 hardware. It adds PCIe connectivity, tighter mechanical tolerances, and EEPROM-based device tree overlay loading. The M.2 HAT+ is the most widely used HAT+ board, providing NVMe SSD support via the Pi 5’s PCIe Gen 2 lane. Older HATs that use only the 40-pin GPIO header are mechanically compatible with Pi 5 but are not HAT+ certified.
- GPIO conflicts when stacking HATs are the most common setup problem. Before stacking, map every pin used by each HAT against the Pi’s 40-pin header. I2C HATs share SDA (GPIO2) and SCL (GPIO3) by design using device addressing. SPI HATs share MOSI/MISO/CLK but need separate chip-enable (CE) pins. Any two HATs claiming the same non-shareable GPIO pin will conflict.
- Use gpiozero for HAT projects on Bookworm. It is the current recommended GPIO library, ships with Bookworm, and its higher-level abstractions (LED, Button, MotionSensor, Motor) reduce boilerplate compared to RPi.GPIO. RPi.GPIO still works but is no longer the preferred starting point.
What Raspberry Pi HATs Are and How They Work
A HAT connects to the Pi’s 40-pin GPIO header and conforms to the Raspberry Pi HAT specification: it must include an EEPROM containing a board identifier and optionally a device tree overlay, it must have mounting holes that align with the Pi’s standoff pattern, and it must handle the 3.3V and 5V power rails the Pi provides. The EEPROM means the Pi can query the HAT at boot to load the correct drivers automatically, which is why most HATs work without manual driver installation on modern Raspberry Pi OS.
HAT+ is the updated specification introduced with Pi 5. It adds physical access to the Pi 5’s PCIe Gen 2 lane through a dedicated FFC connector, tighter mechanical tolerances for reliable stacking, and a revised EEPROM format that supports device tree overlays for PCIe devices. The M.2 HAT+ is the primary HAT+ product currently available and adds NVMe SSD support to Pi 5. For Pi 5 NVMe boot setup, see Raspberry Pi 5 NVMe Boot: Complete Setup Guide with Common HATs.
pHATs (Pico HATs) follow the same 40-pin specification but are sized for the Pi Zero form factor rather than the full-size Pi. They are physically smaller and mechanically incompatible with full-size Pi mounting holes, though they work electrically on any 40-pin Pi. Most Pimoroni pHATs are this type. Adafruit Bonnet boards are the equivalent in Adafruit’s lineup.
The EEPROM is important for one practical reason: if a HAT is not recognised at boot, check whether the EEPROM is programmed and whether the I2C bus is enabled. Some third-party boards labelled “HAT” do not include an EEPROM and rely entirely on manual driver installation. These boards work but do not conform to the HAT spec and may require explicit raspi-config interface enabling before use.
Types of Raspberry Pi HATs
Raspberry Pi HATs divide into eight categories by primary function. Most projects draw from two or three categories simultaneously.

Sensor HATs provide environmental and motion data through integrated sensors. The official Raspberry Pi Sense HAT includes temperature, humidity, pressure, accelerometer, gyroscope, and magnetometer plus an 8×8 RGB LED matrix on one board. It is the most capable single-board sensor HAT for general use and is the standard choice for weather stations and motion-logging projects. The Sense HAT V2 adds a colour and light sensor. Third-party options like Waveshare’s Environment Sensor HAT provide BME280-based environmental readings in a cheaper package without the LED matrix.
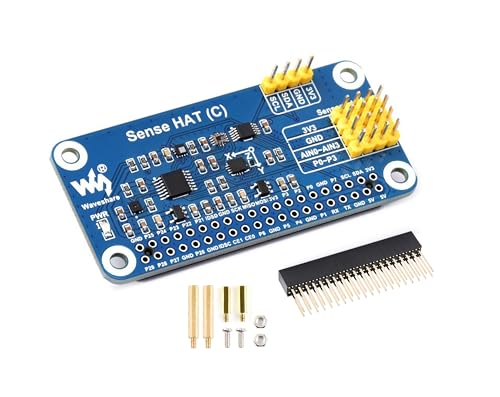
- Sense HAT (C) for Raspberry Pi. Standard Raspberry Pi 40PIN GPIO extension header, supports Raspberry Pi series boards.
- Onboard QMI8658C+AK09918 (3-axis accelerometer, 3-axis gyroscope, and 3-axis magnetometer), detects movement, orientatio…
- Onboard SHTC3 digital temperature and humidity sensor, allows monitoring the environment. Onboard LPS22HB barometric pre…
Motor control HATs drive DC motors, stepper motors, and servos. The Adafruit DC and Stepper Motor HAT uses the TB6612 chipset over I2C, supports up to four DC motors or two steppers, and stacks with other I2C HATs without GPIO conflict. It requires a separate motor power supply; the Pi’s 5V rail cannot power motors above low-current hobby sizes. For robotics projects involving the Pi directly, see Raspberry Pi Robot Basics: The Complete Beginners Guide for wiring and code.

- 4 H-Bridges: TB6612 chipset provides 1.2A per bridge with thermal shutdown protection, internal kickback protection diod…
- Up to 4 bi-directional DC motors with individual 8-bit speed selection (so, about 0.5% resolution)
- Up to 2 stepper motors (unipolar or bipolar) with single coil, double coil, interleaved or micro-stepping.
Storage HATs are dominated by the official Raspberry Pi M.2 HAT+, which connects an NVMe SSD to the Pi 5’s PCIe Gen 2 lane via an FFC ribbon cable. This is the fastest storage option available for Pi 5 and the correct HAT for any deployment where SD card reliability is a concern. Pi 4 does not have PCIe; USB 3.0 SSD is the equivalent upgrade path for Pi 4 builds.

- Unterstützt einspurige PCIe 2.0-Schnittstelle (500 MB/s Spitzenübertragungsrate)
- Unterstützt Geräte, die den M.2-M-Key-Edge-Anschluss verwenden. Unterstützt Geräte mit dem Formfaktor 2230 oder 2242
- Kann angeschlossene M.2-Geräte mit bis zu 3 A versorgen. Inklusive Power- und Aktivitäts-LEDs
Display HATs range from small SPI-connected TFT panels to full HDMI-replacement touchscreens. Adafruit’s PiTFT series (2.4-inch to 3.5-inch) connect over SPI and are well-supported on Bookworm via kernel overlay. Pimoroni’s HyperPixel 4.0 connects over GPIO directly rather than DSI and offers 800×480 at 60fps. E-ink HATs from Waveshare suit low-power deployments where the display updates infrequently. For the official 7-inch DSI touchscreen, see Raspberry Pi DSI Display: Complete Setup Guide.

- This is the Triple LCD HAT for Raspberry Pi. Onboard 1.3inch IPS LCD Main Screen and Dual 0.96inch IPS LCD Secondary Scr…
- 1.3inch IPS LCD Main Screen with built in ST7789 driver chip, SPI interface communication, wide viewing angle, supports …
- Dual 0.96inch LCD secondary screens with built in ST7735S driver chip, SPI interface communication, supports 65K color d…
Audio HATs provide DAC output and headphone amplification beyond what the Pi’s built-in PWM audio can deliver. HiFiBerry makes the most widely used range: the DAC+ Standard for stereo line-level output, the DAC+ Pro for audiophile-grade output with an independent clock, and the AMP2 for direct speaker output up to 2x30W. IQaudio (now a Raspberry Pi Foundation product) offers the DAC Pro and DigiAMP+. Audio HATs load their ALSA driver via the EEPROM overlay and appear as sound devices without additional configuration on Bookworm.

- Stereo output
- Connects directly to the Raspberry Pi, no additional cables needed
- Integrated headphone amplifier
Power management HATs address the Pi’s single-point-of-failure: mains power. The PiJuice HAT from Pi Supply provides a LiPo battery backup with graceful shutdown management and a real-time clock. It communicates over I2C and has a Python API for monitoring battery level and triggering scripted shutdown sequences. The official PoE HAT (Pi 4) and PoE+ HAT (Pi 5) allow a PoE-capable switch to power the Pi through a single Ethernet cable, eliminating the USB-C supply entirely. See UPS HAT Raspberry Pi: Safe Shutdown and Power Loss Protection for a full UPS setup guide.
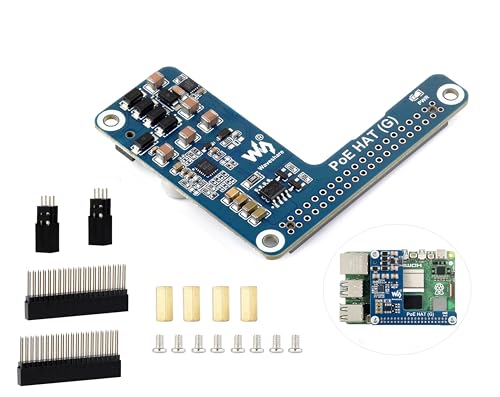
- PoE HAT for Raspberry Pi 5 — Power Over Ethernet HAT (G) for Raspberry Pi 5. With Standard Raspberry Pi 40PIN GPIO hea…
- Power via a single Ethernet cable — By using with a PoE router or switch that supports the IEEE 802.3af/at network sta…
- PoE capabilit y— IEEE 802.3af/at-compliant. PoE power input: 38V ~ 57V DC in.
Communication HATs extend the Pi’s radio capabilities beyond built-in WiFi and Bluetooth. LoRa HATs from Waveshare and RAK Wireless enable long-range, low-bandwidth sensor networks over the 868MHz (EU) or 915MHz (US/AU) band. LTE HATs add cellular data via SIM card for remote deployments where WiFi is unavailable. For Zigbee and Thread, dedicated USB dongles are generally preferred over HATs for Pi 5 because they do not consume GPIO pins and are hot-swappable. See Zigbee2MQTT Raspberry Pi: Complete CC2652 Setup Guide for the full Zigbee setup.

- This SX1262 LoRa HAT is used for Raspberry Pi 4 3 2 1 Series board,covers 915MHz frequency band,for America, Oceania, As…
- This Raspberry Pi LoRa HAT based on SX1262,allows data transmission up to 5km through serial port.
- By utilizing the new generation LoRa spread spectrum modulation technology, the communication distance of the module is …
AI accelerator HATs are the current growth category. The Hailo-8L M.2 HAT+ connects to Pi 5’s PCIe lane and provides 13 TOPS of neural network inference, sufficient for real-time object detection at 30fps. The Google Coral USB Accelerator is not a HAT but connects via USB 3.0 and works on both Pi 4 and Pi 5. For the full Coral setup, see Coral TPU Raspberry Pi 5 Setup: Complete Installation Guide. These are the specific current options for AI inference; there are no general-purpose “AI HATs” in development that cover an unspecified future capability.
GPIO Expansion HATs increase the Pi’s input/output capabilities, making it easier to connect with external devices like sensors, buttons, or relay modules. Examples include the Pimoroni Explorer HAT and Adafruit GPIO HAT, which provide additional control for robotics and other interactive projects. These HATs are ideal for beginners and hobbyists who want to experiment with prototyping and building circuits without complex wiring.

- This is a very beautiful screw terminal expansion version, which is expanded for the pins of the Raspberry Pi. Compatibl…
- It is convenient for everyone to connect when doing electronic experiments. Terminal Block Pitch is 3.5mm. Wire Gauge Ra…
- The status information of the pin is displayed. When the GPIO pin is operated and effective in the terminal, the LED mat…
Camera HATs allow for image and video capture, expanding the Pi’s use in projects like security systems, remote monitoring, and vision-based AI applications. The Pi Camera Module and Arducam Multi-Camera HAT are popular choices for adding visual capabilities, essential in fields such as surveillance, interactive media, and machine learning.

- Supported Platforms: Designed for Raspberry Pi 5, 4B, Model A/B/B+, Pi 2, 3, and 3B+ Note:IMX708 + B012001 cannot work o…
- Supported Cameras: It can support Raspberry Pi Camera Module V3/5MP OV5647/8MP IMX219/12MP IMX477, or other Arducam MIPI…
- Multi Camera Solution: Up to 4 Raspberry Pi cameras on a single raspberry pi board
LED and lighting HATs provide programmable, vibrant displays. The Unicorn HAT and Blinkt! HAT offer various LED configurations, allowing users to create custom lighting effects, notifications, or even pixel art displays. LED HATs are popular in projects focused on visual effects or interactive notifications.
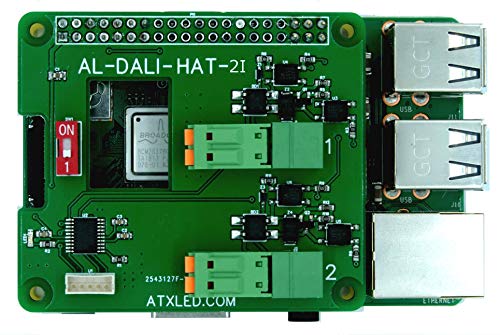
- Hat for Raspberry Pi 3 B and B+ or 4, Two channels of DALI with 64 addresses each. Opto Isolated to 1500 volts.
- Hardware I/O to the DALI Bus, for control of 64 lights, 16 groups, 16 scenes
- See ATX LED ZWD software for a fully packaged lighting solution – available separately
Automation and control HATs provide relays, analog inputs, and outputs, ideal for industrial automation and home automation. The Automation HAT offers options to control high-voltage devices safely and allows users to connect sensors for data collection and actuation, making it a versatile choice for DIY smart home projects.

- Compatible with all 40-pin header Raspberry Pi models
- Comes fully assembled (broken out pins require soldering)
- 15 x channel indicator LEDs
Selecting, Stacking, and Installing a Raspberry Pi HAT
Selecting a HAT starts with the interface it uses, not just its function. I2C HATs (most sensor, motor, and power HATs) share two GPIO pins and use device addressing, so multiple I2C HATs coexist without conflict as long as their device addresses do not collide. SPI HATs share the MOSI/MISO/CLK lines but need a dedicated chip-enable pin each. HATs that use arbitrary GPIO pins for their logic are the most restrictive because those pins are exclusively consumed. Before buying a second HAT, download the pin diagrams for both and check for overlaps.
Physical installation is straightforward. Power off the Pi completely before attaching any HAT. Align the HAT’s 40-pin female header with the Pi’s 40-pin male header. Press down evenly and firmly until the header is fully seated. Use the provided standoffs and screws if included. A partially seated HAT causes intermittent failures that are harder to diagnose than a HAT that simply does not work.
Enable the required interfaces before first use. Most I2C HATs need I2C enabled:
sudo raspi-config nonint do_i2c 0
sudo raspi-config nonint do_spi 0   # for SPI HATs
Verify an I2C HAT is detected after powering on:
sudo apt install -y i2c-tools
i2cdetect -y 1
Expected result: i2cdetect outputs a grid showing the HAT’s I2C address as a hex number (for example, 70 for the Adafruit Motor HAT, 5c for a PiJuice). If the grid is empty, the HAT is not communicating. Check seating, verify I2C is enabled, and confirm the HAT requires I2C rather than SPI or direct GPIO.
For HATs requiring Python libraries, install inside a virtual environment on Bookworm:
python3 -m venv ~/hat-env
source ~/hat-env/bin/activate
pip install adafruit-circuitpython-motorkit  # example for Motor HAT
pip install sense-hat                         # example for Sense HAT
For stacking HATs, use pass-through GPIO headers (also called stacking headers) rather than standard female headers. These have extended male pins on the underside that pass through to the next HAT. Stacking more than two HATs introduces mechanical stress on the lower GPIO header. Use standoffs between each board to distribute the load and prevent pin damage.
Troubleshooting Raspberry Pi HAT Problems
HAT problems fall into three categories: physical, interface, and software. Working through them in order avoids the common mistake of debugging software when the problem is a loose header pin.
Physical problems are the most common first-time failure. Symptoms: HAT is detected intermittently or not at all despite correct software. Diagnosis: power off, remove the HAT, inspect both headers for bent pins, reseat firmly, power on. If stacking, check that pass-through headers are fully pressed on both boards. A multimeter across the HAT’s power pins (5V and GND) should read 5V when the Pi is powered.
Interface problems present as “device not found” errors in Python or empty output from i2cdetect. Check whether the interface is enabled with raspi-config nonint get_i2c: it returns 0 if enabled, 1 if disabled. Some HATs require a reboot after enabling the interface before the device appears. For SPI HATs, confirm the CE pin assignment matches what the library expects; some HATs allow CE0 or CE1 via a solder jumper.
Software problems on Bookworm are almost always caused by pip installations outside a virtual environment. If a library install fails with “externally-managed-environment,” create a venv and install inside it. If an HAT that worked on Bullseye fails on Bookworm, check whether its library has been updated for Python 3.11 and the Bookworm glibc version. Most major HAT libraries (Adafruit CircuitPython, Sense HAT, HiFiBerry ALSA overlays) have been updated; niche third-party libraries may still have Python 3.11 incompatibilities.
Power problems occur when the combined draw of the Pi and HATs exceeds the PSU capacity. Motor HATs, display HATs with backlighting, and PoE HATs drawing from an undersized switch all exhibit this as brownout reboots under load. Measure actual draw with Raspberry Pi Power Monitoring via USB. Pi 4 requires a 3A supply; Pi 5 requires a 5A supply. Motor and servo HATs require their own power input and should never be powered solely through the Pi’s 5V rail.
GPIO conflicts when stacking manifest as one HAT working and another behaving erratically or not at all. Run gpio readall (install wiringpi if needed) or use gpioinfo from the gpiod package to see which pins are currently exported and in use. Cross-reference against both HATs’ pin documentation. If a conflict is unavoidable, some HATs allow address or CE pin reassignment via solder jumpers. Check the HAT’s schematic before assuming a conflict is unresolvable.
FAQ
What is the difference between a Raspberry Pi HAT and HAT+?
HAT is the original specification covering 40-pin GPIO add-on boards with EEPROM identification. HAT+ is the updated specification introduced with Pi 5 that adds physical access to the Pi 5’s PCIe Gen 2 lane via an FFC connector, tighter mechanical tolerances, and a revised EEPROM format for PCIe device tree overlays. The M.2 HAT+ is the main HAT+ product currently available. Older HATs that use only the 40-pin header are mechanically compatible with Pi 5 but cannot use the PCIe lane and are not HAT+ certified.
Can you stack multiple Raspberry Pi HATs?
Yes, with caveats. Stacking requires pass-through GPIO headers and careful pin conflict checking. I2C HATs can share the bus as long as their device addresses differ. Most I2C HATs have configurable addresses via solder jumpers for exactly this reason. SPI HATs need unique CE pins. HATs that use arbitrary GPIO pins exclusively are the hardest to stack because those pins are unavailable to other HATs. Check both HATs’ GPIO pin diagrams before purchasing and use standoffs between boards to prevent mechanical stress.
Do Raspberry Pi HATs work on all Pi models?
HATs that use only the 40-pin GPIO header work on any Pi with a 40-pin header: Pi 2B and later, Pi Zero and Zero 2W, Pi 3, Pi 4, and Pi 5. HATs designed for the Pi 5 HAT+ standard (PCIe via FFC connector) work only on Pi 5. A few older HATs were designed for the 26-pin header on Pi 1B and are electrically incompatible with 40-pin Pis without an adapter. Always check the manufacturer’s compatibility list against your specific Pi model and RAM variant.
Which Raspberry Pi HAT is best for AI and machine learning?
For Pi 5, the Hailo-8L M.2 HAT+ is the current recommended option. It provides 13 TOPS of neural network inference via the Pi 5’s PCIe lane and is the hardware behind the Pi 5’s AI camera kit. It handles real-time object detection at 30fps, which is beyond what the Pi’s CPU can do alone. For Pi 4, the Google Coral USB Accelerator connects via USB 3.0 and provides 4 TOPS; it is not a HAT but works on any Pi with a USB 3.0 port. For the Coral setup, see Coral TPU Raspberry Pi 5 Setup: Complete Installation Guide.
Why is my Raspberry Pi HAT not being detected?
Work through three checks in order. First, physical: power off, remove and reseat the HAT firmly, power on. A partially seated header is the most common cause. Second, interface: run i2cdetect -y 1 for I2C HATs. An empty grid means I2C is disabled or the HAT is not seated. Enable with sudo raspi-config nonint do_i2c 0 and reboot. Third, software: confirm the library is installed inside a virtual environment and that the correct device address or SPI CE pin is specified in the code. If none of these resolve the issue, test the HAT on a known-good Pi to determine whether the board itself is faulty.
References:
- Raspberry Pi HAT specification: github.com/raspberrypi/hats
- Raspberry Pi HAT+ specification: datasheets.raspberrypi.com
- Adafruit Motor HAT documentation: learn.adafruit.com
- HiFiBerry documentation: hifiberry.com/docs
- gpiozero documentation: gpiozero.readthedocs.io
About the Author
Chuck Wilson has been programming and building with computers since the Tandy 1000 era. His professional background includes CAD drafting, manufacturing line programming, and custom computer design. He runs PidiyLab in retirement, documenting Raspberry Pi and homelab projects that he actually deploys and maintains on real hardware. Every article on this site reflects hands-on testing on specific hardware and OS versions, not theoretical walkthroughs.
Last tested hardware: Raspberry Pi 4 Model B (4GB) and Raspberry Pi 5 (8GB). Last tested OS: Raspberry Pi OS Bookworm 64-bit. gpiozero 2.0, Sense HAT library 2.6.