
🕐 45 min read ⚙ Intermediate Level 📌 Raspberry Pi 4 📋 Raspberry Pi OS
What Is a Raspberry Pi Router?
A Raspberry Pi router is a custom-built network device that replaces the cheap router your ISP hands you. Instead of relying on locked-down firmware with limited features, you gain complete control over routing, DNS, firewall rules, traffic shaping, and monitoring.
At its core, a router does three things: it forwards packets between network interfaces, assigns IP addresses to clients via DHCP, and uses NAT (Network Address Translation) to share a single public IP across all devices on your local network. A Raspberry Pi 4 has the CPU, RAM, and built-in Gigabit Ethernet to handle all of this comfortably for a home or small office network.
Why build your own? You get ad-blocking at the DNS level, VPN routing, real-time traffic monitoring with tools like
vnstat, custom VLAN segmentation, and the freedom to run any software you want on the same device.

Step 1: Hardware You Need
The Raspberry Pi 4 Model B is the recommended choice. Its Gigabit Ethernet port and USB 3.0 bus make it capable of real-world routing speeds. The Pi 5 is also excellent but costs more for limited extra benefit in this use case.
Required Components
- Raspberry Pi 4 (2 GB+) – Main compute board. 2 GB RAM is sufficient.
- MicroSD Card (16 GB+) – Class 10 / A1 or faster. Samsung Endurance Pro recommended.
- USB to Gigabit Ethernet Adapter – Second NIC for LAN. ASIX AX88179 chipset recommended.
- USB-C Power Supply (3 A) – Official Raspberry Pi power supply preferred.
- Two Ethernet Cables (Cat 5e+) – One for WAN, one for LAN / switch.
- Case with Cooling – Aluminum passive or active fan case for 24/7 operation.
Important: The Pi 4 has one built-in Gigabit Ethernet port. You need a second NIC for the LAN side. The cleanest solution is a USB 3.0 to Gigabit Ethernet adapter. Avoid cheap RTL8152-based adapters since they cap out at USB 2.0 speeds (~300 Mbps).
| Item | Recommended Model | Approx. Cost | Notes |
|---|---|---|---|
| Pi 4 Model B | 4 GB variant | $55 | More RAM = more flexibility |
| MicroSD | Samsung Pro Endurance 32 GB | $10 | Rated for 24/7 write cycles |
| USB NIC | Cable Matters USB 3.0 Gigabit | $18 | AX88179 chipset, great driver support |
| Power Supply | Official Raspberry Pi USB-C PSU | $12 | Avoids undervoltage warnings |
| Case | Argon ONE M.2 | $25 | Allows SSD boot for better reliability |
Step 2: Installing the Operating System
Use Raspberry Pi OS Lite (64-bit). The Lite image has no desktop environment, which means less RAM usage and a smaller attack surface. Download the Raspberry Pi Imager from raspberrypi.com/software and flash the image to your MicroSD card.
Flashing with Raspberry Pi Imager
- Open Raspberry Pi Imager and click Choose OS. Select “Raspberry Pi OS (other)” then “Raspberry Pi OS Lite (64-bit)”.
- Click the gear icon to open advanced settings. Set a hostname (e.g.
pirouter), enable SSH, and set your username and password. - Select your MicroSD card under Choose Storage, then click Write.
- Insert the card into your Pi, connect a monitor and keyboard for the initial setup, and power it on.
- Log in with the credentials you set in the imager and run a full update before continuing.
# Update all packages on fresh install
sudo apt update && sudo apt full-upgrade -y
sudo reboot
Security first: Change the default password immediately if you did not set one in the imager. Run
passwdafter first login. You should also disable password authentication for SSH and use key-based auth before putting this device on a live network.
Step 3: Configuring Network Interfaces
Before configuring anything, identify your network interfaces. Plug in your USB Ethernet adapter and run the following command:
ip link showYou will see output listing your interfaces. The built-in Ethernet is typically eth0. Your USB adapter will appear as something like eth1 or enx001122334455. Make note of both names. In this guide:
eth0is the WAN interface (connects to your modem or ISP)eth1is the LAN interface (connects to your switch or directly to devices)
Assigning a Static IP to the LAN Interface
The LAN interface needs a static IP address because it will act as the default gateway for all your devices. Edit the DHCP client configuration file:
sudo nano /etc/dhcpcd.confAppend the following lines at the bottom of the file to assign a static IP to eth1:
# Static IP for LAN interface
interface eth1
static ip_address=192.168.1.1/24
static domain_name_servers=1.1.1.1 8.8.8.8
Save the file with Ctrl+O, exit with Ctrl+X, and restart the DHCP client service:
sudo systemctl restart dhcpcd
Step 4: Setting Up DHCP and DNS with dnsmasq
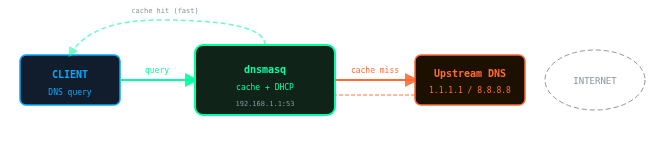
dnsmasq is a lightweight DNS forwarder and DHCP server perfectly suited for a small network router. It will hand out IP addresses to your devices and cache DNS queries for faster browsing.
Installing dnsmasq
sudo apt install dnsmasq -yBefore editing the configuration, back up the original file:
sudo mv /etc/dnsmasq.conf /etc/dnsmasq.conf.bakNow create a new clean configuration file:
sudo nano /etc/dnsmasq.confPaste the following configuration:
# Interface to listen on (LAN side only)
interface=eth1
bind-interfaces

# DHCP range: assign IPs from .100 to .200
# Lease time: 24 hours
dhcp-range=192.168.1.100,192.168.1.200,24h

# Set the default gateway and DNS for clients
dhcp-option=3,192.168.1.1
dhcp-option=6,192.168.1.1

# Upstream DNS servers (Cloudflare + Google)
server=1.1.1.1
server=8.8.8.8

# Cache 1000 DNS entries
cache-size=1000

# Block DNS rebinding attacks
stop-dns-rebind
rebind-localhost-ok

# Log queries for debugging (optional)
# log-queries
Enable and start the dnsmasq service:
sudo systemctl enable dnsmasq
sudo systemctl start dnsmasq
sudo systemctl status dnsmasq
Tip: To assign a permanent reserved IP address to a specific device, add a line like
dhcp-host=aa:bb:cc:dd:ee:ff,192.168.1.50using the device’s MAC address. This is useful for servers, printers, and smart home hubs.
Step 5: Enabling NAT and IP Forwarding
IP forwarding allows the kernel to forward packets between interfaces. NAT (specifically masquerade) rewrites the source IP of outbound packets so they appear to come from the Pi rather than from individual LAN devices. This is how your modem/ISP sees a single IP while dozens of devices share the connection.
Enable IP Forwarding
Edit the kernel parameters file to enable forwarding at boot:
sudo nano /etc/sysctl.confFind and uncomment (or add) this line:
net.ipv4.ip_forward=1Apply the change immediately without rebooting:
sudo sysctl -w net.ipv4.ip_forward=1Configure NAT with iptables
Add the NAT masquerade rule so packets leaving through eth0 (WAN) have their source IP rewritten:
# Add NAT masquerade rule for WAN interface
sudo iptables -t nat -A POSTROUTING -o eth0 -j MASQUERADE

# Allow established and related connections back in
sudo iptables -A FORWARD -m state --state RELATED,ESTABLISHED -j ACCEPT

# Allow all forwarding from LAN to WAN
sudo iptables -A FORWARD -i eth1 -o eth0 -j ACCEPT
Make iptables Rules Persistent
By default, iptables rules are lost on reboot. Install iptables-persistent to save them:
sudo apt install iptables-persistent -y
# When prompted, say YES to save current IPv4 rules
sudo netfilter-persistent save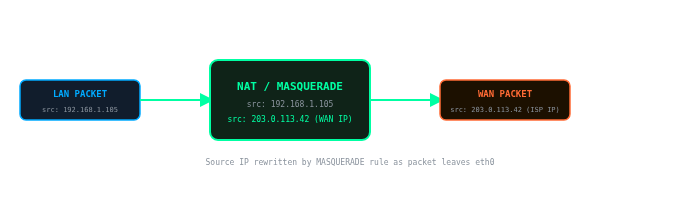
Step 6: Configuring the Firewall
A proper firewall policy drops all unexpected inbound traffic on the WAN interface while allowing traffic you initiate from inside the network. This is a critical step before connecting your Pi router to the internet.
# Set default policies
sudo iptables -P INPUT DROP
sudo iptables -P FORWARD DROP
sudo iptables -P OUTPUT ACCEPT

# Allow loopback interface
sudo iptables -A INPUT -i lo -j ACCEPT

# Allow established/related connections
sudo iptables -A INPUT -m state --state ESTABLISHED,RELATED -j ACCEPT

# Allow SSH from LAN (do this BEFORE locking down)
sudo iptables -A INPUT -i eth1 -p tcp --dport 22 -j ACCEPT

# Allow DHCP from LAN clients
sudo iptables -A INPUT -i eth1 -p udp --dport 67:68 -j ACCEPT

# Allow DNS from LAN clients
sudo iptables -A INPUT -i eth1 -p udp --dport 53 -j ACCEPT
sudo iptables -A INPUT -i eth1 -p tcp --dport 53 -j ACCEPT

# Allow ICMP (ping) from LAN
sudo iptables -A INPUT -i eth1 -p icmp -j ACCEPT

# Allow forwarding: LAN to WAN
sudo iptables -A FORWARD -i eth1 -o eth0 -j ACCEPT
sudo iptables -A FORWARD -i eth0 -o eth1 -m state --state ESTABLISHED,RELATED -j ACCEPT

# Save rules
sudo netfilter-persistent save
Test before rebooting! From a device connected to the LAN side, confirm you can SSH into the Pi at
192.168.1.1and that you can reach the internet before rebooting. If something goes wrong, you can still access the Pi via a directly connected keyboard and monitor.
Verifying Your Rules
# List all rules with line numbers
sudo iptables -L -v --line-numbers

# Check NAT table
sudo iptables -t nat -L -v
Step 7 (Optional): Setting Up a Wi-Fi Access Point
The Raspberry Pi 4 has a built-in Wi-Fi chip (802.11ac). You can use it as a wireless access point, meaning devices can connect to your Pi router over Wi-Fi rather than Ethernet. We will use hostapd for this.
Install hostapd
sudo apt install hostapd -y
sudo systemctl unmask hostapd
sudo systemctl enable hostapd
Configure hostapd
sudo nano /etc/hostapd/hostapd.conf# Use the on-board Wi-Fi interface
interface=wlan0
driver=nl80211
# Network name (SSID)
ssid=PiRouter_Network
# 5 GHz band (use hw_mode=g for 2.4 GHz)
hw_mode=a
channel=36
ieee80211n=1
ieee80211ac=1
# WPA2 security
wpa=2
wpa_passphrase=YourSecurePassword123
wpa_key_mgmt=WPA-PSK
rsn_pairwise=CCMPTell hostapd where to find its config file:
sudo nano /etc/default/hostapd
# Find and set:
DAEMON_CONF="/etc/hostapd/hostapd.conf"
Add wlan0 to dnsmasq
Add the Wi-Fi interface to your dnsmasq configuration so wireless clients also get DHCP leases. Open /etc/dnsmasq.conf and add:
interface=wlan0
dhcp-range=192.168.2.100,192.168.2.200,24h
dhcp-option=3,192.168.2.1
dhcp-option=6,192.168.1.1
Assign a static IP to wlan0 in /etc/dhcpcd.conf:
interface wlan0
static ip_address=192.168.2.1/24
nohook wpa_supplicant
Also add iptables rules to forward Wi-Fi traffic through the WAN interface:
sudo iptables -A FORWARD -i wlan0 -o eth0 -j ACCEPT
sudo iptables -A FORWARD -i eth0 -o wlan0 -m state --state ESTABLISHED,RELATED -j ACCEPT
sudo iptables -t nat -A POSTROUTING -o eth0 -j MASQUERADE
sudo netfilter-persistent save
Start all services:
sudo systemctl start hostapd
sudo systemctl restart dnsmasq
sudo systemctl restart dhcpcd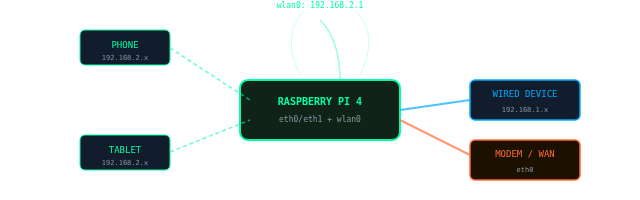
Step 8: Testing and Troubleshooting
With all services configured, connect a device to the LAN side and verify the following:
Verify DHCP Lease
From a connected client, confirm it received a DHCP lease in the 192.168.1.100-200 range. On Linux/Mac:
ip addr show
# Should show something like: inet 192.168.1.105/24
Ping Tests
# Ping the router gateway
ping 192.168.1.1

# Ping a well-known IP (tests NAT/forwarding)
ping 1.1.1.1

# Ping a domain (tests DNS resolution)
ping google.com
Check Active DHCP Leases
# View current DHCP leases on the Pi
cat /var/lib/misc/dnsmasq.leases
Common Issues
| Symptom | Likely Cause | Fix |
|---|---|---|
| No IP from DHCP | dnsmasq not running or wrong interface | sudo systemctl status dnsmasq, check interface name |
| Can ping gateway but not internet | IP forwarding off or missing NAT rule | Check sysctl net.ipv4.ip_forward and iptables NAT table |
| DNS not resolving | dnsmasq not forwarding queries | Check server= lines in dnsmasq.conf |
| SSH blocked from LAN | Missing INPUT rule for port 22 | Add iptables -A INPUT -i eth1 -p tcp --dport 22 -j ACCEPT |
| Wi-Fi AP not appearing | hostapd config error | Run sudo hostapd /etc/hostapd/hostapd.conf to see errors |
Step 9: Performance Tuning
A properly tuned Pi 4 can handle 900+ Mbps of routing throughput. These tweaks ensure you get the most out of your hardware.
Increase Network Buffer Sizes
Add the following to /etc/sysctl.conf:
# Increase network buffer sizes for better throughput
net.core.rmem_max=16777216
net.core.wmem_max=16777216
net.core.netdev_max_backlog=5000
net.ipv4.tcp_rmem=4096 87380 16777216
net.ipv4.tcp_wmem=4096 65536 16777216

# Enable TCP BBR congestion control (better than cubic)
net.core.default_qdisc=fq
net.ipv4.tcp_congestion_control=bbr
sudo sysctl -pEnable Hardware Offloading
# Enable checksum offloading (reduces CPU load)
sudo ethtool -K eth0 rx on tx on
sudo ethtool -K eth1 rx on tx on
Use an SSD Instead of MicroSD (Recommended)
MicroSD cards have limited write cycles and slow random I/O. Booting from a USB 3.0 SSD dramatically improves responsiveness and longevity for a 24/7 router. The Argon ONE M.2 case accepts an M.2 SATA SSD for a clean integrated solution.
Monitor Traffic with vnstat
sudo apt install vnstat -y
sudo systemctl enable vnstat

# View real-time bandwidth usage
vnstat -l -i eth0
Advanced features to explore: VLANs for network segmentation, Pi-hole integration for network-wide ad blocking, WireGuard VPN server for remote access, and Prometheus + Grafana for a full network monitoring dashboard.
Conclusion and Next Steps
You now have a fully functional Raspberry Pi router with DHCP, DNS caching, NAT, and a hardened firewall. Your network traffic flows through a system you control entirely, with the flexibility to add features that commercial routers simply cannot match.
Summary of What You Configured
- OS: Raspberry Pi OS Lite 64-bit, fully updated
- Interfaces: eth0 as WAN (DHCP from ISP), eth1 as LAN (192.168.1.1 static)
- DHCP/DNS: dnsmasq serving 192.168.1.100-200 with upstream Cloudflare/Google DNS
- Routing: IP forwarding enabled via sysctl, NAT via iptables MASQUERADE
- Firewall: Default DROP policy on INPUT/FORWARD; only necessary ports open
- Wi-Fi AP (optional): hostapd on wlan0 with WPA2, separate 192.168.2.0/24 subnet
Recommended Next Steps
- Install Pi-hole – Network-wide DNS ad blocking for all devices simultaneously.
- Add WireGuard VPN – Access your home network securely from anywhere in the world.
- Set Up Grafana – Visualize network metrics and bandwidth usage in real time.
- Configure VLANs – Isolate IoT devices, guests, and trusted devices on separate subnets.
If you found this guide useful, consider automating the entire setup as a shell script so you can rebuild your router in minutes if the SD card ever fails. Keep a copy of your iptables rules and dnsmasq config in a private git repository.
Frequently Asked Questions
Can a Raspberry Pi fully replace a commercial router?
Yes, for most home and small office use cases. A Raspberry Pi 4 running the setup in this guide handles DHCP, DNS, NAT, firewall, and Wi-Fi access point duties just as a commercial router does. You gain far more configurability than any consumer router firmware offers. The trade-offs are that setup requires Linux knowledge, there is no graphical web UI out of the box (unless you add one like LuCI or Cockpit), and the built-in Wi-Fi radio is less powerful than a dedicated router with external antennas. For basic to moderate home networking, it is a completely viable replacement.
What internet speeds can a Raspberry Pi 4 router handle?
With the performance tuning in this guide (TCP BBR, larger buffers, hardware offloading), a Raspberry Pi 4 can route close to 900 Mbps of throughput between its Ethernet ports. For most home internet connections of 500 Mbps or less, it will not be a bottleneck. If you have a multi-gigabit ISP connection, the Pi 4 will saturate before your line does. In that case consider a Pi 5, a mini PC with dual 2.5GbE ports, or an OPNsense build.
Raspberry Pi 4 vs Raspberry Pi 5 for a router: which should I choose?
For connections up to about 800 Mbps, the Pi 4 is sufficient and costs less. The Pi 5 offers a significantly faster CPU and a PCIe interface, which means you can attach a proper Intel or Realtek NIC via a PCIe HAT and achieve throughput well beyond 1 Gbps. Jeff Geerling demonstrated Pi 5 routing near 3 Gbps using a PCIe NIC. If you have gigabit or faster internet, or plan to run WireGuard VPN at line speed simultaneously with routing, the Pi 5 is worth the extra cost. For everyone else, the Pi 4 is the better value.
How many Wi-Fi clients can connect to a Raspberry Pi access point?
This is an important limitation to know before relying on the Pi’s built-in Wi-Fi radio. The default Broadcom firmware on the Pi 4 and Pi 5 supports roughly 10 simultaneous Wi-Fi clients when used as a hostapd access point. An alternative firmware (available via the Raspberry Pi forums) raises this to around 19 clients. If you need to support more devices wirelessly, connect a USB Wi-Fi adapter with a chipset that supports AP mode and a higher client limit, such as the MediaTek MT7612U. For large households, a dedicated Wi-Fi access point connected to the Pi via Ethernet is the cleanest solution.
Should I use OpenWrt instead of Raspberry Pi OS for my router?
OpenWrt is an excellent alternative and is now fully supported on stable Pi 4 and Pi 5 releases. Its advantages are a polished web UI (LuCI), built-in QoS, a mature package ecosystem, and a community specifically focused on routing. The approach in this guide using Raspberry Pi OS gives you a general-purpose Linux system where you can run anything alongside your router software, including Pi-hole, Home Assistant, or a WireGuard server. Choose OpenWrt if you want a dedicated, appliance-style router with a GUI and less manual configuration. Choose Raspberry Pi OS if you want full Linux flexibility or plan to run other services on the same device.
Can I use a Raspberry Pi as a travel router?
Yes. A Pi configured as in this guide works well as a travel router. Connect it to a hotel or venue’s wired Ethernet on eth0 (WAN) and share that connection over Wi-Fi via the built-in wlan0 access point to your own devices. All your traffic passes through one trusted device you control, rather than an unknown hotel network. For travel use, a Pi Zero 2 W or Pi 3A+ are more portable options. The RaspAP project also provides a one-command installer that sets up a travel-ready access point with a web dashboard, which is a good alternative to the manual approach in this guide.
Is a Raspberry Pi router good enough for gigabit internet?
A stock Pi 4 can route roughly 900 Mbps between its built-in Ethernet port and a USB 3.0 Gigabit adapter, so it comes close but does not quite saturate a true gigabit line end-to-end due to USB overhead on the second NIC. For symmetrical gigabit connections you may see real-world throughput of 700 to 850 Mbps under load. If you need full gigabit line rate, boot the Pi from an SSD, apply the buffer and BBR tuning in this guide, and consider a USB NIC with the AX88179 chipset which performs better than most alternatives. A Pi 5 with a PCIe NIC card will handle full gigabit and beyond comfortably.
How do I add Pi-hole ad blocking to my Raspberry Pi router?
The cleanest integration is to install Pi-hole on the same Pi and point dnsmasq’s upstream DNS at Pi-hole’s local listener (127.0.0.1#5335 if using Unbound, or 127.0.0.1 on port 53 directly). All DNS queries from DHCP clients will then pass through Pi-hole before hitting upstream resolvers, giving you network-wide ad blocking with no configuration needed on individual devices. Install Pi-hole with its one-line installer: curl -sSL https://install.pi-hole.net | bash. During setup, select your LAN interface (eth1) and configure it to listen on all interfaces. Then update the dhcp-option=6 line in dnsmasq.conf to point to Pi-hole’s IP.
Will the Raspberry Pi router survive a power outage without corrupting the SD card?
MicroSD cards are vulnerable to corruption on sudden power loss because writes may be interrupted mid-block. There are three ways to reduce this risk. First, use a high-endurance SD card rated for continuous writes, such as the Samsung Pro Endurance. Second, boot from a USB SSD instead of an SD card, which handles power loss more gracefully and has no write cycle limit. Third, add a small UPS or battery pack to the Pi’s USB-C power input so it shuts down cleanly during outages. The SSD boot option is the most recommended for a 24/7 router, and the Argon ONE M.2 case makes this straightforward.
Raspberry Pi is a trademark of Raspberry Pi Ltd. This guide is independently produced.