Introduction
All right, I don’t know about you, but the first time I waited almost a full minute for my Raspberry Pi 5 to boot from a microSD card, I had enough time to question most of my life choices. I mean, it’s 2025 — my fridge boots faster. So I swapped in an NVMe SSD, slapped on a PCIe HAT, and suddenly, my Pi acted like it had seen the light.
Turns out, the Pi 5 finally exposes native PCIe lanes, which means you can connect NVMe drives directly instead of fumbling around with USB bridges. But — and there’s always a but — you’ve got to update the EEPROM, tweak some files, and not fry your board in the process. Let me walk you through it.
Key Takeaways
- Raspberry Pi 5 now supports native NVMe boot via PCIe
- Update the EEPROM firmware and set your BOOT_ORDER
- Use a tested HAT with proper thermal and power handling
- Format your drive correctly and edit cmdline.txt and config.txt
- Monitor system temps, firmware, and disk health regularly
Why Boot from NVMe?
Faster boots, fewer headaches. That’s the promise, right? You’re not imagining things — the boot time from an NVMe SSD on a Raspberry Pi 5 absolutely smokes what you get from a microSD card. We’re talking seconds versus awkward staring. The difference mostly comes down to PCIe bandwidth versus the bottlenecked SD interface, which, let’s be real, was barely tolerable back when Pi 3 came out.
Data rate, IOPS, and latency benchmarks paint a clearer picture. An average microSD card might hit 30MB/s read speed, if it’s in a good mood. A mid-range NVMe drive? Try 1500MB/s. Big difference when your Pi is doing anything more than blinking an LED.
But speed isn’t the only reason folks are making the jump. microSD cards wear out, especially when logging data or running containers. NVMe SSDs not only last longer but support TRIM, SMART, and more reliable error correction. That means better uptime, less corruption, and fewer late-night re-flashes.
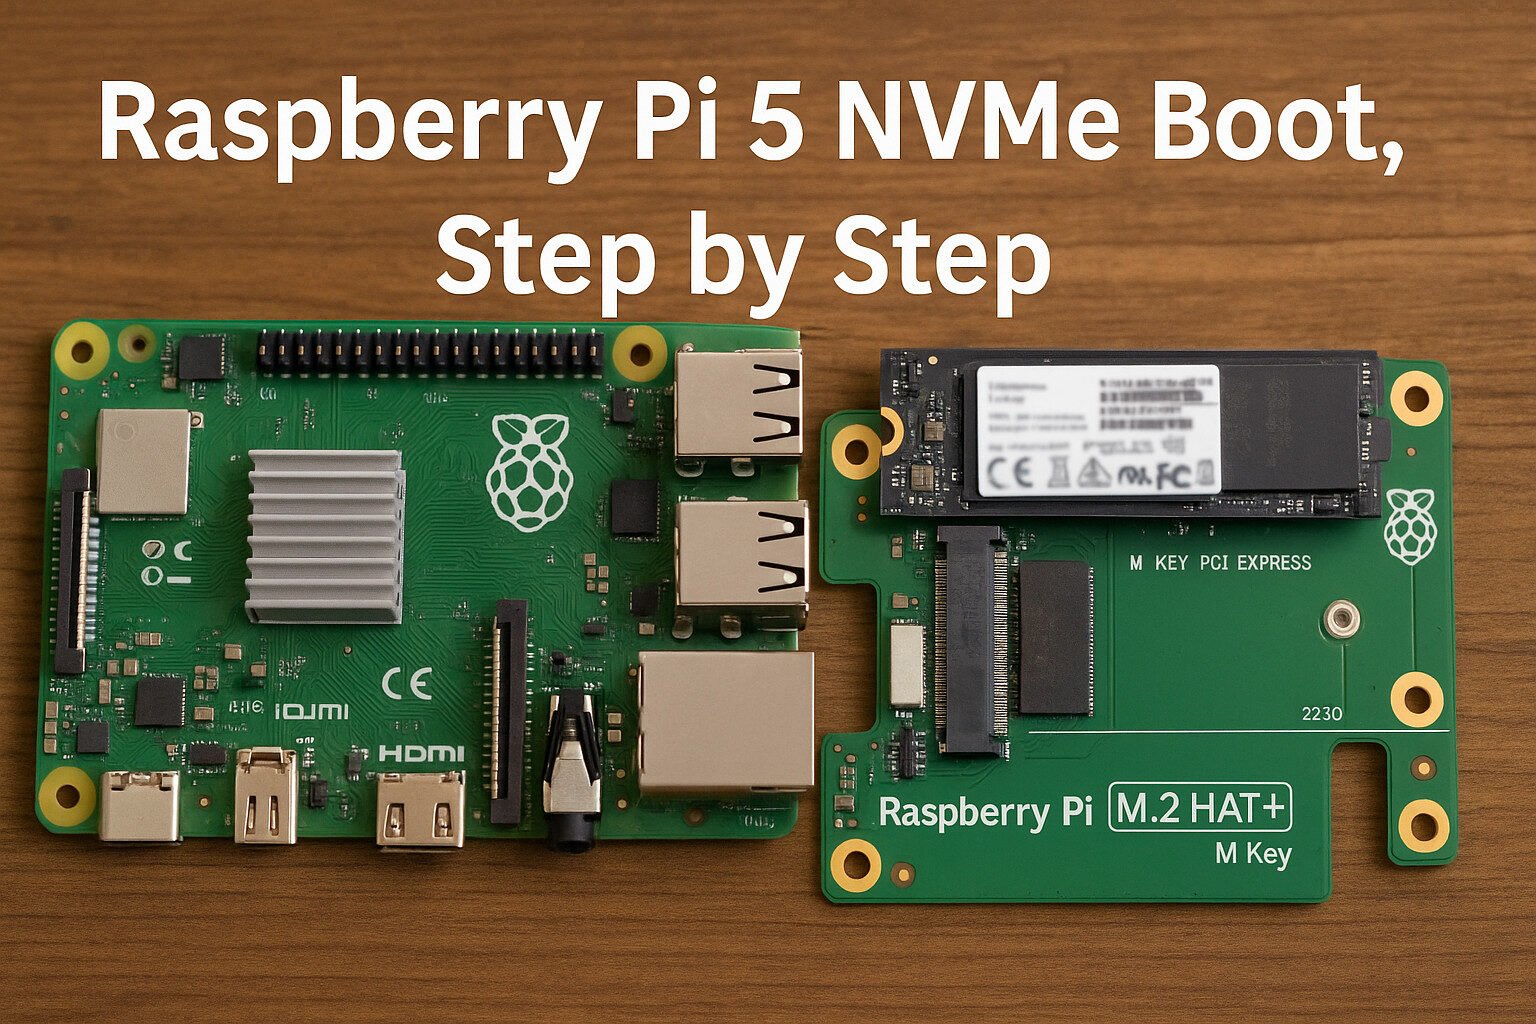
Raspberry Pi 5 Hardware Overview
Before we get into the actual wiring and config files, let’s break down what you’re working with. The Raspberry Pi 5 finally does what tinkerers have begged for since forever — it exposes a native PCIe x1 interface. No more relying on USB bridges or voodoo.
That PCIe lane comes through a little FPC connector on the board. It’s flexible (literally), but you’ll need a PCIe HAT or adapter to connect it to your NVMe drive. And here’s the kicker: not all HATs are created equal. Some pull power differently, some mess with your GPIO pins, and a few don’t even bother with thermal design.
The EEPROM on the Pi 5 also got smarter. It supports setting BOOT_ORDER, which lets you prioritize NVMe over USB or microSD. To use that feature, you’ll need to keep your firmware updated with rpi-eeprom-update. Trust me, outdated firmware is the #1 reason folks think their setup’s broken when it’s just being picky.
Choosing the Right NVMe HAT
Here’s where things get spicy. You’d think slapping an NVMe SSD onto a Pi would be plug and play. Spoiler: it isn’t. The HAT you choose makes or breaks this whole setup.
First off, let’s talk brands that don’t make you want to scream. The Pimoroni NVMe Base is a clean pick — low profile, passive cooling, and doesn’t block your GPIO headers. Geekworm X1004? Great power routing, but watch the height clearance if you’ve got a case. Then there’s Waveshare, who decided to design their PCIe HAT like it was made for a spaceship, complete with a vertical mount that’s either genius or awful, depending on your desk.
But here’s the real checklist:
- Thermal design: If it doesn’t come with a heatsink or fan mount, assume it’s going to throttle under load.
- Power delivery: Some HATs tap into the Pi’s 5V rail. That’s fine… until it’s not. Others bring in power through USB-C or GPIO pins.
- Clearance and compatibility: A few designs block your camera connector, mess with the display cable, or stack so high you can’t use your case lid.
And yeah, don’t forget M.2 slot type. The Pi expects M-key NVMe drives, so leave your B-key SATA SSDs in the drawer.
Want to roll into the tools and files you’ll need?
Required Tools and Files
All right, time to stock your workbench. You’re not building the International Space Station, but you do need a few specific parts to make the Raspberry Pi 5 NVMe boot thing actually work without turning your Pi into a paperweight.
Hardware Checklist
- Raspberry Pi 5 (obviously)
- NVMe SSD – go with something like a Samsung 980, WD Blue SN550, or Kingston KC3000. Not all drives play nice — check controller compatibility if you’re not sure
- PCIe NVMe HAT – one of the good ones we talked about
- Power Supply – 5V 5A recommended, especially if your drive pulls power from the Pi
- Cooling – a fan, heatsink, or thermal pad is a must. These drives get hot
Software Setup
- Raspberry Pi OS – Lite if you don’t need the GUI, Full if you’re feeling fancy
- rpi-eeprom-update – to flash the latest bootloader firmware
- nvme-cli – helpful to troubleshoot or benchmark the drive
- lsblk, blkid, and dmesg – built-in tools to confirm your NVMe’s showing up
- Boot files:
config.txt,cmdline.txt, andusercfg.txt– the usual suspects
No need for NOOBS or BerryBoot — this isn’t 2014.
Preparing the Raspberry Pi 5
Now for the part where most people mess up — firmware setup. The EEPROM on the Raspberry Pi 5 needs to be up to date or your NVMe drive is going nowhere fast.
Step 1: Check your EEPROM version
Boot with a microSD and run:
sudo rpi-eeprom-update
If it says anything older than August 2023, you’re overdue. Update it with:
sudo rpi-eeprom-update -a
sudo reboot
Step 2: Set the BOOT_ORDER
You want the Pi to check NVMe before USB or SD card. That means editing the bootconf.txt (not config.txt, don’t get cute).
sudo -E rpi-eeprom-config --edit
Change the line to something like:
BOOT_ORDER=0xf416
Step 3: Configure config.txt and cmdline.txt
Once you’ve got the drive ready, you’ll need to tweak:
cmdline.txtto point the root=UUID of your NVMe’s root partitionconfig.txtto include:dtparam=nvme
Make sure your SSD shows up with lsblk before continuing. If it doesn’t, check the FPC cable, your HAT power, or the drive itself.
Flashing and Installing the OS to NVMe
All right, let’s get the Raspberry Pi OS onto that NVMe drive so you can finally ditch the microSD card like it’s a cable bill.
Option 1: Use Raspberry Pi Imager
Grab the official Raspberry Pi Imager, pick your OS (Lite or Full), and select the NVMe drive from the storage list.
Important: make sure you don’t flash the wrong drive. Check twice, click once.
Option 2: Manual Clone from SD to NVMe
If you already have a working system on microSD:
sudo rsync -axv / /mnt/nvme
Update /mnt/nvme/etc/fstab and cmdline.txt with the new UUID of the root partition. Use blkid to find it.
Step 1: Partition and Format
You might need to manually create partitions. Use gparted, fdisk, or cfdisk. Format as ext4. No NTFS, no exFAT — this isn’t Windows.
Step 2: Mount and Copy Boot Files
If needed, copy /boot to the first partition of your NVMe. Double-check start.elf, kernel.img, and config.txt are all in place.
Step 3: Reboot and Pray
Remove the microSD. Power on. If the LED flashes four times, something’s off. If it flashes once and hangs, your BOOT_ORDER might be wrong.
Next up: common problems and how to not lose your mind fixing them?
Common Problems and Fixes
Booting your Raspberry Pi 5 from NVMe sounds great… until it doesn’t boot. Don’t worry — most issues fall into three main categories: boot failure, thermal or power issues, and mount errors.
Boot Failures
- No LED or solid red LED: Power issue. Your HAT might be drawing more than the PSU can give.
- Green LED blinking four times: Pi can’t find
start.elf. Check your boot partition. - Hangs with no output: Wrong
BOOT_ORDERor missing root UUID incmdline.txt. - Drive not detected: Run
lsblkordmesg | grep nvmeto confirm. If nothing shows, the FPC cable or HAT might be loose.
Thermal or Power Issues
- NVMe drives throttle when they overheat, and some even shut off. Use a heatsink or fan.
- If you’re using a cheap USB-C PSU, voltage sag can trigger brownouts. Get a solid 5V 5A supply.
- Some HATs draw power from GPIO pins, which aren’t meant for high current. Use a HAT with separate USB-C power input if possible.
Mount Errors and File System Glitches
- Boot drops to an initramfs shell? Check your fstab and
cmdline.txt. - Use
fsckto fix corrupted partitions — but don’t do it on a mounted drive. - If you’re seeing “Drive not ready” or “mount failed”, your file system may be badly aligned. Re-partition and format.
Powering the Setup Safely
Look, you can have the best NVMe HAT, a fancy PCIe adapter, and still end up dead in the water if your power setup’s a joke. Raspberry Pi 5 is pickier than your buddy who thinks ketchup is “too spicy.”
Smart Power Management Options
- Use the official Raspberry Pi USB-C PSU — it delivers clean 5V 5A with minimal voltage dip.
- Consider a UPS HAT or a powered USB hub if you’re running additional gear like displays, sensors, or fans.
- Buck converters help step voltage down if you’re pulling from a 12V or PoE source.
Avoid These Rookie Moves
- Don’t power your NVMe HAT through the GPIO 5V pin unless the manufacturer specifically supports it. It’s a fast way to undervolt or overheat.
- Avoid cheap cables and adapters — they may limit current, and your Pi will act weird for no obvious reason.
- Watch out for PoE HAT conflicts — they can block PCIe connectors or fight for GPIO space.
Safe power = stable boot = less swearing.
Testing & Benchmarking the Setup
So it boots. Nice. Now let’s make sure it doesn’t just look fast — we’re gonna test it like we mean it. There’s no point in switching to NVMe if it runs slower than a dollar-store USB stick.
CLI Tools to Benchmark Like a Nerd
fio– measures IOPS, latency, and sequential read/writenvme-cli– gets SMART data, temperature, and firmware versionhdparm -tT /dev/nvme0n1– quick and dirty read speed checkiostat– shows ongoing disk I/O activitydmesg– for boot time breakdown and kernel errors
What to Expect
- Boot time under 10 seconds with Raspberry Pi OS Lite
- Read speeds 10–30x faster than microSD (depending on drive)
- Lower CPU usage under I/O load
- Temps under 60°C if you’ve got halfway decent cooling
- No dropped logs or stutters if you’re running a desktop environment
Run your tests after a cold boot and again after a few hours. Some drives throttle fast, and you won’t notice until you wonder why opening Chromium suddenly takes 12 seconds.

- Official Pi PCIe To M.2 HAT for Raspberry Pi 5, HAT + Standard, High-Speed Reading/Writing, Supports NVMe Protocol M.2 S…
- Compatible With 2230/2242 Size M.2 Solid State Drive. Supports Gen2 and Gen3 Modes, Supports Booting PI5 From Solid Stat…
- Onboard Dual LED Indicators. Easy to monitor the Working Status

Long-Term Usage Tips
You made it through the setup, benchmarks look good, and your Raspberry Pi 5 finally boots like it means it. Don’t screw it up now.
Keep an Eye on System Health
- Use
nvme-cli smart-logto check drive wear, temperature, and reallocated sectors - Log temps regularly with
vcgencmd measure_tempor your HAT’s sensors - Monitor system load with
toporhtop— high I/O wait can mean failing SSD or misconfigured system
Stay on Top of Firmware and Backups
- Run
rpi-eeprom-updatemonthly. They quietly patch stuff all the time - Use
rsyncorddto back up your NVMe to an external drive or spare microSD - Keep a bootable microSD card with the same OS as a fallback — just in case your NVMe gets moody
Pro Tips for Stability
- Avoid using NTFS or exFAT partitions for anything important
- Schedule
fstrimweekly to keep SSD performance high - Update your
cmdline.txtif you ever clone or change the partition layout — UUIDs matter
You’ve got a fast, reliable boot now — treat it right and it’ll last longer than most New Year’s resolutions.
Conclusion
Booting your Raspberry Pi 5 from NVMe isn’t just doable — it’s a huge quality-of-life upgrade if you’re tired of microSD cards acting like they just got out of a coma. With native PCIe support, a solid HAT, and a little config file elbow grease, you can get lightning-fast boots, better stability, and longer drive life.
The key is paying attention to firmware updates, thermal limits, and power delivery. Skip those, and you’ll end up chasing boot loops or wondering why your Pi acts like it’s haunted.
Now that you’ve got the gear, the steps, and a few smart tweaks, you’re set up for long-haul performance.
Let’s wrap it up with the FAQ and key takeaways.
FAQ
Can I boot any NVMe drive with the Pi 5?
Not all drives work. Stick to well-supported brands like Samsung, Kingston, or WD with M-key NVMe (not SATA).
Does the Pi 5 support PCIe Gen 3?
Nope. It supports PCIe Gen 2 x1 — that’s still plenty fast for single-board computing.
Will USB-to-NVMe adapters work for booting?
Not on the Pi 5 if you’re using PCIe boot. USB boot is possible but not the same — you’re skipping native PCIe.
What’s the best size NVMe to use?
Depends on your needs, but 256GB to 512GB is the sweet spot. Some drives over 1TB pull more power than the Pi likes.
Can I dual-boot from microSD and NVMe?
Yes, if you set up your BOOT_ORDER smartly. But it complicates things and may introduce boot delays.